3D Printed LED Guitar Chord Chart

Learning to play guitar can involve a lot of memorization – chords, scales, arpeggios, you name it. [MushfiqM] has made the process a bit easier with his Digital Chord Chart. Just about every beginning guitarist keeps a chord app, chord book, or even a chord poster handy. Usually these chord charts are in the form of tablature, which is a shorthand method of showing where each finger should go on the instrument. [MushfiqM] took things a step further by actually placing that chart on a 3D printed model of a guitar fretboard.

ledmatrixx
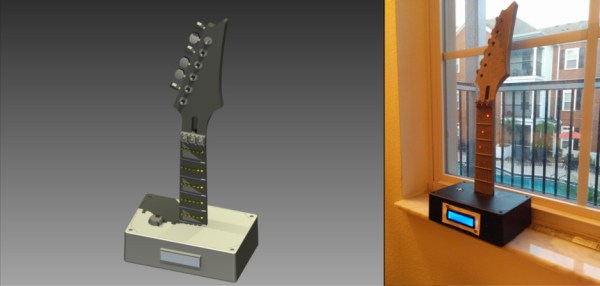
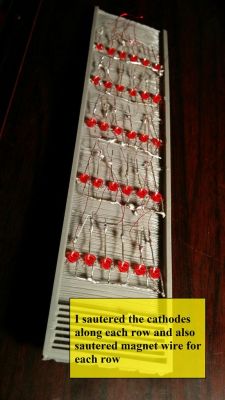
[MushfiqM] started by rendering a 3D model of an abbreviated guitar using Autodesk Inventor. He then printed his creation in 3 parts: headstock, neck, and fretboard. The neck of the guitar was hollowed out to allow room for a matrix of LEDs which would show the finger positions. [MushfiqM] then painstakingly soldered in a charlieplexed matrix of 30 leds, all connected by magnet wire. The LEDs are controlled by an Arduino UNO, which has the chord and scale charts stored in flash.

For a user interface, [MushfiqM] used a 2×16 character based LCD and a low-cost IR remote control. All the user has to do is select a chord or scale, and it’s displayed on the fretboard.

There are a couple of commercial products out there which perform a similar function, most notably the Fretlight guitar. Those can get a bit pricy though – costing up to $400.00 USD for an LED enabled guitar.

[via Instructables]

DIY guitar mute pedal

Guitar Mute Pedal Made From Upcycled Parts

Rockin’ out on your fave guitar is pretty fun for sure but whether your on stage or jamming in your basement, it can be convenient to quickly mute those killer licks. [wozlaser] wanted a mute pedal for his guitar and instead of shelling out the tens of dollars for a commercial version, he decided to build one himself.

This pedal is heavy-duty and made out of metal. If the frame looks familiar, that is because in a prior life this was a control pedal for a sewing machine. [wozlaser] found it cheap at a thrift store. After the internals were taken out, he added a few key parts. First were the 1/4″ input and output jacks that were scavenged from an old stereo system. There is a momentary switch from a VCR and a standard guitar stomp pedal switch mounted all the way in the front of the frame. The wiring is as follows:

DIY guitar mute pedal

The wiring schematic is pretty darn simple, it just grounds and ungrounds the signal wire. As stated earlier, there are 2 switches, a momentary and a push-on/push-off switch. A normal mute pedal would only have one switch but [wozlaser] wanted something special. If you push the pedal all the way forward it will mute or unmute the signal until it is pushed again. When the pedal is in the spring-supported ‘up’ position a lever pushes on the momentary switch, a slight push on the pedal lifts the lever off of the momentary switch to mute or unmute the signal. The function of the momentary switch (mute or unmute) changes with the state of the other switch. This works exactly the same as a 3-way light switch circuit allows two switches to control one light in your house. With this setup [wozlaser] is able to not only mute and unmute his guitar but strum a chord with it off and pulse the chord on to the beat of the music or tap the pedal with some guitar feedback to make the sound cut in and out. All that only cost [wozlaser] a little time and spare parts… and there are no batteries to replace!

modded guitar pedal

Guitar Pedal Hack Via Manufacturer’s Shortcut

There seems to be no shortage of manufacturers that cut costs by using similar components across a wide range of products. This isn’t necessarily a bad thing though, since it makes it easier for someone with some know-how to quickly open up the product and figure out how to get more use out of it. [Lewin] noticed some peculiarities on the PCB of his EHX Screaming Bird guitar pedal, and used a manufacturer’s shortcut to turn this treble-boosting pedal into a flat booster.

Once [Lewin] removed the case, he noticed that there were some unpopulated pads on the PCB. Additionally, the potentiometer was labelled as 10k, but a 100k was actually installed. These were indications that something was awry, so after poking around on the internet, [Lewin] now believes that the same PCB was used to make at least three different effects pedals with similar internal structures.

The Screaming Bird pedal was a little harsh for [Lewin]’s taste, so he changed out some capacitors on the board to get it closer to the flat booster. There are some other things that could be changed, but now he has a pedal that suits his needs much more appropriately, thanks to the manufacturer making only minor changes across a range of similar products. Historically, guitar pedals are pretty easy to modify, but it’s nice that the manufacturer of these has made it so much simpler!

internal guitar effects

The Effects Are IN The Guitar? It’s So Simple…

We’ve all had that problem. Up on stage, rocking out Jimi Hendrix-style on guitar with your band, but frustrated at having to mess around with foot pedals to control all of the effects. [Richard] solved this problem in a unique way: he put a preamp and a microcontroller in a guitar that can create some very interesting effects.

For the musically challenged, electric guitars often have several sets of electromagnetic pickups that detect vibrations in the strings at different points along the strings. Selecting different pickup combinations with a built-in switch changes the sound that the guitar makes. [Richard] wired the pickups in his Fender Stratocaster to the microcontroller and programmed it to switch the pickups according to various patterns. The effect is somewhat like a chorus pedal at times and it sounds very unique.

The volume and tone knobs on the guitar are used to select the programmed patterns to switch various pickups at varying speeds. This has the added bonus of keeping the stock look of the guitar in tact, unlike some other guitars we’ve seen before. The Anubis preamp, as it is called, is a very well polished project and the code and wiring schematic are available on the project site along with some audio samples.

DIY pickup winder

Pro-Quality Pickup Winder You Can Make At Home

A lot of people find the art of building a guitar to be a worth while and pleasurable hobby. The task can be as easy as buying pre-made parts and assembling the guitar or as complicated as starting with just a piece of wood. Even advanced guitar builders normally do not get involved enough to wind their own pickups as it can be a tedious and labor intensive task. A low-end professional pickup winder can be purchased for about $450 which is certainly not economical for the hobbyist. [Doug] is one of those folks that wanted a pickup winder but didn’t want to shell out the big bucks. So what did he do? Build his own, of course.

If [Doug] was going to build a winder he was going to do it right, with all the features to make pickup winding as quick and painless as possible. The winder needed to be fast, count the windings and stop after a pre-programmed amount of revolutions. To keep this machine safe and reliable while maintaining the ability to spin quickly, [Doug] chose to base the machine on an off-the-shelf wood lathe since they are sturdy and made to spin at high speeds. The lathe is equipped with a face plate where the pickup is mounted.

Once the pickup is mounted to the face plate, the desired amount of turns is programmed into a digital counter that receives a signal from an opto switch and encoder disk attached to the lathe spindle. The motor speed is manually controlled by a user-adjustable potentiometer. There is also a stand alone tachometer that gives speed feedback to the user. Once the counter reaches the pre-programmed limit, it trips a relay that cuts power to the motor. This way the amount of windings can be precisely controlled. There is even a switch that changes the motor direction for reverse winding humbuckers without the need to remove and flip over the pickup.

Continue reading “Pro-Quality Pickup Winder You Can Make At Home”

Extrinsic Motivation: An Open, Modular Effects Pedal

Microcontrollers and Arduinos are cool and all, but dealing only in the digital domain does have its limitations. In fact, most of your electron heroes didn’t begin their electronics career by blinking pins on digital outputs; they were solely in the analog domain with their radios and, yes, guitar effects pedals.

[Josh]’s entry for The Hackaday Prize was by far the most analog project of the entire contest. It’s an open source effects pedal that takes advantage of the modular design of the most popular pedals in history.

A good number of the famous circuits for turning an electric guitar into an aural experimentation are based on small circuit modules, packaged and repackaged again until the desired tone is achieved. [Josh] wants to pack these modules separately on different boards, specifically shields, although no Arduino is used, so any sound can be created.

Already [Josh] has done some research to determine what circuits and circuit modules to clone. The list should be fairly familiar to anyone with a pedalboard – Tube Screamers, Fuzz Faces, Big Muffs, and Phase 90s are at the top of the list. He may not get to the complicated digital effects like pitch shifters and digital delays, but it’s still a great project for experimentation.

You can see [Josh]’s project video below.


SpaceWrencherThis project is an official entry to The Hackaday Prize that sadly didn’t make the quarterfinal selection. It’s still a great project, and worthy of a Hackaday post on its own.

Continue reading “Extrinsic Motivation: An Open, Modular Effects Pedal”

ServoBender, The Electronic Pedal Steel

You’ve most certainly heard a pedal steel guitar before, most likely in any ‘old’ country song, or more specifically, any country song that doesn’t include the word ‘truck’ in its lyrics. Pedal steels are strange devices, looking somewhat like a 10-string guitar with levers that change the pitch of individual strings. Historically, there have been some attempts to put a detuning mechanism for individual strings in normal electric guitars, but these are somewhat rare and weird. [Gr4yhound] just nailed it. He’s come up with the perfect device to emulate a pedal steel in a real guitar, and it sounds really, really good.

The imgur album for this project goes over the construction of the ServoBender in a bit more detail than the video. Basically, four servos are mounted to a metal plate below the bridge. Each servo has a spring and cam system constructed out of 3D printed parts. The detuning is controlled by an Arduino and a few sustain pedals retrofitted with hall effect sensors. Simple, really, but the effect is astonishing.

[Gra4hound]’s contraption is actually very similar to a B-Bender where a guitarist pushes on the neck to raise the pitch of the B string. This setup, though, is completely electronic, infinitely adjustable, and can be expanded to all six strings. Very, very cool, and it makes us wonder what could be done with one of those freaky robot guitars, a soldering iron, and a bit of code.

Video below, because you should watch it again.

Continue reading “ServoBender, The Electronic Pedal Steel”