PasswordManagerCode

Tearing Apart An Android Password Manager

With all of the various web applications we use nowadays, it can be daunting to remember all of those passwords. Many people turn to password management software to help with this. Rather than remembering 20 passwords, you can store them all in a (presumably) secure database that’s protected by a single strong password. It’s a good idea in theory, but only if the software is actually secure. [Matteo] was recently poking around an Android password management software and made some disturbing discoveries.

The app claimed to be using DES encryption, but [Matteo] wanted to put this claim to the test. He first decompiled the app to get a look at the code. The developer used some kind of code obfuscation software but it really didn’t help very much. [Matteo] first located the password decryption routine.

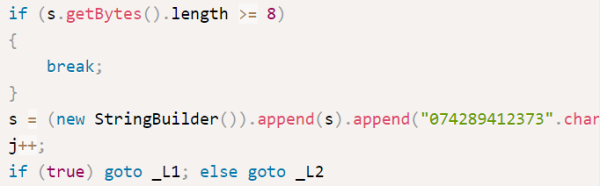
He first noticed that the software was using DES in ECB mode, which has known issues and really shouldn’t be used for this type of thing. Second, the software simply uses an eight digit PIN as the encryption key. This only gives up to 100 million possible combinations. It may sound like a lot, but to a computer that’s nothing. The third problem was that if the PIN is less than eight characters, the same digits are always padded to the end to fill in the blanks. Since most people tend to use four digit pins, this can possibly lower the total number of combinations to just ten thousand.

As if that wasn’t bad enough, it actually gets worse. [Matteo] found a function that actually stores the PIN in a plain text file upon generation. When it comes time to decrypt a password, the application will check the PIN you enter with the one stored in the plain-text file. So really, you don’t have to crack the encryption at all. You can simply open the file and reveal the PIN.

[Matteo] doesn’t name the specific app he was testing, but he did say in the Reddit thread that the developer was supposedly pushing out a patch to fix these issues. Regardless, it goes to show that before choosing a password manager you should really do some research and make sure the developer can be trusted, lest your secrets fall into the wrongs hands.

[via Reddit]

Xbox PS4 Laptop

Enter The PlayBox, Where Microsoft And Sony Get Along

[Eddie Zarick] is a pretty eccentric case modder. So when a customer asked him for an Xbox One / Playstation 4 combo unit, he got excited. He calls it the PlayBOX 4ONE. Cute.

He has managed to cram the guts of both the PS4 and Xbox One into a 22″ laptop-like shape — it is pretty chunky though. The power supply is internal, but obviously you can only turn on one system at a time. Surprisingly he was even able to keep the cooling systems intact! Both consoles still have full use of WiFi and have dedicated LAN ports available on the back of the system. Unfortunately, the Xbox USB ports weren’t so lucky — looks like you’re stuck with wireless Microsoft accessories only.

To see how he did it, check out the following video.

Continue reading “Enter The PlayBox, Where Microsoft And Sony Get Along”

Hackaday Links Column Banner

Hackaday Links: January 18, 2015

A little while ago, we complained that there aren’t many projects using the Microview, a very cool Arduino and OLED thing that might be just too big for a ring. [Johannes] answered the call with a slot car track timer. He’s using an infrared distance sensor to count off lap times for his slot car track and a mini thermal printer to print out the times. Video right here.

Too many cables in your freshman college dorm room? Here’s the solution.

Our Internet travels frequently take us to strange auctions (we’re still looking for a US Mail truck, btw), but this one takes the cake. 24kt gold plates that were flown in space for five and a half years weighing 6,015.5 grams (212.191 oz). At the current price of $1277.06/oz, this auction should go for $270,980 USD. I’m 99% sure this was part of the Long Duration Exposure Facility, but I have no clue why this much gold was flown. Surely they could have done the same amount of science with only a hundred thousand dollars worth of gold, right?

So here’s this, but this isn’t your everyday, “put an Arduino in a vibrator” crowdfunding campaign. No, they actually have some great tutorials. Did you know that a stroke sensor looks like shag carpeting? [Scott] tells us, “I believe the founders are all graduate students getting PhDs in something or other, starting a sex toy company on the side.” More power to ’em.

Speaking of dildonics, the guy who coined that term will be giving one of the keynotes at the Vintage Computer Festival East this year. Yes, we’ll be there in full force.

iram

PCI I-RAM Working Without A PCI Slot

[Gnif] had a recent hard drive failure in his home server. When rebuilding his RAID array, he decided to update to the ZFS file system. While researching ZFS, [Gnif] learned that the file system allows for a small USB cache disk to greatly improve his disk performance. Since USB is rather slow, [Gnif] had an idea to try to use an old i-RAM PCI card instead.

The problem was that he didn’t have any free PCI slots left in his home server. It didn’t take long for [Gnif] to realize that the PCI card was only using the PCI slot for power. All of the data transfer is actually done via a SATA cable. [Gnif] decided that he could likely get by without an actual PCI slot with just a bit of hacking.

[Gnif] desoldered a PCI socket from an old faulty motherboard, losing half of the pins in the process. Luckily, the pins he needed still remained. [Gnif] knew that DDR memory can be very power-hungry. This meant that he couldn’t only solder one wire for each of the 3v, 5v, 12v, and ground pins. He had to connect all of them in order to share the current load. All in all, this ended up being about 20 pins. He later tested the current draw and found it reached as high as 1.2 amps, confirming his earlier decision. Finally, the reset pin needed to be pulled to 3.3V in order to make the disk accessible.

All of the wires from his adapter were run to Molex connectors. This allows [Gnif] to power the device from a computer power supply. All of the connections were covered in hot glue to prevent them from wriggling lose.

Laugh Track Jacket Is Actually A Blazer

Picture it: your first open mic night at Larry’s Laugh Lounge. You’re up second in the lineup. It’s better than going first, but the crowd is far from hitting the two-drink minimum and your dad jokes are going over like a lead balloon. What now? Time for your secret weapon. You throw out the ‘tough crowd’ line while casually reaching into a pocket of your herringbone blazer. You press a button and the sound of crickets reaches the microphone. Someone chortles near the back. You smile, and remembering that Barbie joke from Reddit, your act takes a turn for the profane and the sweet sound of your first real laugh is forever burned in your memory.

This laugh track jacket from Adafruit’s [Becky Stern] is based on their own audio FX board, a standalone unit that can store and play WAV and OGG files. The board is also available with 16MB of flash for extended pre-recorded Foley artistry. This is an easy solder-and-sew project with a lot of wearable applications, and all of the components are available in the Adafruit store. There are plenty of places to get free sound effects that are already in WAV format, as the board does not support MP3s. As always, [Becky] has provided a clear and thorough guide with plenty of pictures and an introduction video that you can see after the break.

Continue reading “Laugh Track Jacket Is Actually A Blazer”

Tracking Power Usage With A Raspi

With tiny, Internet-connected computers everywhere these days, home automation is finally hitting it big. [Jelora] was looking for a few more home automation projects and realized his electric meter had a pair of ‘digital information outputs’. With a Raspberry Pi and a few bits of wire, he figured out how to read this digital output and put a log of his electricity consumption up on the web.

The digital output on [Jelora]’s meter is a bit odd; it’s 1200 bps, 7 bits per character, parity, with one stop bit. It’s also a 50 kHz AC signal for a binary ‘0’ and nothing for a binary ‘1’. To read this signal, [Jelora] is using a diode to throw out half the signal, a 6N138 optoisolator so the Pi isn’t connected directly to the meter, and a small cap to smooth out the signal. Simple, and it works.

This cleaned up signal is then connected to serial to USB chip and a PHP script scrapes the data every minute. The data received from the meter is stored in a data base along with a few other bits of information: if the meter is being charged peak or off-peak rates, and the price per kWh. All this is saved on an IDE hard drive (more reliable than the SD card, surprisingly), and a ‘electricity cost per day’ is plotted on a nifty graph and served up by the Raspberry Pi.

Circuit Plotting With An HP Plotter

Over the last few years we’ve seen a few commercial products that aim to put an entire PCB fab line on a desktop. As audacious as that sounds, there were a few booths showing off just that at CES last week, with one getting a $50k check from some blog. [Connor] and [Feiran] decided to do the hacker version of a PCB printer: an old HP plotter converted to modern hardware with a web interface with a conductive ink pen.

The plotter in question is a 1983 HP HIPLOT DMP-29 that was, like all old HP gear, a masterpiece of science and engineering. These electronics were discarded (preserved may be a better word) and replaced with modern hardware. The old servo motors ran at about 1.5A each, and a standard H-Bridge chip and beefy lab power supply these motors were the only part of the original plotter that were reused. For accurate positioning, a few 10-turn pots were duct taped to the motor shafts and fed into the ATMega1284p used for controlling the whole thing.

One of the more interesting aspects of the build is the web interface. This is a small JavaScript app that is capable of drawing lines on the X and Y axes and sends the resulting coordinates from a server to the printer. It’s very cool, but not as cool as the [Connor] and [Feiran]’s end goal: using existing Gerber files to draw some traces. They’re successfully parsing Gerber files, throwing out all the superfluous commands (drills, etc), and plotting them in conductive ink.

The final iteration of hardware wasn’t exactly what [Connor] and [Feiran] had in mind, but that’s mostly an issue with the terrible conductivity of the conductive ink. They’ve tried to fix this by running the pen over each line five times, but that introduces some backlash. This is the final project for an electrical engineering class, so we’re going to say that’s alright.

Video below.

Continue reading “Circuit Plotting With An HP Plotter”