Getting A Rise With Laser Cutting

Your first 3D print probably seemed pretty amazing. But if you revisit it after a few years, you’ll likely notice it wasn’t nearly as good as you thought. We improve our printers and our processes and the new better results become normal. If you have a laser cutter, you may go through the same iteration. At first, you are happy just to get scorch marks on the workpiece. But when you move to cutting, you want cleaner cuts. You put tape over the work, add air assist, and invest in a honeycomb bed. Each step gets you better results, but you can always improve.

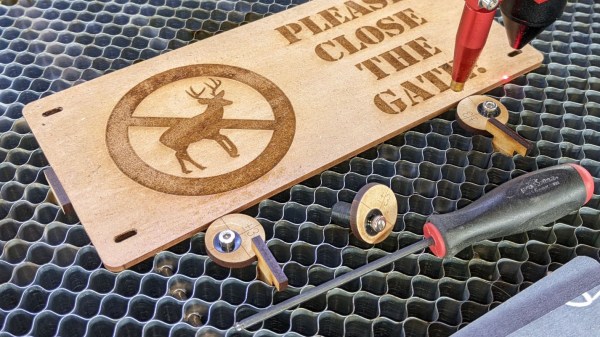
[The Louisiana Hobby Guy] (also known as [Rich]) knows a lot about the practical side of lasers. He suggests using standoff pins to not just secure the part to the honeycomb bed but lift it up a little, allowing air to flow under the part and lets the laser easily cut all the way through. You can see them in action in the video below.

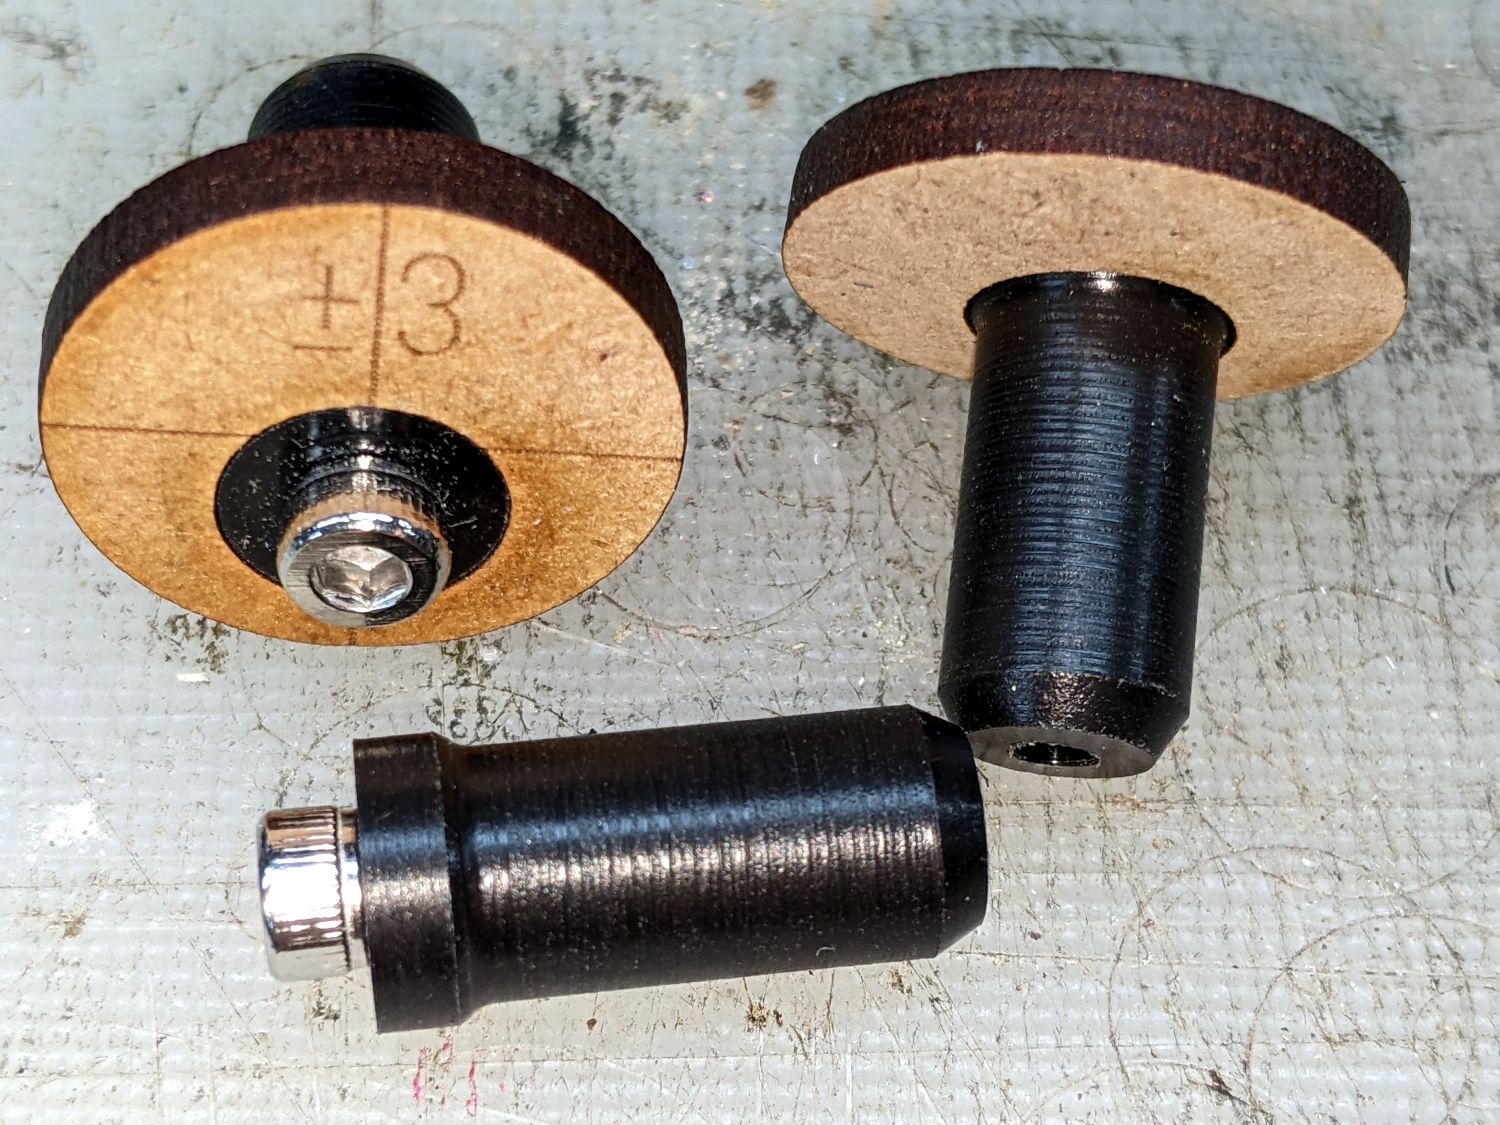
This is a cheap upgrade to prevent flashback when cutting. [Rich] explains how to size them properly and even how to make your own if you don’t want to buy them off the shelf. You can laser cut hold-down pins from plans [Rich] provides, although he prefers to 3D print them, and you can do that, too. Most beds look similar, but if yours is an oddball, you might have to modify them slightly. He has regular dog clamps and the antiflashback standoffs, so you can make some of each. You can also buy them online. Most do not have the antiflashback feature, but at least one vendor that [Rich] points out does have them

If you don’t like the ones [Rich] shows, you can find 3D models for similar pins in the usual places. You can also design them yourself if you want them exactly how you want.

A good thing to add to your laser cutting workflow. [Rich’s] channel is full of great stuff. If you want to know more about air assist, we’ve added it to our cutters. If you are serious about precision cuts, know your kerf, too.

Continue reading “Getting A Rise With Laser Cutting”

Adjustable Workholding For Honeycomb Tables, With A Bit Of DIY

Honeycomb tables are often found on laser cutters, where they provide a way for work material to be laid flat while not interfering with things like airflow. This leads to a cleaner laser cut and a nicer finish, but if one’s work depends on precise positioning and placement, they leave something to be desired because there’s no good way to attach rails, jigs, or anything of the sort in an easy and stable fashion.

The solution [Ed] found for this was to make himself some adjustable offset stops designed to fit into his laser cutter’s honeycomb table. Each consists of a laser-cut disc of wood, which is screwed off-center into an acetal “plug” sized to fit into the vertical gaps in the honeycomb table. This allows each disc to be rotated to fine-tune positioning. With the help of some T-shaped pegs that are also sized to fit into the honeycomb table, [Ed] has all he needs to fix something like a workpiece or jig into a particular and repeatable position.

The whole thing depends on a friction fit, so the sizing of the plug needs to match a particular honeycomb table’s construction. We think this makes it a good match for 3D printing, as one can measure and print plugs (perhaps employing the Goldilocks approach) that fit with just the right amount of snug.

Honeycomb tables are fantastic for laser cutting, but if you find yourself in a pinch for a replacement, an old radiator can make a pretty decent stand-in.

A Cheap Honeycomb Table Replacement For Your Laser

FH6KXVYHRWN86BN.LARGE

CO2 lasers make use of a honeycomb table which allows you to support parts you are cutting — without cutting into the bed too much. Unfortunately they are a consumable part, so they will eventually wear out, and they aren’t that cheap. [Claptrap] came up with an excellent alternative.

A few months ago, his radiator blew in his station wagon, and it had to be replaced. He was about to throw it out when he realized the similarity of the radiators cooling fins, to that of his honeycomb table… He cut it down to size, pressure washed it (though he notes you should probably wash it first before cutting) and put it in place. It works great!

The only caveat we have is that you should probably flush the radiator with a water pump first — you don’t want to be heating up any residual radiator fluid inside the radiator channels!

Continue reading “A Cheap Honeycomb Table Replacement For Your Laser”