printrbot simple metal fix

Cheap Hot End Modification Allows Easy Future Repairs

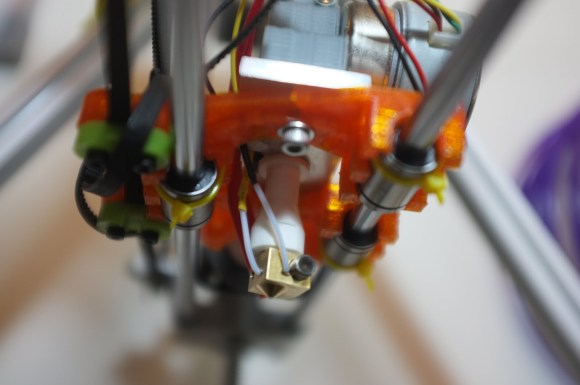
We’ve seen a lot of experimenting with 3D printers over the years, and that is a good thing. However, [Tyler] has had a bad experience with experimenting. He has a Printrbot Simple Metal and decided to try nylon weed wacker line. Since he wanted to get straight to printing, he skipped the apparently important step of drying the trimmer line before printing. This experimentation ended in several clogged nozzles. Removing and cleaning the nozzle several times put undo stress on the Ubis hot end wires and they broke. Things were not going well.

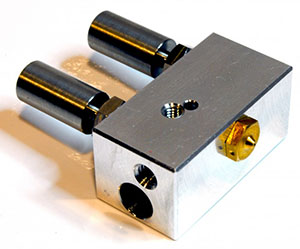
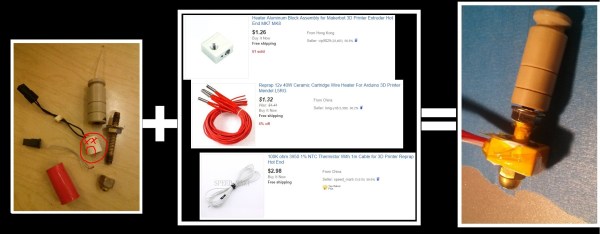
In an effort to make his printer more repairable, [Tyler] ordered up an aluminum RepRap heater block, heating resistor and thermistor. The heater block was tapped with standard M6 threads but the Ubis was 1/4 inch. This was remedied by drilling and tapping the M6 hole to 1/4-20.

Now for the nozzles, [Tyler] bought a handful of cheap brass acorn nuts. He drilled a hole for the molten plastic to exit the nozzle, then used a Dremel to grind the acorn nut’s dome into a cone. He reports it only took him about 5 minutes per nozzle.

It looks like [Tyler] got back to printing with a little creative thinking. Unfortunately, the Ubis and J-Head hot ends are not interchangeable. A couple of other ex-Ubis users have made J-Head adapters for their Printrbots.

MRRF: Hot Ends, Extruders, Extremely Posh Brits, And Stoic Swedes

As far as locations for the Midwest RepRap Festival go, it’s not exactly ideal. This is a feature, not a bug, and it means only the cool people come out to the event. There were a few people travelling thousands of miles across an ocean, just to show off some cool things they built.

Two Colors, One Nozzle

[Sanjay] and [Josh] from E3D came all the way from merry olde England to show off a few of their wares. The star of their show was the Cyclops extruder, a dual-extrusion hot end that’s two input, one output. Yes, two colors can come out of one nozzle.

cyclops

If you see a printer advertised as being dual extrusion, what you’re going to get is two extruders and two hot ends. This is the kludgy way to do things – the elegant solution is to make two colors come out of one nozzle.

The guys from E3D were showing off a few prints from their Cyclops nozzle that does just that, including a black and red poison dart frog, and a blue and white octopus. The prints looked amazing, and exactly what you would expect from a two-color print.

Rumor has it the development of the Cyclops involved extruding two colors, freezing the nozzle, and putting it in the mill just to see how the colors mixed. I didn’t see those pictures, but there’s a lot of work that went into this hot end.

The Power of Two Extruders

[Martin] of bondtech.se came to MRRF all the way from Sweden. He was there showing off his new extruder.

The extruder uses a normal stepper motor, but instead of the usual knurled or threaded feed wheel and bearing to push filament though, he’s using two counter-rotating feed wheels attached to a planetary gear system. That’s a lot of torque that doesn’t distort or strip the filament. When you consider all the weird filaments that are coming out – ninjaflex, and even 3D printable machinable wax filament, this is extremely interesting.

Even if your filament isn’t exactly 1.75 or 3mm in diameter, this setup will still reliably push plastic; there is a bolt that will move one of the feed wheels in and out 0.4mm.

[Martin] had a pair of his extruders hooked up to a strain gauge, and it’s strong enough to lift your printer off the table without stripping the filament. Here’s a video of that demo from the bondtech page.

3D Printering: Induction Heating

Every filament-based 3D printer you’ll find today heats plastic with resistive heaters – either heater cartridges or big ‘ol power resistors. It’s efficient, but that will only get you so far. Given these heaters can suck down only so many Watts, they can only heat up so fast. That’s a problem, and if you’re trying to make a fast printer, it’s also a limitation.

Instead of dumping 12 or 24 VDC into a resistive heater, induction heaters passes high-frequency AC through a wire that’s inductively coupled to a core. It’s also very efficient, but it’s also very fast. No high-temperature insulation is required, and if it’s designed right, there’s less thermal mass. All great properties for fast heating of plastic.

A few years ago, [SB] over on the RepRap blog designed an induction heater for a Master’s project. The hot end was a normal brass nozzle attached to a mild steel sleeve. A laminated core was attached to the hot end, and an induction coil wrapped around the core. It worked, but there wasn’t any real progress for turning this into a proper nozzle and hot end. It was, after all, just a project.

Finally, after several years, people are squirting plastic out of an induction heated nozzle. [Z], or [Bulent Unalmis], posted a project to the RepRap forums where he is extruding plastic that has been heated with an induction heater. It’s a direct drive system, and mechanically, it’s a simpler system than the fancy hot ends we’re using now.

Electronically, it’s much more complex. While the electronics for a resistive heater are just a beefy power supply and a MOSFET, [Z] is using 160 kHz AC at 30 V. That’s a much more difficult circuit to stuff on a printer controller board.

This could be viewed as just a way of getting around the common 24V limitation of common controller boards; shove more power into a resistor, and it’s going to heat faster. This may not be the answer to hot ends that heat up quicker, but at the very least it’s a very neat project, and something we’d like to see more of.

You can see [Z]’s video demo of his inductive hot end below. Thanks [Matt] for the tip.

Continue reading “3D Printering: Induction Heating”

Ceramic Hot-end Mount Seeks To Improve Extrude Performace

ceramic-hot-end-mount

Take a gander at the part of this extruder head which looks like a chess pawn. It’s the mounting bracket for the hot end and it’s made out of ceramic. [Ed] came up with the idea to use ceramic to mount the hot end when trying to improve the design while keeping it rather simple and easy to assemble. The concept uses the thermal properties of the ceramic to insulate well enough to operate the extruder at higher temperatures without causing other problems.

Where does one get a custom ceramic part anyway? Turns out you can get low volume runs from China much like PCBs. The minimum order was ten units, which was still a leap of faith since he had no way of testing the design in advance. The first run with the new part went quite well, but only for the first layer and then the filament jammed. He’s still not sure why, but overcame the issue by lining the inside of the ceramic with a PTFE tube. This means he now has to use a smaller filament to fit through it. But the quality of the prints he’s getting with 1.75mm stock and the ceramic head are superb.

It may even be possible to print this ceramic part some day. We remember seeing another extruder that can deposit ceramic clay.

[Prusa]’s Nozzle Prints Polycarbonate, PEEK, & Nylon

Oh, we’ve been sitting on this one for a while.

[Josef Prusa], brainchild behind what is probably the most popular 3D printer, has just unleashed a new hot end that is capable of printing objects in polycarbonate, PEEK, and nylon.

This new hot end is completely made out of stainless steel – there are no plastic parts made out PTFE or PEEK to keep the heat from transferring up to the extruder. Because the Prusa Nozzle can print these plastics, it’s also now possible to print parts for other hot ends such as the J Head and the Budaschnozzle.

We ran into [Prusa] at NYC Maker Faire a few months ago, and he was kind enough to go over the advancements in his new nozzle and new i3 printer. So far, it looks like the lack of a PEEK insulator isn’t doing the new hot end any harm – [Prusa] has left molten plastic in the nozzle for a few hours and nothing bad has come of it.

You can check out the interview below.

[youtube=www.youtube.com/watch?v=fzFpMZE366Q]

Again, thanks to [Prusa] for granting us an interview and providing some free advertising for Hackaday’s hosts for the NYC Maker Faire. Before you complain about the delay in getting this interview out to you, don’t worry; I slapped a few Makerbot stickers on the back of [Prusa]’s jacket. Everything’s cool.

All Metal Hot End For Makerbot

Imagine if you will for a moment, you’re printing along on your Makerbot clone and all of a sudden your PTFE hot end melts, what are you going to do now? One solution is to mill your own all metal end from a bolt with some careful drilling. Or you could follow [Peter Jansen] who has made his own all metal hot end using the existing extruder. All that’s required is some aluminum sheet and cutting down the nozzle and hat (and fans to help, but technicalities), and you’re in business with no more melted PTFE hot end.