Some people just want to watch the world burn. Others want to spread peace, joy and mustaches. [Joe Grand] falls into the latter group this time around. His latest creation is Mustache Mayhem, a hack, video game, and art project all rolled into one. This is a bit of a change from deconstructing circuit boards or designing electronic badges, but not completely new for [Joe], who wrote SCSIcide and Ultra SCSIcide for the Atari 2600 back in the early 2000’s.
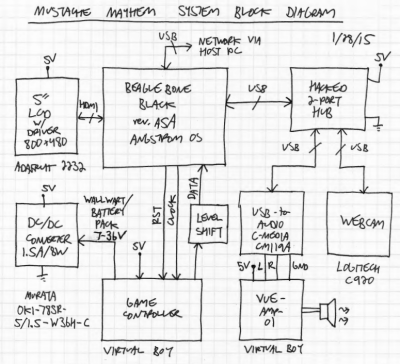
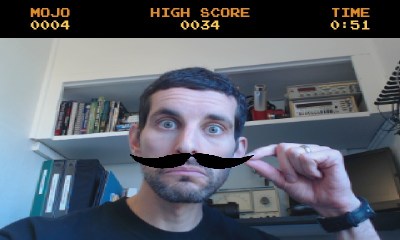
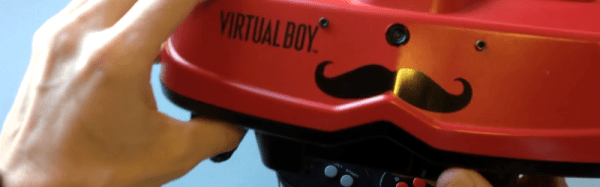
Mustache Mayhem is built into a Nintendo Virtual Boy housing. The Virtual Boy itself was broken, and unfortunately was beyond repair. [Joe] removed most of the stock electronics and added a BeagleBone Black, Logitech C920 webcam, an LCD screen and some custom electronics. He kept the original audio amplifier, speakers, and controller connector. Angstrom Linux boots into [Joe’s] software, which uses OpenCV to detect faces and overlay mustaches. Gameplay is simple: Point the console at one or more faces. If you see a mustache, press the A button on the controller! The more faces and mustaches on-screen at once, the more points, or “mojo” the player gets. The code is up on Github, and can be built with Xcode targeted to the Mac, or directly on the BeagleBone Black.
[Joe’s] goal for the project was to make a ridiculous game that looks like it could have come out in the 90’s. He also used Mustache Mayhem as a fun way to learn some new skills which will come in handy for more serious projects in the future.
We caught up with [Joe] for a quick interview about his new creation.
How did you come up with the idea for Mustache Mayhem?
 I was selling a bunch of my video game collection at PRGE (Portland Retro Gaming Expo) a few years ago and had a broken Virtual Boy that no one bought. A friend of mine was at the table and said I had to do something with it. I thought “People wear cosplay and walk around at conventions, so what if I could do something with the Virtual Boy that you could walk around with?” That was the seed.
A few months later, Texas Instruments sent me the original production release of the BeagleBone Black (rev. A5A). Eighteen months after that I actually started the project. The catalyst was to do something for an upcoming Portland, OR art show (Byte Me 4.0), which is an annual event that shows off interactive technology-based artwork. I wrote up a little description and got accepted. I had less than 2 months to actually get things working and it ended up taking about a month of full-time work. It was much more work than I expected for such a silly project. I originally was going to do something along the lines of walking around in a Doom-like perspective and shooting people when their faces were detected.
That would be pretty darn cool. How did you get from Doom to Mustaches?
 I saw a TI BeagleBoard demo called “boothstache” which drew mustaches on faces and tweeted the pictures. I thought that doing something non-violent with mustaches would be more suitable (and funny) to actually show my kids. I also secretly wanted to use this project as a way to experiment with Linux, write some code, and learn about face detection and image processing with OpenCV, which I plan to use for some actual computer security research in the future. Mustache Mayhem turned out to be a super cool project and I’m really happy with it. I sort of feel guilty spending so much time on it, since it’s basically just a one-off prototype, but I just got so obsessed with making it exactly as I wanted.
You mentioned on your website that Mustache was “designed to challenge the paradigms of personal privacy and entertainment.” What exactly did you mean there?
Continue reading “Mustachioed Nintendo Virtual Boy Gone Augmented Reality” →

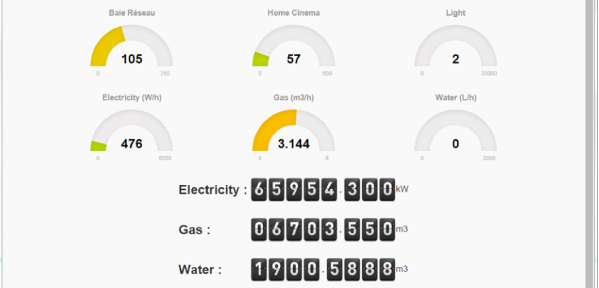
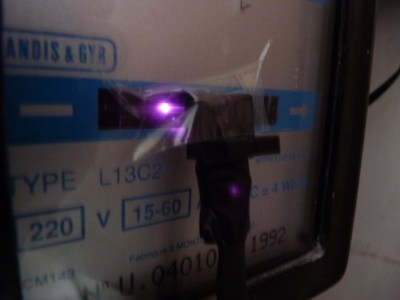 So he figured out a way to extract data from the existing meters. For the Electricity meter, he thought of using current clamps, but punted that idea considering them to be suited more for instantaneous readings and prone for significant drift when measuring cumulative consumption. Eventually, he hit upon a pretty neat hack. He took a slot type opto coupler, cut it in half, and used it as a retro-reflective sensor that detected the black band on the spinning disk of the old electro-mechanical meter. Each turn of the disk corresponds to 4 Watt-hours. A little computation, and he’s able to deduce Watt-hours and Amps used. The sensor is hooked up to an Arduino Pro-mini which then sends the data via a nRF24L01+ module to the main circuit located inside his house. The electronics are housed in a small enclosure, and the opto-sensor looks just taped to the meter. He has a nice tip on aligning the infra-red opto-sensor – use a camera to check it (a phone camera can work well).


 The entry requirements and judging criteria for Best Product are both a bit different form the main entry field. Rest assured you are still eligible to compete for all of the other prizes.


