Extruded Rail And 3D Printed Connectors Form A Proper Laser Engraver

3d-printed-laser-engraver

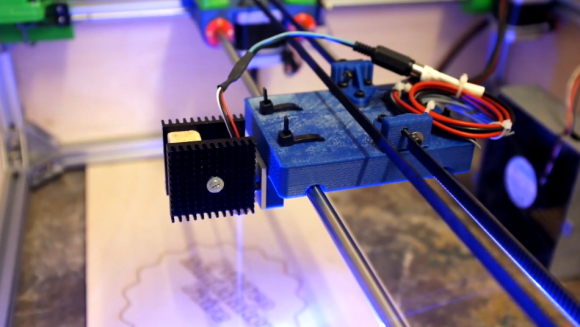
Fast and accurate is a good description of this laser engraver built by [Ragnar] and [Gunnar]. The’re planning to show it off at the Trondheim Maker Faire after the new year but they took it out in the wild for the PSTEREO Mini Maker Faire (also in Trondheim) this past August. The video below gives an overview of the build process and the engraver at work. But we also enjoyed reading the post about a few missteps in the early prototyping process. We call this one a proper laser engraver because it was purpose built from the ground-up. We still like seeing the engravers hacked from optical drives, but this really is a horse of a different color in comparison.

From the start they’re using familiar parts when it comes to CNC builds. The outer frame is made of extruded aluminum rail, with precision rod for the gantry to slide upon. Movement is facilitated with stepper motors and toothed belts, with all of the connecting and mounting parts fabricated on a 3D printer. The mistake made with an early (and unfortunately mostly assembled) prototype was that the Y axis was only driven on one side when it really needed to be driven on both. But filament is relatively cheap so a few tweaks to the design were able to fix this and get the production back on track.

Continue reading “Extruded Rail And 3D Printed Connectors Form A Proper Laser Engraver”

Everything You Need To Know To Make A Laser Engraver From Scrap

make-a-laser-engraver-from-scrap

Check out the Einstein head which [Sebastian Müller] etched on the cover of his calculator using a laser engraver he made from scratch. We think he did a great job with the build, but we’re even more impressed with the work he put into sharing the techniques he used to salvage and repurpose all the components. It’s a perfect resource that should be pretty easy to adapt to different model/manufacturer source hardware.

He used an old scanner and an old printer for the bulk of the parts. These both originally included stepper-motor actuated gantries, which pull together to form the x and y axes in his Frankenstein Laser Engraver. As the parts came together he started in on the control electronics which include a couple of EasyDriver stepper motor boards and an Arduino.

At this point he took the machine for a test-run, attaching a marker to the carriage to use it as a pen plotter. After putting in a solid performance at this [Sebastian] moved on to adding in the laser diode. He covers how to drive the diode, as well as focal point alignment in great detail. It seems like his webpage post has the same content as the Instructable linked above but we wanted to leave the link just in case.

Integrating A Power Bus Into A Quadcopter Frame

When working on flying vehicles weight is always a consideration. [Brendin] found a way to get rid of a wiring harness on his quadcopter, simplifying the assembly while lightening the load. He did it by incorporating the power bus into the frame of the vehicle.

He started with some copper clad board. Because the substrate is a structural component he didn’t want to use a CNC mill to do the etching as it also removes a bit more than just copper. After using the mill to cut out the shape and drill holes he coated the board with flat black paint. This acts as the etch resist, which he sent through a 50W laser engraver to remove the paint and expose the areas he wants to etch. After etching he removed the rest of the resist, and masked off his solder pads with small rectangles of electrical tape. This protects the solder pads from the truck bed liner paint he uses to insulate the copper. He says it works great and plans to use the technique on all future builds.