PCB Agitator From A Broken CD-ROM Drive

pcb-agitator

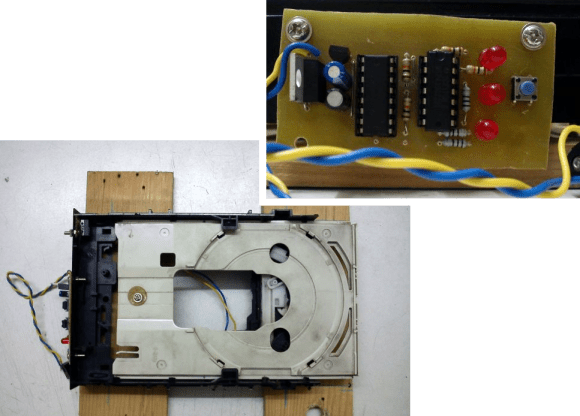
Etching PCBs goes a lot better if you agitate the solution in order to carry away the dissolved copper and get fresh etchant to the area. With that in mind [Rohit Gupta] designed a mechanism in Sketch Up before realizing he was going about it the hard way. He ended up basing his agitator on a broken CD-ROM drive instead of starting from scratch.

He uses the CD sled from the drive, ditching the lens and its support structure. To get direct access to the motor that drives the tray he uses an L293D H-bridge chip. This is controlled by an MSP430G2231 microcontroller. The driver board seen in the upper right includes a voltage regulator, three status LEDs, and one user input switch. Once triggered, the sled will move back and forth, contacting an old mouse microswitch which acts as the limiting switch. We find it entertaining that [Rohit] prototyped the circuit on a breadboard, then used that success to etch the final circuit board (shown in the video below).

If you’ve been following the hacker creed and never getting rid of any junk you’ll have no problem finding a donor drive to make one of your own. But just in case you can’t get a hold of this hardware a similar agitator can be built using a hobby servo.

Continue reading “PCB Agitator From A Broken CD-ROM Drive”

Making A Line-following Toy Into A Programmable Robot

[Eric Gregori] picked up this little yellow robot as a kit build. It has a single PCB inside that has a pair of IR emitters and detectors pointed downward at the front of the robot. It is able to follow a dark line on a light surface based on how the infrared beam reflects back to the detector. But it’s a one-trick pony that [Eric] wanted to make into a programmable robot.

The kit came with a schematic, which makes the process of patching into its logic quite easy. There are two motors, each with a driver circuit made up of a pair of transistors and one flyback diode. This means the motors can only move in one direction, but they also only take one logic connection to control. Instead of populating the transistor that usually connects the IR receiver to the motor driver, [Eric] soldered jumper wires from each to an MSP430 chip (the G2231 that came with his Launchpad).

As you can see in the clip after the break, the first version of the code he wrote makes the robot follow a line as it would if it had not been altered. But there’s still plenty of programming space and several free I/O pins for future improvements.

Continue reading “Making A Line-following Toy Into A Programmable Robot”

Reading A Digital Caliper With A Microcontroller

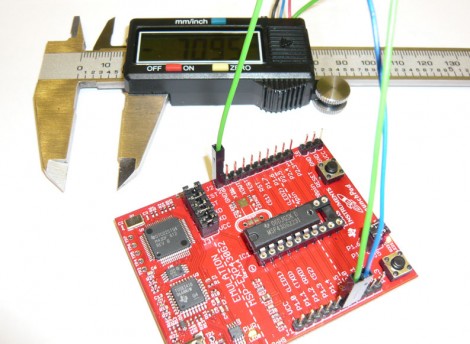
[Maris] wanted a way to read measurements from a digital caliper electronically. He ended up using the TI Launchpad to accomplish this, but not all of the necessary hardware is seen above. The calipers cost him about $7 on eBay, and they have four interface pins which made this hack quite a bit easier. After a bit of probing he established their purpose; voltage, ground, clock and data. A bit of scoping proved that data was being sent in 24-bit burst in packets that are quite easy to decode.

From there it’s just a matter of interfacing with a microcontroller. The chip he’s using is an MSP430G2231 that runs at 3.3V, but the caliper’s logic high is only 1.5v. By constructing an adapter using a pair of transistors, the data and clock from the calipers are able to pull pins on the MSP430 low. This is collected and analyzed by [Maris’] firmware and can be read on a PC using a terminal program.

[Thanks Chris]