DIY Camera Stabilizer

DIY Camera Stabilizer Takes The Shakes Out Of Filming

We’ve all prematurely stopped watching some Youtube video because of shaky camera work that makes the video unwatchable. There is a solution available for this problem, it’s a device called a camera stabilizer and it is designed to compensate for jerky camera movement. There are several types available for purchase but they can get fairly expensive. Even the cheaper ones at a few hundred dollars are not economical for hobbyists. [John] set out to make his own camera stabilizer using some unorthodox parts.

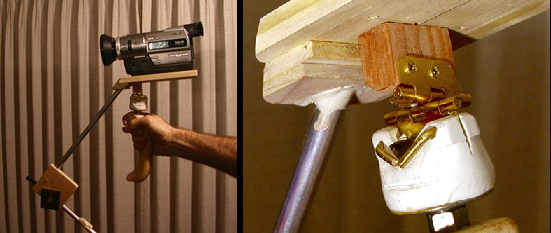
[John’s] chose a gimble style design that effectively lowers the camera’s center of gravity down close to the camera persons hand. The handle of the device must also be mounted in a manor to prevent angular and rotation movement of the supporting hand from transferring to the camera.

The handle is from a cement trowel, on top of which is a ball bearing mounted to a threaded rod. A PVC fitting was heated to soften it and the bushing pressed in. This bearing is responsible for allowing the rotational freedom between the handle and the camera. To decouple any angular movements, two hinges were attached to the PVC fitting. The hinges are perpendicular to each other, one allows forward-back tilting while the other allows left-right tilting. The upper hinge is attached to a piece of poplar wood that also serves as a base for the camera.

At this point, if you were to try to hold this contraption with the camera installed, it would immediately tip over due to gravity. To prevent this, the center of gravity of the moving parts (including the camera) must be lowered. [John] did this by using some aluminum tubing to support wood weights that reside lower than the pivot points created by the hinges.

If you like the DIYer-style stabilizers, check this other wooded one out. Want something more polished looking? How about this pistol grip stabilizer?

Make Your Own Steadycam Mount

gopro-steadycam

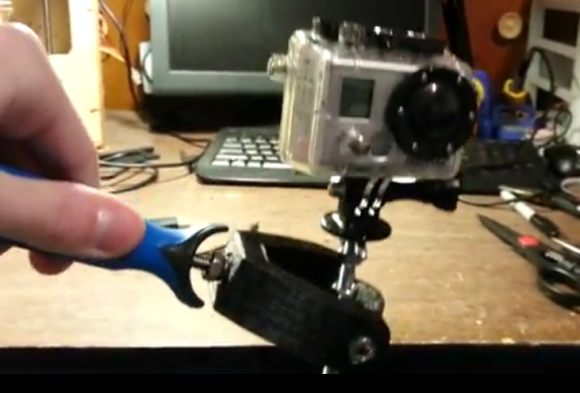
[Ryan] wrote in to tell us about his partially 3D-printed steadycam mount on Instructables. In the video after the break, the camera does stay quite steady through some basic tests. The base is a paint roller handle, and the device works by using a long arm on the bottom with some weights to keep the camera upright. This handle is attached to the weights and camera through a 3-axis Gimbal system that allows the camera to stay relatively steady even if your hand isn’t. A full bill of materials and the needed STL files are provided.

Of course if you’re “old school” and like to use subtractive manufacturing methods, you can always check out this [camera stabilizer] from [Do-It-Yourself Gadgets]. The device works in a nearly identical manner, but the BOM seems to be: metal, screws, threaded rod. There are some cool animated GIFs of it in action on the site, or check out the video after the break.

As a “camera mount” bonus, check out this super easy [GoPro] (or any other small camera) clamp mount.  Really clever. Continue reading “Make Your Own Steadycam Mount”

IPhone 4 Steadicam

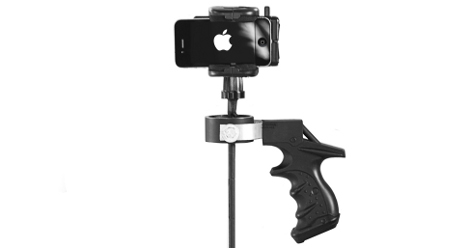
It’s been a while since we’ve seen a steadicam, and to quench our thirst is this  iPhone 4 steadicam. The system does use the typical 3 axis PVC gimbal and heavy weight setup that we’ve seen before, but (why has it taken so long to get this implemented?) the addition of a hand grip means you no longer get blistered fingers. The tutorial recommends the use of an expensive cup holder mounting system, but we think making your own epoxy one might save another dime and allow a wider range of cameras or phones.

The whole process is also wrapped up in a quick and simple how-to video (after the jump alongside an in action video), which goes to show even though a hack may have been done several times before, presentation can make a big difference and impact.

[Thanks Max Lee]

Continue reading “IPhone 4 Steadicam”

Gimbal Camera Stabilizer

steadycam

Professional cameramen use steadicams to make their shots look smooth and clean. However, their prices are generally way too high for an indie’s budget. Previous attempts have tried adding a counterweight and moving the camera away from the hands. [YB2Normal] took a different method and used a bob and gimbal to hold the camera upright. The gimbal is free to rotate along 3 axes, so the camera can stay in place. The whole thing cost less than $15. The first video he made with he mount is after the break.

[youtube http://www.youtube.com/watch?v=nXB0ncUQLn4%5D

Related: Building a Snorricam

[via Gizmodo]