RomoCart, Indoor Robot Racing

Your Living Room Becomes Next Mario Kart Course

[Ken] likes his living room and he is on a continual mission to make it more interesting. Recently, he has made a giant leap forward with a racing game project he calls RomoCart. Think of it as a partially-physical game of Mario Kart. You are able to race others around a track while still having the ability to fire projectiles or drop defensive measures in efforts to win the race!

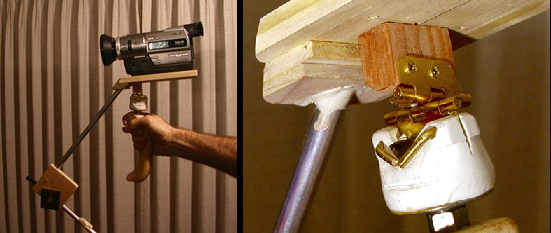
First, lets talk about the hardware required. The racers are standard Romo educational robots. Wireless game controllers provide the means for the drivers to control the Romos. Hanging from the ceiling is an Xtion motion sensing camera and a video projector, both pointed down at the floor.

To get started, the system scans the floor and determines a race course based on the room layout and any physical objects in the vicinity. A course is then generated to avoid the obstacles and is projected onto the floor. At this point it would still be a pretty neat project but [Ken] went way further. The ceiling-mounted camera tracks the motion of the Romos driving around the track and the video projector displays a smoke trail behind each racer. Randomly displayed on the track are items to help you win the race, including an acceleration item that makes your Romo go twice as fast for a short time.

Have a tailgater? No problem, just pick up some bananas and drop them on the track. If a following competitor drives into one, they spin out. If you want to get super rude, pick up some missiles and fire them at the racers ahead of you. A direct hit will stop them right in their tracks.

[Ken] is no stranger to HaD, he’s had a few of his projects covered here before. Check out his Tempescope, Moving Window and his Autonomous Lighting System.

Check out a video of the racing in action after the break. It is amazing!

Continue reading “Your Living Room Becomes Next Mario Kart Course”

DIY Camera Stabilizer

DIY Camera Stabilizer Takes The Shakes Out Of Filming

We’ve all prematurely stopped watching some Youtube video because of shaky camera work that makes the video unwatchable. There is a solution available for this problem, it’s a device called a camera stabilizer and it is designed to compensate for jerky camera movement. There are several types available for purchase but they can get fairly expensive. Even the cheaper ones at a few hundred dollars are not economical for hobbyists. [John] set out to make his own camera stabilizer using some unorthodox parts.

[John’s] chose a gimble style design that effectively lowers the camera’s center of gravity down close to the camera persons hand. The handle of the device must also be mounted in a manor to prevent angular and rotation movement of the supporting hand from transferring to the camera.

The handle is from a cement trowel, on top of which is a ball bearing mounted to a threaded rod. A PVC fitting was heated to soften it and the bushing pressed in. This bearing is responsible for allowing the rotational freedom between the handle and the camera. To decouple any angular movements, two hinges were attached to the PVC fitting. The hinges are perpendicular to each other, one allows forward-back tilting while the other allows left-right tilting. The upper hinge is attached to a piece of poplar wood that also serves as a base for the camera.

At this point, if you were to try to hold this contraption with the camera installed, it would immediately tip over due to gravity. To prevent this, the center of gravity of the moving parts (including the camera) must be lowered. [John] did this by using some aluminum tubing to support wood weights that reside lower than the pivot points created by the hinges.

If you like the DIYer-style stabilizers, check this other wooded one out. Want something more polished looking? How about this pistol grip stabilizer?

supercapacitor ups

Supercapacitors For The Raspberry Pi

As versatile as the Raspberry Pi is, it has a weakness when it needs to be able to shut down properly during a power outage, especially when handling data-sensitive or industrial applications. To solve this problem, [Pavol Sedlacek] has created a supercapacitor-based UPS specifically for the Raspberry Pi that gives it enough time to properly halt its processes and shut down if it detects a power failure.

The device is called the Juice4Halt. It uses a DC-DC converter to provide power to the Pi from the normal power supply and to charge the supercapacitors during normal operation. It is bidirectional, so in the event of a power failure it works in reverse to take power from the capacitors and feed it back to the Pi. A second DC-DC converter handles power from an external power supply.

A side effect of using supercapacitors as a UPS is that they can also help the Pi survive brownouts. The project site has an incredible amount of detail about the functionality of the device, including circuit diagrams and the source code. We’ve seen other supercapacitor-based UPS units before but this particular one is much more robust and would be truly at home in any industrial or other sensitive setting.

Hackaday 10th Anniversary Update

The Hackaday 10th anniversary is going great guns. Attendees have already built line following robots with [Adam Fabio], learned lockpicking with [Datagram] and [Jon King]. [Jame Hobson’s] team is building an awesome video game controller. The attendees are currently building LiPo battery chargers. [Todd Black] gave a great presentation on the care and feeding of LiPo batteries. He designed and built a PCB just for this event!

build

Some familiar faces are on hand, such as [Chris Gammell], [Bil Herd], as well as the entire Hackaday editing team!

cbb

Still to come are talks by [Steve Collins], [Quinn Dunki], [Jon McPhalen], and [Thundersqueak].

Want to check out the live view? Click our Hackvision streams!

Building A Retro Computer That Never Existed

Sometimes you come across a build so far along you wish you could go back and enjoy it just a bit at a time. This C65 build is so far along, it’s like binge watching a retro computer build. One that never actually existed.

Okay, that’s admittedly a bit rash. But technically the C65 (successor to the Commodore C64) never saw its way through development. A good place to start looking in on the build is from the second post way back in March. The FPGA-based project is already looking promising with proof-of-concept display tests. Are we the only ones surprised by the 1920 native display resolution?

Checking back in June we see that there is some software working but a bounty of bugs will definitely keep [Paul] busy for a while. Fast forward to the beginning of September and he’s come full through to getting a network connection up and running.

The Wikipedia page on the C65 gives a good idea of how awesome this would have been back in the day had it actually made it to market. We suppose it joins the Commodore lists of would-haves and should-haves with the likes of the C128.

The ESP8266 Becomes A Terrible Browser

The ESP8266 are making their way over from China and onto the benches of tinkerers around the world for astonishing web-enabled blinking LED projects and the like. [TM] thought he could do something cooler with his WiFi to UART module and decided to turn one into a web browser.

There’s no new code running on the ESP8266 – all the HTML is being pushed through an Arduino Mega, requesting data from a server (in this case our fabulous retro edition), and sending the data to the Arduino serial console. The connection is first initiated with a few AT commands to the ESP module, then connecting to the retro server and finally dumping everything received to the console.

It’s not much – HTML tags are still displayed, and images are of course out of the question. The result, however, isn’t that much different from what you would get from Lynx, meaning now the challenge is open for an Arduino port of this ancient browser.

Split Flap Display: If You Can’t Find It, Built It

It’s pretty hard to deny that split-flap displays are incredibly awesome. This one has been a long time coming, and it’s not a refab or surplus build. [Tom] fabricated these beautiful alpha-numeric split flaps from scratch.

Having recently seen an alarm-clock split flap hack just a week or so ago we found ourselves wondering where in the world people manage to find this type of awesome mechanical hardware. If you can’t get it out of grampa’s attic, the next best thing is to build it from the ground up.

This was not a build to be taken lightly. [Tom] started years ago, and part way into the project we looked at some of the control hardware for the installation. Make sure that you dig deep into his blog posts. It’s the only way you’ll put together the whole picture of how he ended up with each belt and stepper motor driven character module.

Continue reading “Split Flap Display: If You Can’t Find It, Built It”