Epic Wooden Marble Run For Kids’ Room

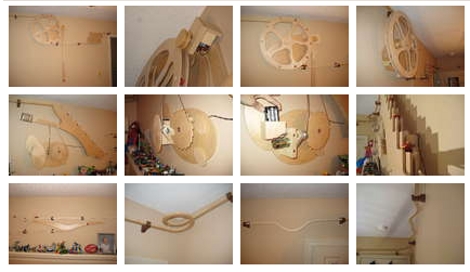
Some parents buy kinetic sculptures for their kids at art or craft fairs. Not [Steve Moseley], he turned his kids’ hovel into a sculpture by wrapping a marble run around the entire room. It’s big enough, with so many features that finding a banner image was a bit tough. After the break we’ve embedded a video where you’ll see a wagon wheel lifter, plenty of gravity-fed curves, loops, inclines, rockers, a stair-step lifter, and… well you get the idea.

Considering the scope of the project it was remarkably inexpensive; about $70 in wood, $40 for the glass marbles, and around $60 for everything else. We’re glad he shared his building methods with such verbosity. You’ll need a well-stocked shop. Fine work like this requires tools common for woodworkers, but we’d bet the band saw and oscillating spindle sander were a godsend.

Continue reading “Epic Wooden Marble Run For Kids’ Room”

Balancing Inverted Pendulums

The robot above can balance an inverted pendulum. But wait, it gets better. It can balance an inverted pendulum that is articulated in the middle like the one seen above. Wait, wait, wait… it gets even better. It can start with the pendulum hanging below the sliding carriage, flick back and forth to get the two segments swinging, and then come to equilibrium with the pendulum as seen above. Once there, it can recover from a bit of a shove, like some of the big boys. Very impressive, even when compared to two-wheeled balancers. See for yourself after the break.

We don’t have very much information on how this works. We do know that it was a seminar paper from a student at the University of Stuttgart but the rest is pretty much a mystery. Does it use visual processing? What kind of controller is driving this thing? We want to know the details but haven’t yet found a copy of the paper. If you know where we can get our mitts on it please leave a comment below.

Continue reading “Balancing Inverted Pendulums”

Barcode Challenge For Radio Operators

[Scott Harden] came across a few posts about QR code matrix barcodes coming through on the 40m baud radio band. A few operators had captured the signals and assembled them into the code block seen above but they weren’t able to get a clear enough shot for a smartphone to decode the image. [Scott] took on the challenge and decoded the mysterious message himself. He tried some graphic editing to separate and enhance the color channels in order to up the contrasts of the image. This helped, but still couldn’t be read automatically. In a move similar to those seen in Hackaday’s own barcode challenges he dropped the image into Inkscape so that he could manually clean it up. Once it was overlaid on a grid the job was pretty simple. the left side did require some more image manipulation and precision”squinting” to eliminate interference from the vertical banding, but he managed to get the message. We won’t spoil it here in case you want to take on the challenge yourself. Good luck!

Automated Chicken Coop Door Is Solar-powered

[Fileark] has been busy with the hacks lately. This time around he’s built a solar-powered chicken coop door that opens in the morning, and closes at night. A single motor slides the door open and closed using a loop of spring-loaded string. There are limiting switches on either side of the door jamb to ensure proper positioning. The grey box seen above houses the hardware; a regulator for the solar panels perched atop the roof line, a battery from a broken UPS, and the driver board itself. An AVR chip running the Arduino bootloader monitors a phototransistor to detect sunup and sundown, driving the door motor appropriately using a pair of relays.

Check out the demonstration and hardware overview after the break. [Fileark] was inspired to build his after seeing the alarm-clock coop door. We don’t know if he got a chance to look at the vertical coop door, but we think his less mechanically-complicated solution is just as elegant.

Continue reading “Automated Chicken Coop Door Is Solar-powered”

Surprisingly Simple Magnetic Card Spoofer

[Craig’s] magnetic card spoofer is both simple and brilliant. There are two parts to spoofing these cards and he took care of both of them. The first part is getting the actual card data. He designed the spoofer board with a header that connects to a card reader for doing this. The second part is the spoofing itself, which is done with an electromagnet. As with past spoofers, he wrapped a shim with enamel-coated magnet wire. An old knife blade was picked for its thickness and ferromagnetism.  This magnet is driven by an ATtiny2313 which stores the data, and is protected by a transistor driving the coil. There were a few design flaws in his board, but [Craig] was able to get the same track data out of the spoof as the original card despite the LED being used as a protection diode and an ‘aftermarket’ resistor on the transistor base.