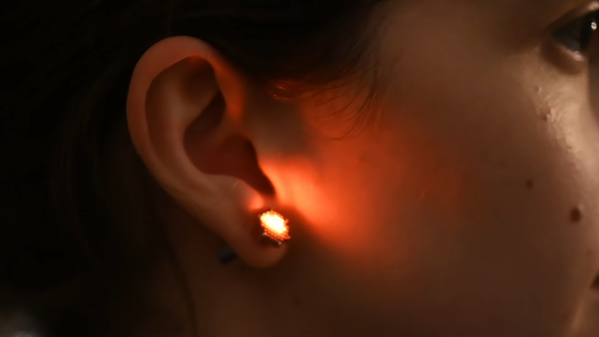
LED Matrix Earrings Show Off SMD Skills

We’ll be honest with you: we’re not sure if the use of “LED stud” in [mitxela]’s new project refers to the incomprehensibly tiny LED matrix earrings he made, or to himself for attempting the build. We’re leaning toward the latter, but both seem equally likely.

This build is sort of a mash-up of two recent [mitxela] projects — his LED industrial piercing, which contributes the concept of light-up jewelry in general as well as the power supply and enclosure, and his tiny volumetric persistence-of-vision display, which inspired the (greatly downsized) LED matrix. The matrix is the star of the show, coming in at only 9 mm in diameter and adorned with 0201 LEDs, 52 in total on a 1 mm pitch. Rather than incur the budget-busting expense of a high-density PCB with many layers and lots of blind vias, [mitexla] came up with a clever workaround: two separate boards, one for the LEDs and one for everything else. The boards were soldered together first and then populated with the LEDs (via a pick-and-place machine, mercifully) and the CH32V003 microcontroller before being wired to the power source and set in the stud.

Even though most of us will probably never attempt a build on this scale, there are still quite a few clever hacks on display here. Our favorite is the micro-soldering iron [mitxela] whipped up to repair one LED that went missing from the array. He simply wrapped a length of 21-gauge solid copper wire around his iron’s tip and shaped a tiny chisel point into it with a file. We’ll be keeping that one in mind for the future.

Continue reading “LED Matrix Earrings Show Off SMD Skills”

Alarm Panel Hack Defeats Encryption By Ignoring It

As frustrating as it may be for a company to lock you into its ecosystem by encrypting their protocols, you have to admit that it presents an enticing challenge. Cracking encryption can be more trouble than it’s worth, though, especially when a device gives you all the tools you need to do an end-run around their encryption.

We’ll explain. For [Valdez], the encrypted communication protocols between a DSC alarm panel and the control pads on the system were serious impediments to integration into Home Assistant. While there are integrations available for these alarm panels, they rely on third-party clouds, which means that not only is your security system potentially telling another computer all your juicy details, but there’s also the very real possibility that the cloud system can either break or be shut down; remember the Chamberlain MyQ fiasco?

With these facts in mind, [Valdez] came up with a clever workaround to DSC encryption by focusing on physically interfacing with the keypad. The device has a common 16×2 LCD and a 25-key keypad, and a little poking around with a multimeter and a $20 logic analyzer eventually showed that the LCD had an HD44780 controller, and revealed all the lines needed to decode the display with an ESP32. Next up was interfacing with the keypad, which also involved a little multimeter work to determine that the keys were hooked up in a 5×5 matrix. Ten GPIOs on the ESP32 made it possible to virtually push any key; however, the ten relays [Valdez] originally used to do the switching proved unwieldy. That led to an optocoupler design, sadly not as clicky but certainly more compact and streamlined, and enabling complete control over the alarm system from Home Assistant.

We love this solution because, as [Valdez] aptly points out, the weakest point in any system is the place where it can’t be encrypted. Information has to flow between the user and the control panel, and by providing the electronic equivalents to eyes and fingers, the underlying encryption is moot. Hats off to [Valdez] for an excellent hack, and for sharing the wealth with the HA community.

Taking A Public Transit Display From Project To Product

We’ve noticed an uptick in “project to product” stories lately, which seems like a fantastic trend to us. It means that hackers are turning out projects that really resonate with people, to the degree that taking the leap and scaling up from a one-off to a marketable product is worth the inherent risk. And luckily enough for the rest of us, we get to learn from their experiences.

The latest example of this comes to us from [Stefan Schüller], who from the sound of things only reluctantly undertook the conversion of his LED matrix public transit sign into an actual product. The original project had a lot going for it; it looked fantastic, it was technologically simple, and it provided a valuable service. But as a project, it made certain assumptions and concessions that would cause problems when in the hands of a customer. Chief among these was the physical protection of the fragile LEDs, which could easily shear off the display modules if bumped or dropped. There were also firmware issues, such as access to the backend API that serves the transit data; requiring each customer to sign up for and configure their own API key is a non-starter for a product.

In the article, [Stefan] enumerates a long list of problems that going from project to product raises, as well as how he addressed them. The API issue was solved by implementing his own service, which acts as a middleman between the official API and his customers. A nice plexiglass and sheet-metal frame serves to protect the display, too. Design changes were made as well, not only to provide better functionality but to make manufacturing easier. [Stefan] also relates a tale of woe with regard to getting the display’s app into the app stores, something that few of us have to deal with when we’re just fiddling around with something on the bench.

All in all, [Stefan] does a great job walking us through the trials and tribulations of bringing a product to market. There are similar lessons in this production run scale-up, too, but with an entirely different level of project complexity.

LED Matrix Displays Get New Look Thanks To SMD Stencils

Even if surface-mount skills aren’t in your repertoire, chances are pretty good that most of us are at least familiar with SMD stencils. These paper-thin laser-cut steel sheets are a handy way to apply a schmear of solder paste to the pads of a PCB before component placement and reflowing. But are stencils good for anything else?

It turns out they are, if you’ve got some plain old 8×8 LED matrix displays you want to jazz up a bit. In this case, [upir]’s displays were of the square pixel type, but this trick would work just as well for a matrix with circular elements. Most of the video below is a master class in Adobe Illustrator, which [upir] used to generate the artwork for his stencils. There are a lot of great tips here that make creating one simple shape and copying it over the whole array with the proper spacing a lot easier. He also details panelizing multiple stencils, as well as the workflow from Illustrator to manufacturing.

When lined up properly over the face of the LED matrix, the stencils have quite an effect. We really liked the narrow vertical bars, which make the LED display look a bit like a VFD. And just because [upir] chose to use the same simple shape over all the LEDs in a matrix doesn’t mean that there aren’t other options. We can see how you might use the same technique to create different icons or even alphanumeric characters to create custom LED displays. The possibilities are pretty much limited to your imagination.

This isn’t the first time we’ve seen [upir] teaching old displays new tricks.

Continue reading “LED Matrix Displays Get New Look Thanks To SMD Stencils”

fiber matrix

Big LED Matrix Becomes Tiny LED Matrix Thanks To Fiber Optics

Everyone loves LED matrices, and even if you can’t find what you like commercially, it’s pretty easy to make just what you want. Need it big? No problem; just order a big PCB and some WS2812s. Need something tiny? There are ridiculously small LEDs that will test your SMD skills, as well as your vision.

But what if you want a small matrix that’s actually a big matrix in disguise? For that, you’ll want to follow [elliotmade]’s lead and incorporate fiber optics into your LED matrix. The build starts with a 16×16 matrix of WS2812B addressable LEDs, with fairly tight spacing but still 160 mm on a side. The flexible matrix was sandwiched between a metal backing plate and a plastic bezel with holes directly over each LED. Each hole accepts one end of a generous length of flexible 1.5-mm acrylic light pipe material; the other end plugs into a block of aluminum with a 35 by 7 matrix of similar holes. The small block is supported above the baseplate by standoffs, but it looks like the graceful bundle of fibers is holding up the smaller display.

A Raspberry Pi Pico running a CircutPython program does the job of controlling the LEDs, and as you can see in the video below, the effect is quite lovely. Just enough light leaks out from the fibers to make a fascinating show in the background while the small display does its thing. We’ve seen a few practical uses for such a thing, but we’re OK with this just being pretty. It does give one ideas about adding fiber optics to circuit sculptures, though.

Continue reading “Big LED Matrix Becomes Tiny LED Matrix Thanks To Fiber Optics”

Digital Rain Animation Crammed Into Pi Pico

With a new Matrix movie now in cinemas, we’ve all been reminded of those screensavers that were just the coolest thing ever when the original film dropped in 1999. [en0b] decided to recreate the classic “digital rain” effect on the Raspberry Pi Pico, using up all the little microcontroller’s storage in the process.

Rather than rely on existing graphics libraries, [en0b] set about using a high-quality GIF for the animation. The original file was 8 MB, which was far too big to fit on the Pico. After some finagling in an image editor and with the help of a custom Python script, however, [en0b] managed to fit the 127-frame animation at 240 x 135 resolution into the 2 MB Flash onboard the chip. With the microcontroller hooked up to the 1.14″ IPS “Pico Display” from Pimoroni, the final looks great and faithfully recreates the aesthetic seen in the film.

[en0b]’s technique could reliably be used for displaying any GIF that you can cut down to 14 to 16 colors without losing too much quality. It’s not the world’s highest-end graphics format, but it does the job for little animations like these.

We’ve seen similar builds before too, using more heavy-duty hardware to build a magic 8-ball in much the same way. Meanwhile, if you’ve got your own neat little GIF hacks or Pico projects, don’t hesitate to send them in!

Tileable LED matrix

Tiny LED Matrix Panels Tile Together Perfectly

There’s a lot to admire about LED matrix projects, which more often than not end up looking really cool. But most of them rely on RGB matrix panels sourced from the surplus market, and while there’s nothing wrong with that, building your own tiny, tileable LED matrix panels makes these builds just a little bit cooler.

There’s a lot to admire about these matrix panels, not least of which is the seamless way they tile together. But to get to that point, [sjm4306] had a lot of prep work to do. He started with a much simpler 5×7 array, using the popular WS2812 RGB LEDs on a custom PCB. With a little practice under his belt, it was time to move to the much smaller SK6805 LEDs, which were laid out in an 8×8 matrix. The board layout is about as compact as it can be; [sjm4306] reports that it pushed the PCB fab to their limits, but he ended up with LEDs spaced perfectly on the board and just enough margin to keep consistent spacing in two dimensions when the boards are adjacent to each other.

Assembly of the boards was challenging, to say the least. The video below shows that the design left barely enough room for handling the LEDs with tweezers, and some fancy finagling was needed to get the boards on and off the hotplate for reflow. [sjm4306] says that he’ll be exploring JLC PCB’s assembly service in the future, since each board took an hour for him to assemble. But they look fantastic when daisy-chained together, with no detectable gaps at the joints.

With matrices like these, the possibilities are endless. We’ve even got a whole list of LED matrix projects over on Hackaday.io for you to check out.

Continue reading “Tiny LED Matrix Panels Tile Together Perfectly”