An Absurdly Clever Thermal Imaging Camera

Thermal imaging cameras, cameras able to measure the temperature of an object while taking a picture, are amazingly expensive. For the price of a new car, you can pick up one of these infrared cameras and check out where the drafts are in your house. [Max Justicz] thought he could do better than even professional-level thermal imaging cameras and came up with an absurdly clever DIY infrared camera.

While thermal imaging cameras – even inexpensive homebrew ones – have an infrared sensor that works a lot like a camera CCD, there is a cheaper alternative. Non-contact infrared thermometers can be had for $20, the only downside being they measure a single point and not multiple areas like their more expensive brethren. [Max] had the idea of using one of these thermometers along with a few RGB LEDs to paint different colors of light around a scene in response to the temperature detected by an infrared thermometer sensor.

To turn his idea into a usable tool, [Max] picked up an LED flashlight and saved the existing LED array for another day. After stuffing the guts of the flashlight with a few RGB LEDs, he added the infrared thermometer sensor and an Arduino to change the color of the LED in response to the temperature given by the sensor.

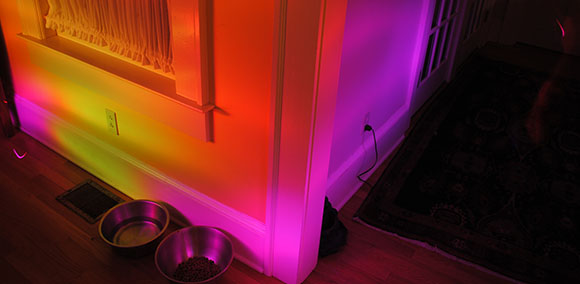
After that, it’s a simple matter of light painting. [Max] took a camera, left the shutter open, and used his RGB thermometer flashlight to paint a scene with multicolor LEDs representing the temperature sensed by the infrared thermometer. It’s an amazingly clever hack, and an implementation so simple we’re surprised we haven’t seen before.

Accurate Timers With An AVR

timer

An awful lot of microcontroller projects use timers to repeat an action every few minutes, hours, or days. While these timers can be as accurate as a cheap digital wrist watch, there are times when you need a microcontroller’s timer to measure exactly, losing no more than a few milliseconds a day. It’s not very hard to get a timer to this level as accuracy, as [Karl] shows us in a tutorial.

The problem with keeping time with a microcontroller has to do with the crystal, clock frequency, and hardware prescalers of your chip of choice. [Karl] started his project with an ATMega168 and a 20 MHz crystal and the prescaler set at 256. This made the 78.125 interrupts per second, but the lack of floating point arithmetic means one second for the microcontroller will be 0.9984 seconds to you and me.

[Karl]’s solution to this problem was to have the ATMega count out 78 interrupts per second for seven seconds, then count out 79 interrupts for one second. It’s not terribly complicated, and now [Karl]’s timers are as accurate as the crystal used for the ‘168’s clock.

Tentacles And Phalanges Made From Drinking Straws

arnie

He human hand is one of the most impressive pieces of machinery – biological, mechanical, or otherwise – that you’ll ever lay eyes on.  With two dozen degrees of freedom, the hand can gently caress the most fragile flower petal without bruising it, or beat a hammer into an anvil with tremendous force. Simulating the human hand, however, is quite a challenge that requires dozens of servos and complex mechanical linkages. [Tomdf] over on Instructables is able to create hands, tentacles, and other weird biological contraptions using spring-loaded drinking straws and custom-made 3d printed joints.

[Tomdf] got the idea for drinking straw phalanges after seeing a few 3D printed drinking straw connectors meant to be used for creating 3D objects out of disposable plastic tubes. After designing a new spring-loaded joint for drinking straws, [Tomdf] is able to add a few lengths of thread to serve as ligaments to control the segments of drinking straws. It’s a similar setup to the horrible demon spawn we saw at Maker Faire last year, but far more extendable for any project that might pop into your head.

You can check out the drinking straw tentacles in action after the break.

Continue reading “Tentacles And Phalanges Made From Drinking Straws”