An image of skyscrapers over a bay is shown, with some foliage along the bank. The sky and water are a pale blue-grey, while the foliage is pink.

Taking Tri-Camera True-Color Infrared Videos

Silicon-based CMOS camera sensors are cheap and plentiful, but they’re rarely used to their full potential: they can detect a greater range of wavelengths in the infrared spectrum than they can in the visible spectrum, but in most cameras this is blocked by an IR-cut filter. [Project 326]’s infrared camera system reverses this: it records infrared images in color while blocking out visible light.

The system uses three USB webcams, each with its IR cut filter removed and replaced with a different dichroic IR band-pass filter. One filter is centered at 750 nm, one at 850 nm, and one at 940 nm. There is no band overlap; in testing, each camera only detected an infrared flashlight tuned to its own filter wavelength. The original cameras didn’t hold the sensors in a consistent position, so [Project 326] designed new housings. Using three lenses, each with distinct aberrations, introduced some difficulties in alignment. [Project 326] originally intended to use a pair of beam-splitting prisms with only one lens, but this proved too difficult to align using 3D-printed frames.

A Raspberry Pi records a separate monochromatic stream from each camera, which can then be processed into a composite color video. The first frames need to be manually aligned, but afterwards a script can apply the alignment to the rest of the video. Finally, the channels are mapped to colors, with the precise mapping being freely changeable. There were some few unexpected issues: each camera has its own, not terribly precise, local oscillator, and they drifted apart by about one or two frames per minute. Parallax error, on the other hand, was less severe than might be expected: at close range it’s noticeable, but by a distance of 35 meters, it represents less than one pixel of distortion.

The resulting images look great, and it’s easy to forget that they’re being captured without the use of any visible light. We’ve seen a similar technique (though extending into the visible range) used to recreate the surreal effect of Aerochrome film.
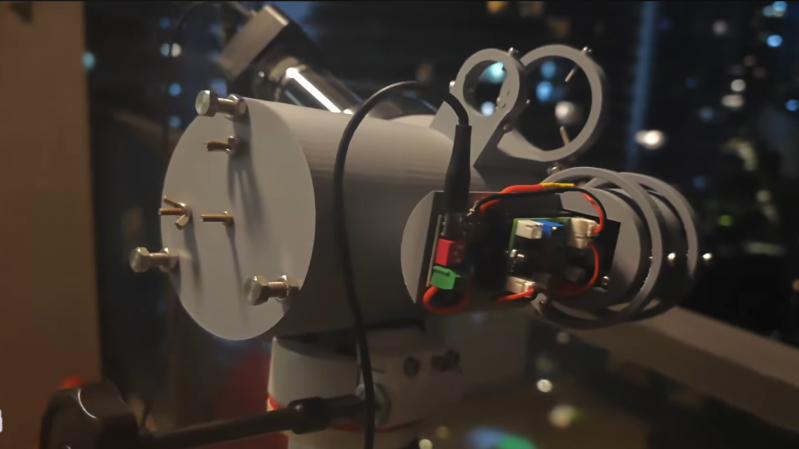
A 3D-printed telescope with an infrared laser on the side is pointed out the window of a building at night.

Long-Range Night Vision With An Infrared Laser

Most consumer-grade night vision devices are basically a standard camera without the usual filter to block near infrared (NIR) light, which are then paired with a NIR light source that’s not visible to the human eye. Unlike the passive night vision provided by an image intensifier tube, these can’t resolve objects beyond the beam of their illumination source. On the other hand, if, as [Project 326] did, you use an infrared laser to illuminate the scene, you can still get a very long range out of these devices.

[Project 326]’s device consists of a previously-built reflecting telescope focusing a distant scene in to a webcam with the infrared filter removed, with the infrared laser illuminating the scene. Finding a suitable laser took some effort: the first option, a secondhand fiber-coupled industrial laser, was accidentally over-volted and destroyed during testing. The second had a fiber output which proved extremely hard to terminate, and a third laser couldn’t be collimated correctly. The final laser was a Vertical-Cavity Surface-Emitting Laser (VSEL) diode array element driven at about two Watts and collimated by a small lens.

This illumination setup is safe at a long range, but only at a long range. The laser was strong enough to burn cardboard at close range, but out at about 500 meters, the beam had spread until it was less than a hundredth of the standard safety limit. To make sure that nothing else would get in the way of the beam, it was shone down from the top of a tall building. Testing with a power meter also showed that at a long range, the beam was weaker than expected. It turned out that the wavelength used (940 nm) is attenuated by water vapor, to the point that up to 70% of the beam’s strength was lost before reaching the target. Despite this, and despite a rather linear beam profile, a somewhat dark image was still visible at 650 meters.

If you’re looking for a somewhat more versatile long-range night vision device, check out one based on an image intensifier. Another approach is to use a very high-sensitivity camera.

Continue reading “Long-Range Night Vision With An Infrared Laser”

Your Own Santa? Thermal Camera Roundup

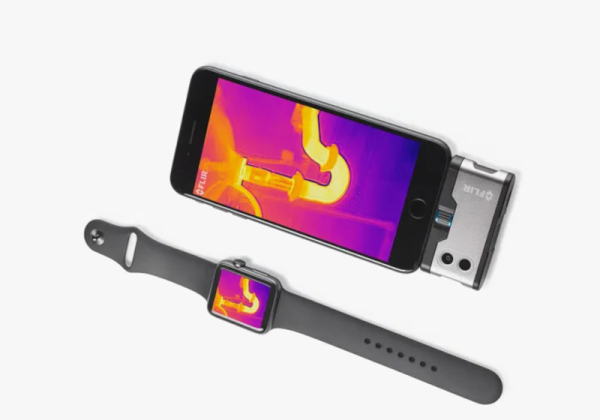
With Christmas and other end-of-year celebrations, there are gifts. The problem is that your loved ones don’t really know what to get you. Who can blame them? Do you want an Arduino, a Raspberry Pi, or a Blue Pill? Is that 3D printer on sale better than the one you have? Do you even want a second printer? They don’t know. In the best case, they’ll give you gift cards. But sometimes you just have to buy yourself something nice. [Wired] has a suggestion: a phone-based thermal camera. Which one? They have four suggestions ranging from about $150 to $200.

Different people have different reasons for wanting a thermal camera. You can see hot spots in electronics, for example. Or pick out hot water pipes behind walls. The resolution is limited. The highest in the [Wired] review is only 206×136. For the digital camera buffs, that’s 0.028 megapixels! Some cameras have even less resolution. For example, one of the cameras has an 80×60 resolution but uses an optical camera to give the illusion of a higher resolution.

Continue reading “Your Own Santa? Thermal Camera Roundup”

Turning A Tiny FLIR Into An Action Cam With FPGAs

FLIR are making some really great miniature thermal cameras these days, designed for applications such as self-driving cars, and tools that help keep firefighters safe. That’s great and all, but these thermal cameras are so cool, you really just want to play with one. That’s what [greg] was thinking when he designed a PCB backpack that captures thermal images from a FLIR Boson and stores it on an SD card. It’s a thermal action cam, and an impressive bit of FPGA development, too.

The FLIR product in question is a Boson 640, an impressive little camera that records in 640×512 resolution, with a 60 Hz update rate. This one’s got the 95° field of view, giving it a very good specification in a very small footprint. This is a huge improvement over FLIR’s Tau camera, for which [greg] built a breakout board with Ethernet and DDR memory a few years ago. Once he found out about the Boson, he figured a backpack PCB for this camera would be possible and a great excuse to teach himself FPGAs with a hands-on project.

With an impressive ability to find the perfect part, [greg] sourced a Lattice iCE40 FPGA in an 8×8 mm package along with an 8 Mbit HyperRAM in a 6×8 package. This combination allows for all the chips to fit behind the Boson camera. Add in an microSD card slot and a few connectors and this breakout board is very close to being a commercial product, for whatever forward looking infrared needs you might have.

The Sensors Automating Your Commute

In a bout of frustration I recently realized that the roads have all updated — most people have no idea how — and this sometimes hurts the flow of traffic. This realization happened when an unfortunate person stopped in a left turn lane well before the stop line. The vehicle didn’t trigger the sensor, so cycle after cycle went by and the traffic system never gave the left turn lane a green light, thinking the lane was unoccupied. Had the driver known about this the world would have been a better place. The first step in intelligent automation is sensing, and there are a variety of methods used to sense traffic’s flow.

Continue reading “The Sensors Automating Your Commute”

Make Your Own Infrared Camera On The Cheap!

This is a super fun hack that’s been around for ages — but now with cheap full 1080P HD camera availability, it’s probably a good time to make your own infrared camera!

It’s actually a very easy modification to perform. All cameras are capable of “seeing” infrared light, but for standard photography and video, you don’t want to see the infrared light. So most sensors just have an infrared filter in front of the sensor, to block out any excess infrared light. If you remove it … you have a converted infrared camera.

The following video shows exactly how to modify a camera to do this. It is a bit misleading though as it labels it as a thermal camera; and while it is seeing “infrared”, it’s not actually full thermal infrared, like a FLIR or Seek Thermal can see — it’s a mixture of visible and near infrared light. You will be able to see some hot things glowing through the camera, but not to the same degree as a real thermal imaging device. Continue reading “Make Your Own Infrared Camera On The Cheap!”

Cyclists Use Tiny Motors To Cheat

Blood doping is so last decade! The modern cyclist has a motor and power supply hidden inside the bike’s frame.

We were first tipped off to the subject in this article in the New York Times. A Belgian cyclocross rider, Femke Van den Driessche, was caught with a motor hidden in her bike.

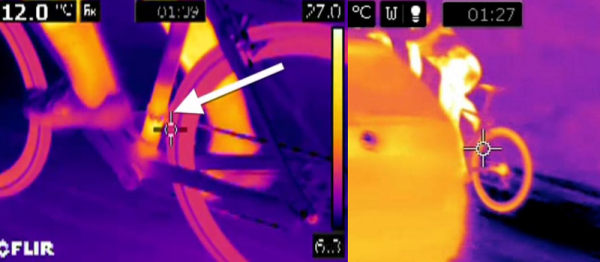
While we don’t condone sports cheating, we think that hiding a motor inside a standard bike is pretty cool. But it’s even more fun to think of how to catch the cheats. The Italian and French press have fixated on the idea of using thermal cameras to detect the heat. (Skip to 7:50 in the franceTVsport clip.) We suspect it’s because their reporters recently bought Flir cameras and are trying to justify the expense.

The UCI, cycling’s regulatory body, doesn’t like thermal. They instead use magnetic pulses and listen for the characteristic ringing of a motor coil inside the frame. Other possibilities include X-ray and ultrasonic testing. What do you think? How would you detect a motor inside a bike frame or gearset?