Arduino Using A Straight Key For Morse Code Assistance

arduino-morse-code-straight-key

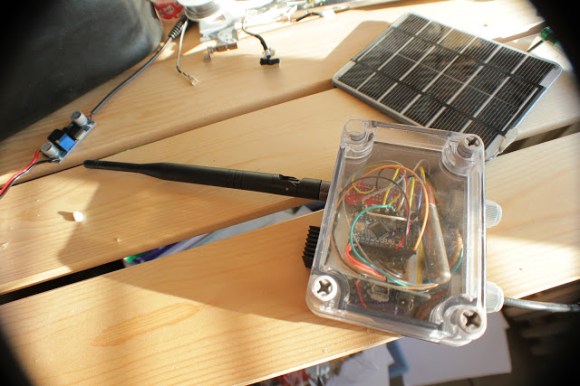
For those unfamiliar with Ham Radio, there are lots of fancy tools these days to make it easier for the radio operator. But enthusiasts still like to get back to basics, and one way to do this is to participate in Straight Key Night. This is when you pull out your traditional Morse code keyer and have a chat with others around the world. The most recent event was on New Year’s Eve. The only drag is that it sometimes takes a while to find another Ham who’s listening, and this can mean repetitively keying the letters QC SKN for long periods of time (QC invites listeners to respond, and SKN is to inform them you’re participating in Straight Key Night). Sure, a programmable keyer will do this for you, but that is against the spirit of the event. [Mike Herr] found a grey area by mechanically interfacing an Arduino with a straight key.

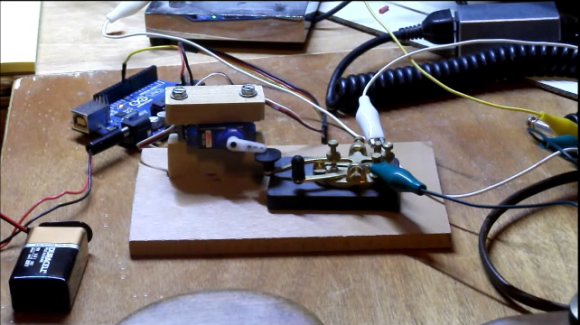
You can see the straight key being pressed by a hobby servo in the image above. The servo is driven by the Arduino, which will transmit the series of letters automatically. As you can see in the video after the break, once [Mike] hears back from a fellow operator he switches to a huge wooden straight key for the rest of the conversation.

Continue reading “Arduino Using A Straight Key For Morse Code Assistance”

Building A Rather Rudimentary Arduino Tank Bot

building-an-arduino-tankbot

The tank robot builds that we see are often quite complex. This lets them do great things, but makes the platform scary for beginners. Here’s a tank build that would be a great first project, especially if you’re more interested in the programming side of robotics than you are in the hardware itself. [Paul Bleisch] combined several different commercially available products to fabricate this Arduino-powered tank robot base.

Locomotion is provided by a double geared-motor module. This unit, the plastic wheels and treads, as well as the wooden mounting platform are all made by Tamiya. They cost very little and are already designed to work with one another. To this base he adds the Arduino and a motor shield which makes the connections dead simple. The black case on one end of the chassis holds four AA batteries which provide power for everything.

These components are all that’s really needed to start, but they provide no interactivity. So [Paul] picked up a used wireless PlayStation 2 controller. There’s a library (written by regular reader [Bill Porter]) that allows him to connect the receiver to the Arduino in order to pick up commands from the controller. He also plans to add an ultrasonic range finder to the build sometime in the future.

If you’re don’t need to do things the easy way you should consider fabricating your own tank treads.

OCR Automatically Reads A Power Meter

ocr-used-to-read-a-power-meter

[Chris] tried his hand at using Optical Character Recognition in his server power monitoring rig. The image above is what the IP camera used in the setup sees. He’s included a bright light to ensure that the contrast is as great as possible. After applying a threshold filter to the captured still, he is able to process the image to test all seven segments of every digit.

He uses Mathematica for the processing. We’re not familiar with the particulars of the language, but it’s easy enough to see the main parts of the program. Line six of his source code applies the image filters and then the program loops through the assigned location of each digit, testing segment combinations to ascertain what number is shown. Things get hairy when it comes to the decimal point. We gather that the meter can show varying degrees of precision based on the total number of digits needed (like a Digital Multimeter). But [Chris’] setup has a difficult time reliably detecting that decimal point because of its size. He uses a shortcut to get around this, knowing that his server never pulls less than 300W so he corrects the output (by multiplying it by ten) if the reading is below that benchmark.

Of course it would be easier to crack open the monitor and glean data electronically (that’s how the Tweet-A-Watt does it) but then [Chris] wouldn’t have had the fun of playing with OCR.

Tie Tack Sends Morse Code Seasons Greetings

morse-code-tie-tack

For [Davide Gironi] made a holiday tie tack this year. It’s not made to look like Santa Claus, Frosty, or a Christmas tree. He simply wishes you a Merry Christmas (‘Buon Natale’ in Italian) by flashing the message in Morse code.

Two LEDs have been added to a plain tie tack. It is tethered to the logic circuitry that provides power and drives the red and blue lights accordingly. As you can see in the video after the break, red signifies the end of a letter, and long or short blue flashes correspond to dashes or dots. This doesn’t require much horsepower so he’s gone with an 8-pin ATtiny13 microcontroller (you might be able to find one of these in a light bulb if you look hard enough). The rest of the equipment includes a few resistors, a push button, and a coin cell for power. [Davide] uses a byte-packing technique he learned from a different project to store each letter as an 8-bit packet which means there’s plenty of room to store your message in the chip’s memory.

Continue reading “Tie Tack Sends Morse Code Seasons Greetings”

Web-based TI Graphing Calculator Emulator

You can leave the TI graphing calculator at home thanks to this web-based TI-83 and TI-84 emulator. As with pretty much all emulators, this depends on a ROM image from the actual hardware to work. But if you have one of the supported calculators (TI-83+, TI-83+ SE, TI-84+, or TI-84+SE) you can dump the image yourself and this should work like a charm.

[Christopher Mitchell] calls the project jsTIfied because he wrote it in JavaScript and HTML5 (that’s where the js comes from) and it’s based on the Texas Instruments line of hardware (hence the capital TI). After agreeing that you’re not getting any ROMs from his site you can choose the file to load on your browser. The image of the calculator has working buttons and will show the boot screen just like the real thing. You can use it like normal but you can load load up programs for the environment. See this demonstrated after the break.

We’ve seen some arguments online about the price of the TI line over the years. Prices haven’t dropped much over the decades even though they’re making pretty much the same hardware. It’s cool to see someone figure out how to emulate the hardware — and on a web interface to boot! But we’re left wondering why TI isn’t selling an equivalent app for iOS and Android or at least leveraging what must be millions in each production run for a lower retail price?

Continue reading “Web-based TI Graphing Calculator Emulator”

Sump Pump Monitor Emails And Raises Alarm If Water Rises

sump_pump_overview

[Matt] literally finds himself in a sticky situation. There’s an oil slick in his sump well. These wells work in conjunction with drain tiles to pump water away from the foundation of a house. Unfortunately the tar that was used to waterproof the outside of his foundation is also washing into the sump and gumming up the works. The system he built will sound an audio alarm and send an email if something goes wrong with the sump pump.

He’s monitoring for two different issues. One technique uses a float valve to sense if the water is too high, signalling that the mechanism controlling the pump has malfunctioned. The other is a current monitor that senses if the sump pump has been running too long (caused by the sump’s water sensor getting stuck in the on position). The one thing he didn’t want to do is control the pump directly as a bug in his code will easily result in a flooded basement. We have the same concerns when considering building a DIY thermostat (an error there could mean frozen water pipes leading to flooding).

Solar Powered Wifi Radiation Sensor

Solar Radiation Detector

[Manish] packed lots of functionality into this radiation sensor module. The device is completely solar powered and weatherproof, so it can be mounted anywhere. It uses a Geiger Muller tube to monitor radiation and connects to the internet using wifi network to report the readings.

The design uses an Arduino Pro Mini to perform the monitoring and reporting. Wifi connectivity is provided by a RN-XV wifi module. A solar panel, Adafruit’s solar charger, and a LiPo battery are used to provide power to the device. It’s enclosed in Adafruit’s IP-66 rated weatherproof enclosure.

A custom Geiger Muller tube interface is used to interface with the tube. The interface is simple and cheap. It provides the high voltage required to drive the tube, and circuitry needed to detect the ionization events.

Once the device is connected to the internet, it uploads data directly to Cosm. This service lets the data be shared using Twitter, or accessed using an API. The project shows how to build a wireless networked sensor that directly connects to the internet for about $100.