We are all used to Fused Deposition Modeling, or FDM, 3D printers. A nozzle squirts molten material under the control of a computer to make 3D objects. And even if they’re usually rather expensive we’re used to seeing printers that use Stereolithography (SLA), in which a light-catalysed liquid monomer is exposed layer-by layer to allow a 3D object to be drawn out. The real objects of desire though are unlikely to grace the average hackspace. Selective Laser Sintering 3D printers use a laser on a bed of powder to solidify a 3D object layer by layer.
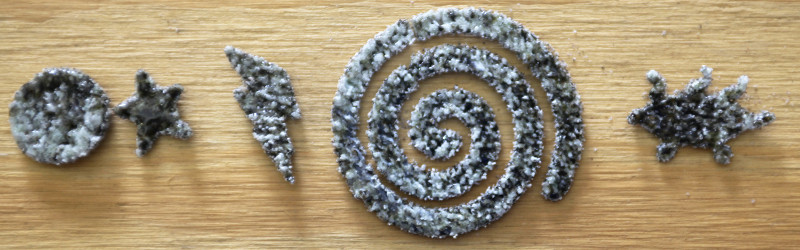
While an SLS printer may be a little beyond most budgets, it turns out that it’s not impossible to experiment with the technology. [William Osman] has an 80 W laser cutter, and he’s been experimenting with it sintering beach sand to create 2D objects. His write-up gives a basic introduction to glassmaking and shows the difference between using sand alone, and using sodium carbonate to reduce the melting point. He produces a few brittle barely sintered tests without it, then an array of shapes including a Flying Spaghetti Monster with it.
The results are more decorative than useful at the moment, however it is entirely possible that the technique could be refined. After all, this is beach sand rather than a carefully selected material, and it is quite possible that a finer and more uniform sand could give better results. He says that he’ll be investigating its use for 3D work in the future.
We’ve put his video of the whole process below the break, complete with worrying faults in home-made laser wiring. It’s worth a watch.
This project was inspired by a video of using sunlight to sinter sand, which we also covered back in 2011.


Instead of sand and soda you can buy glass bead blasting media (sieved glass powder). The lower melting point is built in and it’s cheap.
I also wonder if the pieces could be fired post-printing to just below the melting point like they do for powder metallurgy for densification.
That’s what I thought too. Glass bead media is cheap and an annealing heat treatment is definitely something to consider.
Likely NOT glass beads. because of their quite regular, spherical shape and clear look, they would reflect MUCH more light to the laser lens.
In fact this material has been used in SLM, directly: See: http://link.springer.com/article/10.1007/s00170-015-8051-9
and as a filler
Glass spectral absorption rate is 80% at the typical 10.6 µm wavelength of a CO2 Laser, so don’t worry about reflection or transmission of the beam.
obsidian would be a better choice. Black sand, or industrial blasting medium
Black sand is generally hematite, which melts about 100 C than silica sand. Occasionally it’s basalt, but as with all building materials it depends on what locality you’re in.
Magnetite sand is not expensive and has a very similar melting point to silicone dioxide so the two should blend well and the magnetite will also improve absorption of the beam energy. But you can just extrude the mix with some gum binder and microwave it to get the same effect as magnetite is a microwave susceptor. You can also use carbon with the laser and sand and then etch it out, perhaps, with piranha solution AKA Caro’s acid.
silicon dioxide
Add a vibrating, descending bed with a powder feed system and it’s a metal sintering 3D printer. Make one off “castings” from CAD/CAM files.
good luck finding the right parameters for dimensional integrity, that is a nightmare in its own.
Would need to add a vacuum chamber for all that, otherwise the metal will oxidize upon melting and give poor results.
BUT, yes, should be tried.
Was going to say that! Awesome idea, but inert/vacuum required.
Flood the chamber with inert gas, just like welding. its enclosed and would easily keep the gas inside with a slow but steady supply.
bowl/bucket shaped container around the outside of the build area, co2 in place of the air line for the nozzle
Oxidation is an issue, but as others have pointed out, an inert gas will do. I’ve done this on an industrial scale with metal powder feeders and a 2kW diode laser. In industry we called it laser cladding. I wish I had something I could link to, but its mostly proprietary.
Perhaps Optomec would be a good example?
http://www.optomec.com/additive-manufacturing/
Oxidize is your least concern. While a metal fire you most likely create is chemically seen an oxidizing process, it is rather more spectacular than a rusting piece of metal.
Steel, Aluminum and even Titanium are very combustible in powder form. As a bonus they are very hard to extinguish once they are burning.
Than technically, oxidizing is you greatest concern…
I’d like to build one of these: https://www.youtube.com/watch?v=ptUj8JRAYu8
then make these: http://www.mecoconcept.com/en/home/
Most beach sand, unless at the outlet of a river, is largely calcium carbonate from crushed coral and crustacean shells. For glass you want inland sand (like on lake shores and river beds, sand dunes, or decomposed granite) which is mostly silicon dioxide. Beach sand can have a little but the proportions are all wrong. Much stronger results will come from using SiO2 based sand (plus some other components).
The south Texas beach sand I’ve examined is almost entirely quartz and very little calcium carbonate. Every beach is different.
Use a pure sand instead of that mixed type. Dry the sand in an oven first so it does not “spit” as it did.
I’m curious why people aren’t using powdered plastics.
What type of laser?
Try it on fine diatomaceous earth
This sounds like a solution for Mars or the Moon!
It’s funny, one of my students tried the same thing about a year ago, and we thought that using pure silica used to make glazes might work but never pushed it further. I see now that it would not work because of the thermal expansion.
We used some regular playground sand, screened it a bit, but we had to offset the focus of the laser quite a lot (something like 3 or 4 cm, maybe more) to get a hot disc instead of a hot point, helping in fusing the particles together. The process was very long with our 60W laser, but we were able to produce a ring about 30 cm ext / 15cm in diameter.
The piece was very fragile, and it was bending and cracking for weeks, finally being destroyed in a dozen or so pieces. Might be a combination of internal stress, poor structure and ambiant temperature and humidity.
I might try it again, but with a firing in the ceramics kiln after the sintering.
Instagram pic for “proof” we did it :)
https://www.instagram.com/p/-1xNKMTTsp/?taken-by=esaaa_lab
It looks like you got a very flat result compared to the ones in this posting. Do you think this is the case, or is it just that it wasn’t well captured in the photo?
We mostly produced flat discs and rings, kind of a ‘single layer’ printing (we didn’t try to make a pass, put fresh sand on top, and make another pass). The thickness was around 1~1.5mm though.
What is the laser you are using homemade or bought?