Laser Cut LEGO In MDF

It’s hard not to be a fan of LEGO. The humble plastic bricks from Denmark enabled many a young engineer to bring their architectural and mechanical fantasies to life. But one limitation was that you were stuck using the bricks LEGO designed. Thankfully, [John Sokol] has come up with a way to laser cut his own LEGO-compatible bricks, and provided the tools so you can do the same.

After hacking an OpenSCAD script to generate just the top pins of the block, [John] exported an SVG into Inkscape so that he could scale the pins properly before exporting a final PNG for the lasercutter. Using RDWorks, [John] was able to find an engraving setting that worked well with dry-erase whiteboard MDF — an unusual material for a brick, but functional nonetheless. The key here is that the engraving setting takes away just enough material to create a raised pin on the part, without cutting all the way through the MDF or burning the surface.

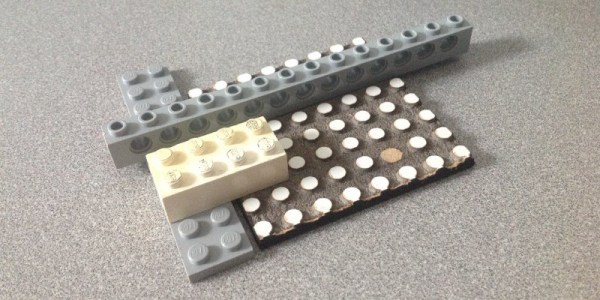
Despite some damage when removing the work piece from the laser cutter, the part mates up well with the official LEGO brand parts. We’d be interested to see how the MDF cut parts hold up over time compared to real LEGO bricks made in ABS, which seem to last forever.

This isn’t the first make-your-own-LEGO hack we’ve seen – maybe you’d like to 3D print your own bricks on a printer made of LEGO?

Voice Activated Fireplace Is As Cool As It Gets

A fireplace can add a cozy, relaxed atmosphere  — and a touch of style — to any home. Redditor [hovee] saw the opportunity to add some flair to his gas fireplace by making it voice activated. Check out the video of it in action below.

Google Home and Google Assistant provides the voice recognition component. A Raspberry Pi 3 with Home Assistant does the legwork. An iTach TCP/IP-to-Contact-Closure relay toggles the fireplace, and an IFTTT account connected to Google Assistant brings it all together.

[hovee] then ran some thick 16/2 wire from the relay network port to the fireplace’s remote receiver circuit to actually turn it on. Some custom code and configuration of the Home Assistant files was necessary, but [hovee] has shown his work, with some tips besides, if you want to throw together a similar setup. It’s a help if your fireplace has a ‘remote’ setting, and a double bonus if there is documentation for the fireplace to be found that will help with the build process.

Once done, all you need to do is kick back with your favorite beverage in the lap of home automated luxury. Just be sure you have a backup to turn off your fireplace just in case your setup goes the way of Skynet. While you’re at it, you can set up your fireplace to save energy as well.

[via /r/homeautomation]

Continue reading “Voice Activated Fireplace Is As Cool As It Gets”

USB Etch-a-Sketch-Style Mouse Is More Analog Than You’d Think

[Mitxela] wanted to build a different kind of mouse, one that worked like an Etch-a-Sketch toy with one X knob and one Y knob. Armed with some rotary encoders and a microcontroller, that shouldn’t be hard. But when you use a pin-limited ATtiny85, you are going to need some tricks.

The encoders put out a two-bit Gray code and close a button when you depress them. Plus you need some pins for the V-USB stack to handle the USB interface. [Mitxela] decided to convert the encoders  to output analog voltages using a simple resistor DAC. That would only require two analog inputs, and another anlaog input could read both switches.

One problem: there still wasn’t quite enough I/O. Of course, with AVRs you can always repurpose the reset pin as an analog pin, but you lose the ability to program the device at low voltage. And naturally, there’s a workaround for this too, allowing you to keep the reset pin and still read its analog value. You just have to make sure that value doesn’t go below about 2.5V so the device stays out of reset. Once that was in place, the rest went easy, as you can see in the video below.

Continue reading “USB Etch-a-Sketch-Style Mouse Is More Analog Than You’d Think”

Sintering Sand WIth A Laser Cutter

We are all used to Fused Deposition Modeling, or FDM, 3D printers. A nozzle squirts molten material under the control of a computer to make 3D objects. And even if they’re usually rather expensive we’re used to seeing printers that use Stereolithography (SLA), in which a light-catalysed liquid monomer is exposed layer-by layer to allow a 3D object to be drawn out. The real objects of desire though are unlikely to grace the average hackspace. Selective Laser Sintering 3D printers use a laser on a bed of powder to solidify a 3D object layer by layer.

The laser creating a ring.

While an SLS printer may be a little beyond most budgets, it turns out that it’s not impossible to experiment with the technology. [William Osman] has an 80 W laser cutter, and he’s been experimenting with it sintering beach sand to create 2D objects. His write-up gives a basic introduction to glassmaking and shows the difference between using sand alone, and using sodium carbonate to reduce the melting point. He produces a few brittle barely sintered tests without it, then an array of shapes including a Flying Spaghetti Monster with it.

The results are more decorative than useful at the moment, however it is entirely possible that the technique could be refined. After all, this is beach sand rather than a carefully selected material, and it is quite possible that a finer and more uniform sand could give better results. He says that he’ll be investigating its use for 3D work in the future.

We’ve put his video of the whole process below the break, complete with worrying faults in home-made laser wiring. It’s worth a watch.

Continue reading “Sintering Sand WIth A Laser Cutter”

Akiba: Shenzhen In 30 Minutes

Multi-talented hacker extraordinaire and electrical engineer [Akiba] is based in Japan, and this makes it just a hop, skip, and a jump over to Shenzhen, China, the hardware capital of the world. He’s led a number of manufacturing tours aimed at acquainting hackers with the resources there, and now he’s giving you the benefit of his experience in a 30-minute video. It’s great.

Continue reading “Akiba: Shenzhen In 30 Minutes”

Official: Pebble Ceases Hardware Production

Today Pebble has announced that it will cease all hardware production. Their outstanding Kickstarter deliveries will not be fulfilled but refunds will be issued. Warranties on all existing hardware will no longer be honored. However, the existing smartwatch service will continue… for now.

This isn’t unexpected, we ran an article yesterday about the all-but-certain rumors FitBit had acquired Pebble (and what led to that). Today’s news has turned speculation about Pebble 2 and Pebble Core Kickstarter campaigns into reality. You won’t get your hands on that fancy new hardware, but at least backers will have the money returned.

Perhaps the most interesting part of today’s blog post from the founder of Pebble, Eric Migicovsky, is about how this impacts more than a million watches already in the wild. Service will continue but (wait for it) “Pebble functionality or service quality may be reduced in the future.”

It’s not like this is a unique problem. Devices purchased by consumers that are dependent on phoning home to a server to function is a mounting issue. Earlier this year [Elliot Williams] coined this issue “Obsolescence as a Service” which is quite fitting. Anyone who still has a functional first generation iPad has enjoyed reduced quality of service; without available upgrades, you are unable to install most apps. It’s zombie hardware; electrons still flow but there’s no brain activity.

One of the perks associated with FitBit acquiring Pebble is that they have decided to keep those servers running for watches in the field. A cynic might look at the acquisition as FitBit reducing competition in the market — they wouldn’t have let hardware production cease if they were interested in acquiring the user base. At some point, those servers will stop working and the watches won’t be so smart after all. FitBit owns the IP which means they could open source everything needed for the community to build their own server infrastructure. When service quality “reduced in the future” that’s exactly what we want to see happen.

Assembly Required: Subroutine Calls And The 1K Challenge

The first computer I personally owned had 256 bytes of memory. Bytes. The processor in my mouse and keyboard both have more memory than that. Lots more. Granted, 256 bytes was a bit extreme, but even the embedded systems I was building as part of my job back then generally had a small fraction of the 64K bytes of memory they could address.

Some people are probably glad they don’t have to worry about things like that anymore. Me, I kind of miss it. It was often like a puzzle trying to squeeze ten more bytes out of an EPROM to get a bug fix or a new feature put in. I though with the 1K challenge underway, I might share some of the tricks we used in those days to work around the small memory problems.

Continue reading “Assembly Required: Subroutine Calls And The 1K Challenge”