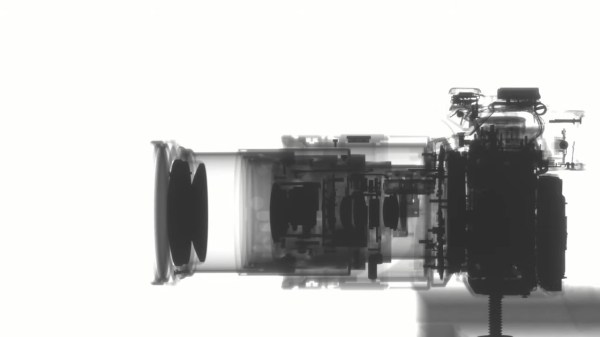
posted Feb 9th 2012 8:58am by
Mike Szczys
filed under:
security hacks

[Navic] added a slew of abilities to his RFID reader. It’s now a full-featured RFID reader and smart card writer with extras. When we looked at it last time the unit was just an RFID and smart card reader in a project enclosure. You could see the RFID code of a tag displayed on the LCD screen, but there wasn’t a lot more to it than that.
The upgrade uses the same project enclosure but he’s added four buttons below the display. These allow him to access the different features that he’s implemented. The first one, which is shown in the video after the break, allows him to store up to six tags in the EEPROM of the Basic Stamp which drives the unit. He can dump these tag codes to a smart card (pictured above), but also has the option of interfacing with a PC to read from and write to that card.
We don’t think you can directly write RFID tags with the device, but we could be wrong.
Read the rest of this entry »
posted Feb 8th 2012 12:01pm by
Mike Szczys
filed under:
Hackaday links
Most useless machine

We love ‘em, and we hope you do too. Here’s [Phase2plus'] take on the most useless machine.
Scratching like it’s 1989

[Nick] spent three bucks at the thrift store and ended up buying days worth of fun with this cassette player. He hacked it to scratch like vinyl.
3D printed jawbone

This lady now has her own 3D-printed jawbone. We’re not talking about the Bluetooth headset… it’s an actual bone replacement! And yes, the skeleton for the Terminator was 3D printed… we’re that much closer now. [Thanks Steve]
Hexbug superbowl

Why not let robots decide our sports gambling choices? [Eric] let this slew of HexBugs battle it out as an early indicator for who would win the Super Bowl. Seems he has no shortage of the little toys, all of which received an MSP430 upgrade. The firmware actually implements obstacle avoidance, but he makes a poke at the Chicago Bears who seem to have the same mission.
Foil fix for worn out remotes

[Viktor] found an interesting repair tip. If you’ve got remote controlers whose buttons are not working so well anymore you may be able to fix them with tin foil. He uses a single-hole punch to clip out circles which are attached to the underside of the misbehaving button. Worth a try!
posted Feb 8th 2012 11:01am by
Mike Szczys
filed under:
multitouch hacks

To us it makes a lot of sense to hold the tablet in one hand and type with the other. That’s exactly how [Adam Kumpf] has implemented this one-handed typing interface which was originally conceived by [Doug Engelbart].
As you can see, there’s a large contextual area for each finger on your right hand. Letters and navigational keystrokes are input through this interface based on single touches, or combinations up to and including all five digits. This offers up 32 possible combinations (including all on and all off) which is enough to cover the modern English alphabet.
[Adam's] demo page works for most tablets so give it a whirl. Yes, it works with iDevices too which is a surprise as we would have thought this was using Flash. If you’re not near a touch-sensitive device you can get the gist of the operation from the demo video embedded after the break.
Now, who’s going to be the first to make this into a replacement keyboard on iOS 5?
Read the rest of this entry »
posted Feb 8th 2012 10:01am by
Mike Szczys
filed under:
wireless hacks

[Abhimanyu Kumar] has been hard at work building and posting about his quadcopter. So far he’s published ten installments for this build, letting us relive the adventure vicariously. But it’s number 11 that we’re really excited about as he plans to share the first free-flight footage in that one.
The bug was planted in his brain after hearing that a quadcopter was used to shoot some of the footage in Spiderman 2. He wanted one to call his very own but the cost of a ready-made unit was out of his league. So he decided to build one instead. The first version uses aluminum bracket for the cross making up the motor mounts. He added LEDs to liven things up and even made a demo video of the thing tied to a table (no IMU yet so free flight would be fatal). After this stepping stone he decided to go with a Wii Motion Plus and Wii Nunchuck as the positioning feedback sensors. There is also a body redesign with helps lighten the load.
It’s a fun project, and we can’t wait to see where he goes from here!
posted Feb 8th 2012 8:51am by
Mike Szczys
filed under:
green hacks

Add some fruit to your indoor bounty with this hydroponic strawberry farm. [Dino] whipped this up as his 45th hack a week episode (getting pretty close to his year-long goal). He used parts you probably already have sitting around the house somewhere. But even if you bought everything and used it once you still wouldn’t be out much.
A plastic storage container serves as the base. [Dino] also grabbed four identical plastic containers (large yogurt containers would work here) to host the plants. He cut off the bottom half and inserted some netting to keep the plant from falling through. After tracing the size of the container on the enclosure’s lid he cut out holes which will host each plant. This provides a way to dangle the roots into the nutrient solution which is kept oxygen rich with an aquarium pump and two air stones. It certainly deserves a place next to that salad farm you threw together. Don’t miss [Dino's] build video after the break.
Read the rest of this entry »
posted Feb 7th 2012 2:01pm by
Mike Szczys
filed under:
cons,
Microcontrollers

It used to be that the contents of your pocket protector directly mirrored your geek level. But that just doesn’t cut it in our fast-paced digital age. We think [Jonathan] is headed down the right track though, by creating a scrolling LED name badge which he takes to conventions with him. With the right enclosure this could reach the same geek level as Woz’s watch. There’s a lot packed into the little device, but readability at close range doesn’t look like one the features so make sure you glance at the tag before you approach him for a conversation.
As you can see, the PCB for the project is the same form factor as a landscape ID card. It hosts an 8×5 LED matrix, which meshes nicely with the registers of the MSP430 chip which runs it. He admits that the hardware may not last very long as the chip is multiplexing the display directly, with no resistors or LED drivers for current protection. But there is potential in the design. It uses a rechargeable battery (which we like) and he included a QR code in the board artwork for easy exchange of contact information. We’ve embedded his description of the project after the break. Read the rest of this entry »
posted Feb 7th 2012 1:01pm by
Mike Szczys
filed under:
Microcontrollers

[Quinn Dunki] got some free stuff from Element14 to evaluate, including this Mircrochip WiFi module. It’s been used as the centerpiece of an Arduino shield in the past, and she grabbed a copy of that library to see if it would play nicely with an ATtiny chip. What follows is a struggle to de-Arduino the code so that it’s portable for all AVR controllers.
This module is one of the least expensive ways to add WiFi to a project, coming in at around $23. But it’s not really an all-in-one solution as there’s still a huge software hurdle to cross. The hardware provides access to to radio functions needed to communicate with the network, but you need to supply the TCP/IP stack and everything that supports it. Hence the re-use of the Arduino library.
Battling adversity [Quinn] fought the good fight with this one. Switching from an ATtiny to the ATmega168, compiling more code, and troubleshooting the process. She used a single LED as feedback, and can get some connectivity with her hotspot. But to this point she hasn’t gotten everything up and running.
We’re hot for an AVR WiFi solution that is cheap and easy to use. But as we see here, the software is complex and perhaps best left up to beefier hardware like the ARM controllers. What do you think?
posted Feb 7th 2012 12:01pm by
Mike Szczys
filed under:
tool hacks

If you’re just getting into hobby electronics chances are there are lots of tools you’d like to get you hands on but can’t yet justify the purchases. Why not build some of the simpler ones? Here’s a great example of a 4-channel logic analyzer that can be your next project and will add to your arsenal for future endeavors.
As you can see, [Vassilis'] creation uses a cellphone-sized LCD screen as the output. It is powered by four rechargeable batteries and driven by an ATmega8 microcontroller. He’s designed the tool without power regulation, relying on the ATmega’s rather wide range of operating voltages, and a few diodes to step down that voltage for the LCD screen.
As you can see in the clip after the break, alligator leads can be used to connect the test circuit to the inputs (don’t forget the ground reference!). Thee buttons at the bottom let you navigate the captured data by panning and zooming. Perhaps the best design feature is the single-sided circuit board which should be quite easy to reproduce at home.
Read the rest of this entry »