showing the ramp and sprayer of the cider press

The Spiced (Cider) Must Flow

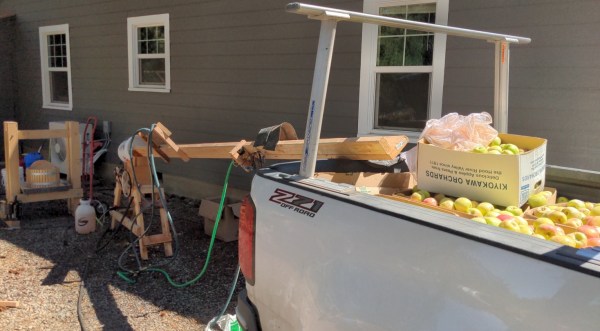
A fresh-squeezed glass of orange juice with breakfast seems like a trope that’s straight from a late 1980s sitcom. Making orange juice is easy; press until the liquid comes out. Apple juice (and, by extension, apple cider) is the same principle but requires much more force to squeeze out the juice. So what if you, like [Peter], have 900 lbs (408.2 kg for those metrically minded) of apples that you want to make cider out of? The obvious solution is to create a somewhat automated homemade cider press with lasers.

An earlier effort to make 25 gallons of cider took several full days of struggle for four people, so [Peter] knew he had to plan better next year. [Peter’s wife] milled and glued red oak into a large, sturdy frame that could press down with proper force and not break. [Peter] reached out to the local metal shop to fabricate a stainless steel tray with a custom drain. The cider basket itself and the pressboard were maple with waterproofing oil.

However, just because you can press apples, doesn’t mean you’re ready to make cider. They still need to be washed, cut, and ground into a pulp. A ramp was fashioned that it could be set in a truck bed with sprayers to wash the apples as they rolled by. A laser circuit with an LM393 opamp and a photoresistor allowed the sprayers to only activate when there was actually an apple to spray. Apple grinders are tricky as they need to survive the drop of several one-pound balls while staying at a reasonable speed. The grinder dispenses the pulp into a mesh nylon bag in a 5-gallon bucket, ready to be pressed. For the curious reader, 900lbs of apples yielded 60 gallons of delicious cider.

If you’re looking for a smaller scale press, here’s a cider press that’s a little simpler to make.

Exploring The Healing Power Of Cold Plasma

It probably won’t come as much surprise to find that a blast of hot plasma can be used to sterilize a surface. Unfortunately, said surface is likely going to look a bit worse for wear afterwards, which limits the usefulness of this particular technique. But as it turns out, it’s possible to generate a so-called “cold” plasma that offers the same cleansing properties in a much friendlier form.

While it might sound like science fiction, prolific experimenter [Jay Bowles] was able to create a reliable source of nonthermal plasma for his latest Plasma Channel video with surprisingly little in the way of equipment. Assuming you’ve already got a device capable of pumping out high-voltage, all you really need to recreate this phenomenon is a tank of helium and some tubing.

Cold plasma stopped bacterial growth in the circled area.

[Jay] takes viewers through a few of the different approaches he tried before finally settling on the winning combination of a glass pipette with a copper wire run down the center. When connected to a party store helium tank and the compact Slayer Exciter coil he built last year, the setup produced a focused jet of plasma that was cool enough to touch.

It’s beautiful to look at, but is a pretty light show all you get for your helium? To see if his device was capable of sterilizing surfaces, he inoculated a set of growth plates with bacteria collected from his hands and exposed them to the cold plasma stream. Compared to the untreated control group the reduction in bacterial growth certainly looks compelling, although the narrow jet does have a very localized effect.

If you’re just looking to keep your hands clean, some soap and warm water are probably a safer bet. But this technology does appear to have some fascinating medical applications, and as [Jay] points out, the European Space Agency has been researching the concept for some time now. Who knows? In the not so distant future, you may see a similar looking gadget at your doctor’s office. It certainly wouldn’t be the first time space-tested tech came down to us Earthlings.

Continue reading “Exploring The Healing Power Of Cold Plasma”

A Guide To Designing A Custom RC Controller

These days, there are tons of RC controllers out there of all shapes and sizes. However, if you want to build something with just the right amount of buttons and sticks for your application, you might want to design something yourself. That’s precisely what [Sebastian] did. 

The project actually began some time ago, with [Sebastian] sharing his process for building a custom ergonomic enclosure through the use of clay and photogrammetry, which we’ve covered before.

Inside that shapely housing, the build relies on a STM32 microcontroller, hooked up to a series of potentiometers, buttons, and a thumbstick (more potentiometers). A NRF24L01 module is used to handle the radio transmission side of things.

Overall, [Sebastian] has produced a great guide to designing a custom RC controller from the ground up, rather than simply instructing one how to replicate his own build. Armed with these skills, any maker should be able to whip up their own entirely bespoke controllers. Video after the break.

Continue reading “A Guide To Designing A Custom RC Controller”

Low-Cost Computer Gesture Control With An I2C Sensor

Controlling your computer with a wave of the hand seems like something from science fiction, and for good reason. From Minority Report to Iron Man, we’ve seen plenty of famous actors controlling their high-tech computer systems by wildly gesticulating in the air. Meanwhile, we’re all stuck using keyboards and mice like a bunch of chumps.

But it doesn’t have to be that way. As [Norbert Zare] demonstrates in his latest project, you can actually achieve some fairly impressive gesture control on your computer using a $10 USD PAJ7620U2 sensor. Well not just the sensor, of course. You need some way to convert the output from the I2C-enabled sensor into something your computer will understand, which is where the microcontroller comes in.

Looking through the provided source code, you can see just how easy it is to talk to the PAJ7620U2. With nothing more exotic than a switch case statement, [Norbert] is able to pick up on the gesture flags coming from the sensor. From there, it’s just a matter of using the Arduino Keyboard library to fire off the appropriate keycodes. If you’re looking to recreate this we’d go with a microcontroller that supports native USB, but technically this could be done on pretty much any Arduino. In fact, in this case he’s actually using the ATtiny85-based Digispark.

This actually isn’t the first time we’ve seen somebody use a similar sensor to pull off low-cost gesture control, but so far, none of these projects have really taken off. It seems like it works well enough in the video after the break, but looks can be deceiving. Have any Hackaday readers actually tried to use one of these modules for their day-to-day futuristic computing?

Continue reading “Low-Cost Computer Gesture Control With An I2C Sensor”

Centaur Costume Features Drinks Cooler And Walking Legs

Let’s say it’s Halloween, and you’re a big fan of centaurs. At the same time, you want to be easily able to store your drinks on ice and always have them to hand. Well, this costume from [David Yakos] might be the one for you.

Construction is simple. Two small bike wheels were fitted to the cooler using bits of a broken chair, and the other end of the cooler is simply fitted around the wearer’s waist with a strap.

The rear centaur legs are carved out of foam board, and attached to the rear wheels with a bolt through the spokes. The top of each leg is attached to a rod, which slides into the frame holding the wheels on. It keeps the top of the legs roughly where they should be but lets them move, allowing the legs to “walk” as the wheels rotate.

It’s not exactly an advanced build, but we simply love the idea of costumes that keep drinks cold all night. Hiding the cooler as a centaur’s body is really just the icing on the cake. Of course, if you’ve got your own costume design for keeping your beverages chilled and frosty, do let us know. Video after the break.

Continue reading “Centaur Costume Features Drinks Cooler And Walking Legs”

Children playing a zombie shooting game on a big screen

Halloween Game Lets You Shoot Zombies With A Laser-Powered Crossbow

Suppose you were looking for all the essential elements to make a great Halloween-themed shooting game. Zombies? Check. Giant “lasers”? Check. Crossbows shooting forks? We’ve got you covered. Check out “Fork The Zombies“, which was set up by [piles.of.spam] to entertain the neighborhood kids this Halloween.

The game is played on a big screen, which shows a horde of angry zombies marching toward the player, who has to shoot as many as possible before they reach the front of the screen. The weapon provided is a crossbow; when the trigger is pulled, a fork is launched and hopefully skewers one of the ghouls. The game was written using an open-source engine called Urho3D, which takes care of all the hard-core 3D and physics work, allowing the user to focus on designing the gameplay and visuals.

A wooden crossbow game controller
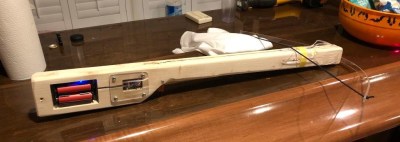
To give the game a bit more of a physical feel, [piles.of.spam] made an actual crossbow for the player to wield. Its handle was cut from a scrap piece of wood, using a band saw for the general shape and a CNC machine for the delicate cut-outs that hold a laser pointer, an ESP32 and a microswitch-based trigger. The laser shines onto the game screen, while the ESP32 sends out a data packet over WiFi when the trigger is pulled.

The location of the shot is tracked using a clever trick: a webcam is pointed at the screen, with a red color filter in front. This way, it only sees the red laser dot moving across the screen. The resulting image is processed using the Python OpenCV library, which provides functions to convert the relative motion of the pointer on the screen to an absolute position along the playing field.

A webcam on top of a Jetson Nano, with a red color filter in frontThe computing hardware consists of a pair of Jetson Nano boards, which sport quad-core ARM A57 CPUs as well as powerful graphics hardware to generate the game’s visuals. The end result is impressive, especially given the fact that all of this was designed and built in just three weeks. It was apparently a great hit with its intended audience, as visitors queued to try their hand at shooting the hungry zombies.

Laser pointers are an obvious tool for creating shooting games: we’ve seen ones with a single round target, a set of shapes set up around you, and even metal cans that fall over and stand up again. But if you need to protect yourself in case of an actual zombie apocalypse, a slingshot that shoots knives might be more useful.

Continue reading “Halloween Game Lets You Shoot Zombies With A Laser-Powered Crossbow”

Hackaday Podcast 144: Jigs Jigs Jigs, Fabergé Mic, Paranomal Electronics, And A 60-Tube Nixie Clock

Hackaday editors Elliot Williams and Mike Szczys get caught up on the week that was. Two builds are turning some heads this week; one uses 60 Nixie tube bar graphs to make a clock that looks like the sun’s rays, the other is a 4096 RGB LED Cube (that’s 12,288 total diodes for those counting at home) that leverages a ton of engineering to achieve perfection. Speaking of perfection, there’s a high-end microphone built on a budget but you’d never know from the look and the performance — no wonder the world is now sold out of the microphone elements used in the design. After perusing a CNC build, printer filament dryer, and cardboard pulp molds, we wrap the episode talking about electronic miniaturization, radionic analyzers, and Weird Al’s computer.

Take a look at the links below if you want to follow along, and as always, tell us what you think about this episode in the comments!

Direct download (55 MB)

Continue reading “Hackaday Podcast 144: Jigs Jigs Jigs, Fabergé Mic, Paranomal Electronics, And A 60-Tube Nixie Clock”