the conversion from hynix SRAM to FRAM on a Pokemon Yellow PCB

Pokemon Time Capsule

The precious Pokemon we spent hours capturing in the early nineties remain trapped, not just by pokeballs, but within a cartridge ravaged by time. Generally, Pokemon games before the GameBoy Advance era had SRAM and a small coin cell to save state as NVRAM (Non-volatile random access memory) was more expensive. These coin cells last 10-15 years, and many of the Pokemon games came out 20 years ago. [9943246367] decided to ditch the battery and swap the SRAM for a proper NVRAM on a Pokemon Yellow cartridge, 23 years later.

The magic that makes it work is a FRAM (ferroelectric random access memory) made by Cypress that is pin-compatible with the 256K SRAM (made by SK Hynix) on the original game cartridge PCB. While FRAM data will only last 10 years, it is a write-after-read process so as long as you load your save file every 10 years, you can keep your Pokemon going for decades. For stability, [9943246367] added a 10k pull-up on the inverted CE (chip enable) pin to make sure the FRAM is disabled when not in use. A quick test shows it works beautifully. Overall, a clever and easy to have to preserve your Pokemon properly.

Since you’re replacing the chip, you will lose the data if you haven’t already. Perhaps you can use [Selim’s] Pokemon Transporter to transport your pokemon safely from the SRAM to the FRAM.

South Korean KSLV-2 Nuri Rocket Almost Orbits

There was a bit of excitement recently at the Naro Space Center on Outer Naro Island, just off the southern coast of the Korea Peninsula. The domestically developed South Korean Nuri rocket departed on its inaugural flight from launch pad LB-2 at 5pm in the afternoon on Thursday, 21 Oct. The previous launch in the KSLV-2 program from this facility was in 2018, when a single-stage Test Launch Vehicle was successfully flown and proved out the basic vehicle and its KRE-075 engines.

This final version of the three-stage Nuri rocket, formally known as Korean Space Launch Vehicle-II (KSLV-2), is 47.2 m long and 3.5 m in diameter. The first stage is powered by a cluster of four KRE-075 sea-level engines having 3 MN of thrust. The second stage is a single KRE-075 vacuum engine with 788 kN thrust, and the final stage is a KRE-007 vacuum engine with 69 kN thrust (all these engines are fueled by Jet-A / LOX). In this maiden flight, the first two stages performed as expected, but something went wrong when the third stage shut off prematurely and failed to gain enough velocity to put the 1400 kg dummy satellite into orbit.

A committee formed to investigate the flight failure convened this week, and issued a statement after a preliminary review of the collected telemetry data. So far, all indications point to a drop in oxidizer tank pressure in the third stage. This could be the result of a leak in the tank itself or the associated plumbing. They will also investigate whether a sensor or other failure in the tank pressurization control system could be at fault. A second launch is currently scheduled for May of next year. Check out [Scott Manley]’s video below the break, where he discusses the launch itself and some history of South Korea’s space program.

Continue reading “South Korean KSLV-2 Nuri Rocket Almost Orbits”

Visualizing Audio With An LCD VU Meter

We all love seeing data represented in pretty ways — whether it’s necessary or not. Take VU meters for example. They’re a super useful tool for audio editors to balance signals, but they also look really cool, even if you’re only listening to music. Who didn’t use a Winamp skin with a built-in VU meter back in the day? Even after the demise of everyone’s favorite media player, we still see these great graphs popping up all over the place.

Most recently, we’ve seen VU meters circle back around to have a bit of a retro vibe in this awesome Arduino-controlled LCD VU meter built by [mircemk]. Based on the KTAudio VU Meter project, it features an ultra-wide LCD, audio input, and volume knob, all tidily wrapped up in a case whose color scheme that can only conjure images of the famed Altair 8800, or an old Tektronix oscilloscope. The LCD itself is fairly responsive — but you can judge for yourself in the video below. The signature fading that so commonly accompanies screen refreshes on LCDs such as this one really adds to the retro effect.

You may just need one of these displays on your desk — after all, while you may not need to know how loud each audio channel is, don’t you at least want the information available? Just in case. Bar graph display a bit too modern-looking for you? Well then you should check out [mircemk]’s OLED version that displays dual analog meters.

Continue reading “Visualizing Audio With An LCD VU Meter”

Reballing And A Steady Hand Makes A Raspberry Pi 800

The all-in-one Raspberry Pi 400 computer is a capable device, but those seeking its maximum power may be disappointed by its 4 GB of memory. When the Pi 4 and Compute Module 4 have double that figure, surely the Pi 400 could catch up! A reddit user called [Pi800] rose to the challenge by replacing the 4 GB chip from the Pi 400 with the 8 GB chip from a Pi Compute Module, resulting in the so-called Pi 800, a working 8 GB all-in-one Pi.

As a piece of work it’s a deceptively straightforward yet extremely fiddly piece of soldering that requires a steady hand for even the most skilled of solderers. What takes it beyond the norm though is the reballing process. A ball-grid-array chip has a grid of small balls of solder on its underside that make the contacts, and these melt when it is soldered so require replacement before reworking. This is normally done with a template of carefully aligned holes to line up balls of solder in a stream of hot air, but lacking the template in this case the job was done by hand, laboriously ball by ball. A soldering task we’d hesitate to take on ourselves, so we’re impressed.

The result is an 8 GB all-in-one Pi, and it’s honestly not beyond the realms of possibility that an official version of this mod could be a future Raspberry Pi product. Perhaps we’ll wait for that, but should you be impatient then at least it’s possible to roll your own. It’s certainly not the first BGA memory swap we’ve brought you.

2021 Remoticon Shirt

Last Call For Hackaday Remoticon Shirts

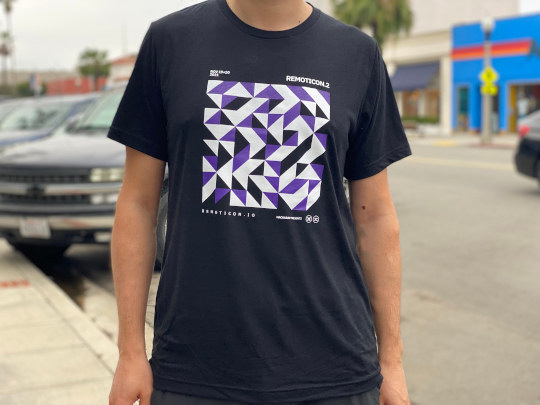
Hackaday conferences have a long history of excellent T-shirt designs and this year’s Remoticon is no different. If you want one of your own, you need get on that before Friday. The only way to score on is to buy one of the T-Shirt + General Admission tickets by November 11th — it gets you into all of the conference events just like the free ticket, but also scores you a shirt. (Shipping within the US is free, international delivery costs an additional $10.) What you see above is the actual test print, modeled by Aleksandar Bradic who designed this and all of the shirt from past Hackaday conferences.

Of course the most important thing is that you don’t miss Remoticon, and there is a free ticket which will remain available through the end of the conference, but you can help us with the logistics by getting one now.

The full list of speakers and the schedule is now available on the conference website. We’re delighted to have Elecia White, Keith Thorne, and Jeremy Fielding present keynote talks, and 16 additional speakers on a range of hardware-related topics. (This is notable: we originally planned for a single day of talks but were blow away by all the proposals and doubled the speaking slots!)

You can’t quite rub elbows with all your friends from afar, but you can certainly spend time together in the conference Discord, during the Hacker Trivia (form teams if you like!), at the Bring-a-Hack inside Gather Town, and at the afterparty which will include a live set from DJ Jackalope.

Everyone Who Bought a Shirt, Read This!

If you bought a shirt and have already claimed it using the code we emailed to you, thank you, you are all set.

If you already bought a shirt but haven’t claimed it, check your email. You need to respond to the Google form we sent you. If you bought a T-shirt ticket and didn’t get an email from us, let us know. All shirts need to be claimed by November 15th! Gogogo!

If you plan to order your shirt right now, here’s what will happen. Buy your ticket following the link at the top of this article. We will email you a poll question about domestic or international shipping because we have to use two different ordering interfaces for these — logistics are hard. We will then email you a redemption code and link where you can choose your size and shipping address.

We Appreciate The Patience All of You Have Shown

Thank you to everyone for your amazing patience through this process. We wanted to replicate the experience of walking into Supercon and getting a shirt at the check-in table. Shipping logistics made that a bit harder, but everyone involved has been super awesome about it and that feels really good. See you at Remoticon a week from Friday!

big LED flashlight

Own The Night With This Ludicrously Bright DIY Flashlight

If you’re a flashlight person, you know that there’s little you would do to get the brightest, most powerful, most ridiculous flashlight possible. You might even decide to build yourself a ludicrously powerful flashlight, like [Maciej Nowak] did.

If you choose the DIY route, be warned that it’s probably not going to be a simple process, at least if you follow [Maciej]’s lead. His flashlight is machined out of aluminum rounds, all turned down on the lathe to form the head of the flashlight. The head is made from three parts, each of which acts as a heat sink for the five 20-Watt CREE XHP70 LED modules. The LEDs are mounted with care to thermal considerations, and wired in series to DC-DC converter that provides the necessary 30 V using a battery pack made from four 21700 Li-ion cells. The electronics, which also includes a BMS for charging the battery and a MOSFET switching module, form a tidy package that fits into the aluminum handle.

The video below shows that the flashlight is remarkably bright, with a nice, even field with no hotspots. Given the 45-minute useful life and the three-hour recharge time, it might have been nice to make it so anywhere from one to five of the LEDs could be turned on at once. Some interesting effects might be had from switching the LEDs on sequentially, too.

Given the proclivities of our community, it’s no surprise that this is hardly the first powerful flashlight we’ve seen. This one broke the 100-Watt barrier with a single COB LED, while this ammo-can version sports an even higher light output. Neither of them looks much like a traditional flashlight, though, which is where [Maciej]’s build has the edge.

Continue reading “Own The Night With This Ludicrously Bright DIY Flashlight”

Linux Fu: Automatic Header File Generation

I’ve tried a lot of the “newer” languages and, somehow, I’m always happiest when I go back to C++ or even C. However, there is one thing that gets a little on my nerves when I go back: the need to have header files with a declaration and then a separate file with almost the same information duplicated. I constantly make a change and forget to update the header, and many other languages take care of that for you. So I went looking for a way to automate things. Sure, some IDEs will automatically insert declarations but I’ve never been very happy with those for a variety of reasons. I wanted something lightweight that I could use in lots of different toolsets.

I found an older tool, however, that does a pretty good job, although there are a few limitations. The tool seems to be a little obscure, so I thought I’d show you what makeheaders — part of the Fossil software configuration management system. The program dates back to 1993 when [Dwayne Richard Hipp] — the same guy that wrote SQLite — created it for his own use. It isn’t very complex — the whole thing lives in one fairly large C source file but it can scan a directory and create header files for everything. In some cases, you won’t need to make big changes to your source code, but if you are willing, there are several things you can do.

Continue reading “Linux Fu: Automatic Header File Generation”