[Lenore] Eviscerates Her Racing Snail

[youtube=https://www.youtube.com/watch?v=pzymwuPdQp4&w=580]


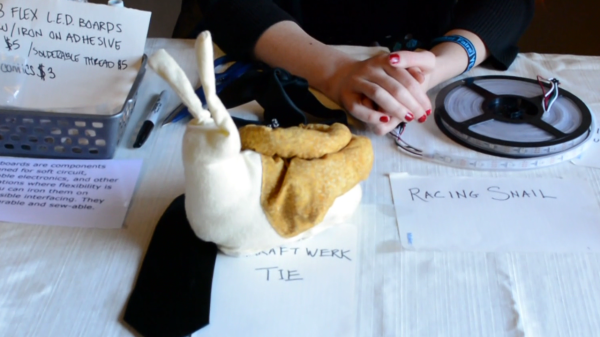
You may have walked past [Lenore’s] unassuming card table at Maker Faire this year. But we’re really glad we stopped for a little chat. She went so far as to pull the working parts out of her racing snail to show them to us!

Wait, wait… racing snail? Yeah, this is a pretty neat one from a few years ago. The snail is a relatively large version of a bristlebot (incidentally, we believe bristlebots were originated by EMSL). The thing that’s missing here are the bristles. Instead of using a scrub-brush for this large version, [Lenore] discovered that velvet has a somewhat uni-directional grain. But using a piece of mouse-pad cut to the same footprint as the velvet she was able to get the flat-footed snail to move in a forward direction purely through the jiggle of a vibrating motor.

If this sparked your interest there are tons of other bristlebot variations to be found around here. One of our favorites is still this abomination which shifts weight to add steering.

Connecting Inexpensive PH Probes With Ease

[youtube=https://www.youtube.com/watch?v=yKigsN8046k&w=580]


We’ve mentioned that it’s hard to find someone not selling or crowd funding something at Maker Faire. Despite the fact that [Ryan Edwards] is selling his boards, we still got the feeling that he’s a hacker who is selling just to make sure the idea he had is available for other hackers to use. He showed us his interface boards for inexpensive pH probes.

Since we’re always looking for more chemistry hacks to run, it was nice to hear [Ryan’s] description on how these probes (which can be had for around $9 on eBay) actually work. It turns out it’s all about salt. When it comes to the electronics, the board provides a connector for the probe on one edge, and pins for voltage, ground, and I2C on another. Rig this up with your microcontroller of choice and you’ll be building your own automatic pool doser, fish tank minder, or one of a multitude of food-related hacks.

Head on over to Sparky’s Widgets to see a few other demo applications.

green monochrome CRT vector display

Vector Graphic Flappy Bird Harder Than It Should Be

The dark room at Maker Faire was loud,  after all it’s where Arc Attack was set up plus several other displays that had music. But if you braved the audio, and managed not to experience a seizure or migraine from all the blinking you were greeted with these sharply glowing vector displays on exhibit at the TubeTime booth. We did the best we could with the camera work, but the sharpness of the lines, and contrast of the phosphorescent images against the black screen still seems to pop more if viewed in person.

This isn’t [Eric’s] first attempt at driving high-voltage tube displays. We previously covered his dekatron kitchen timer. But we’d say he certainly stepped things up several notches in the years between then and now. He blogged about Asteroids, which is running on the same hardware as the Flappy Bird demo from our video above. An STM32F4 Discovery board is running a 6502 emulator to push the game to [Eric’s] CRT vector driver hardware.

Just before we were done at the booth, [Eric] turned to us with a twinkle in his eye. He confessed his delight in purposely leaving out any button debounce from the Flappy Bird demo. As if it wasn’t hard enough it tends to glitch after passing just a few of the pipe gates. Muhuhahaha!

Showing the tablet interface for the scope

Discovering A Wifi Enabled 10MHz Oscilloscope

[youtube=https://www.youtube.com/watch?v=qEqWtKGJhFQ&w=580]


As most of our readers know, [Mike] was visiting Bay Area Maker Faire  last weekend with a big Jolly Wrencher on his back. During his tour he encountered the neat oscilloscope shown in the video above, made by the Belgian company Velleman. Even though it only has a 10MS/s sampling rate and a 10MHz bandwidth, our guess is that it may still be useful for some hobbyists out there as it can communicate with any PC/smartphone/tablet using its Wifi interface.

Inside the black box is a 3.7V 1800mAh Li-ion battery with a USB port to recharge it or update the oscilloscope’s firmware. As seen in the video, the tablet’s touchscreens may enable more natural interaction with the user interface. The protocol used to export the acquired samples is open, which may allow users to create their own analysis program. The oscilloscope uses an 8 bit analog to digital converter and a 4K samples buffer.

[Ben Krasnow] And His 8 KJ Ruby Laser

[youtube=https://www.youtube.com/watch?v=ZUevWmUViJM&w=580]


We were again pleased to find another person who attended Maker Faire just to show off the awesome and not to hawk some goods. In our mind [Ben Krasnow] represents the highest echelon of hardware hacking (apparently Google[x] agrees because they just snatched him up) . But [Ben] always makes a point to explain how he does what he does so that others may learn and someday achieve a similar type of greatness. This time around it’s a functional ruby laser which is backed by a capacitor bank that stores a whopping 8 kilojoules of energy. This is what allows the laser to cut through steel plate. He sure has come a long way since he first showed off the project in January.

Unfortunately we didn’t get to [Ben’s] booth until late on Sunday. His previous demonstrations burned through some seals and left him with a non-functional laser. But he’s a trustworthy guy so we believe him and look forward to him posting a video about the laser and hopefully about the failure. He also mentions that he may make an attempt at lunar laser ranging with this device; bouncing the laser off of reflectors on the moon and measuring the delay. This can then be used to calculate the distance to the moon.

By the way, it was super difficult not to crack a joke when he says the words “Ruby Rod“.

A view inside the Novena Open Hardware laptop

Bunnie Talks To Us About Novena Open Hardware Laptop

[youtube=https://www.youtube.com/watch?v=G9mjDt-4XIM&w=580]


We made a point to stop by the Freescale booth at Maker Faire where [Bunnie Huang] was showing off the Novena laptop. His past accolades (Wikipedia page) and the rabid success of the crowd funding round — which nearly tripled its goal — meant we had to make multiple attempts to speak with him. But the third time’s a charm and it was worth the wait!

Several things struck me about seeing the hardware in person. First off, I like that there’s a little bit of room inside but the case is still reasonably small. This really is a laptop aimed at hardware hacking; I would anticipate that the majority of backers intend to roll their own hardware for it. Second, [Bunnie] showed off several expansion boards as examples which use a standard 80-pin header to get at the onboard components. The example of a man-in-the-middle attack for the flash chip on a thumb drive was extremely tasty. But it was also interesting to hear about an SDR board which will ship to original backers since the campaign made its stretch goals.

If you don’t know much about this project, you can get some background from our post when the crowd funding went live. Open design info is available from the Novena page.

Mini-Molder: Blow Molder Scratch-Built By Single Hacker

[youtube=https://www.youtube.com/watch?v=2P7MaZUrSQQ&w=580]


We caught up with [James Durand] at Maker Faire. He was one of the rare Makers (no mention of selling or future crowd funding) that had a booth at Maker Faire — he was exhibiting a blow molding machine that he built from scratch.

The fabrication process is 100% [James]. Every custom part was designed and milled by him. All of the assembly techniques were his to learn along the way. And we didn’t see anything that isn’t production ready. We’re both impressed and envious.

About three years ago he got the itch to build the mini-molder after learning about the Mold-A-Rama machine — a blow-molding vending machine that was popular a half century ago. A bit of his journey is documented as a molding category on his blog. For the most part it sounds like 1.5 years spent on the CAD design really paid off. He did share one element that required redesign. The initial prototype had a problem with the molds being pushed up when they came together. He tweaked the mechanism to close with a downward motion by flipping the hinge design. This seems to hold everything in place while the drinking fountain chiller and water pump cool the mold and the plastic model within.