Internet Controlled LED Necktie Lights Up The Party

MIDI Controlled Necktie

Wearable devices are all the rage in certain circles — looking for a project of his own, [Hector Urtubia] decided to give it a shot with this six-LED necktie.

It used to be pretty hard to make an Internet connected device without spending all your time and effort on making the Internet connection possible — until the Pinoccio came along. It’s a tiny Arduino compatible board which has wireless Internet connectivity built right in. It even comes with a rechargeable battery. If you have experience with Arduino programming, this little guy is a cinch to get running.

The tie itself makes use of six NeoPixels, which are chainable, addressable and current regulating RGB LEDs, which means the entire chain of LEDs only requires 1 digital pin-out on the Pinoccio! [Hector] has even written a library that will extend the Pinoccio’s scripting environment so that the pixels can interact directly from the web or API.

To demonstrate the tie, he decided to hook it up to his MIDI keyboard — enjoy:

Continue reading “Internet Controlled LED Necktie Lights Up The Party”

Ancient TV Remote Becomes A CNC Pendant

DIY CNC Pendant

Needing a control pendant for his CNC machine, [Bob Davis] took to his scrap bin and started looking for parts. What he came up with is pretty cool — that’s a rather old Zenith TV remote providing the enclosure!

When building a homemade CNC machine, many people overlook one of the most handy components — the control pendant. On a commercial machine, they can get pretty pricey — on a homemade machine, most people just use the computer to control it, but if you’ve used a pendant before you know how handy they are for manual operations!

So what should you do? Well, you could make a second dedicated keyboard for your CNC machine (arguably not much of a hack, but rather clever) — or you could build a pendant from scratch like [Bob] did. It’s pretty simple; he’s using a 555 timer, a few momentary toggle switches, an LED, and plans to add a potentiometer in the future for speed control. It’s all housed in the old TV remote, and seems to do the trick just fine — take a look in the following video:

Continue reading “Ancient TV Remote Becomes A CNC Pendant”

Connecting Inexpensive PH Probes With Ease

[youtube=https://www.youtube.com/watch?v=yKigsN8046k&w=580]


We’ve mentioned that it’s hard to find someone not selling or crowd funding something at Maker Faire. Despite the fact that [Ryan Edwards] is selling his boards, we still got the feeling that he’s a hacker who is selling just to make sure the idea he had is available for other hackers to use. He showed us his interface boards for inexpensive pH probes.

Since we’re always looking for more chemistry hacks to run, it was nice to hear [Ryan’s] description on how these probes (which can be had for around $9 on eBay) actually work. It turns out it’s all about salt. When it comes to the electronics, the board provides a connector for the probe on one edge, and pins for voltage, ground, and I2C on another. Rig this up with your microcontroller of choice and you’ll be building your own automatic pool doser, fish tank minder, or one of a multitude of food-related hacks.

Head on over to Sparky’s Widgets to see a few other demo applications.

[Ken Shirriff] Explains The TL431

[Ken Shirriff] had to get down into a bit of semiconductor physics to give us an explanation of the TL431, which he calls “the most common chip you’ve never heard of”. [Ken] may well be right about the TL431. Even Texas Instruments can’t nail down a single name for it. Their page for the part calls it a “Adjustable Precision Shunt Regulator”, yet the datasheet is titled “Precision Programmable Reference”. You’d think they’d have figured this out by now, considering the TL431 was launched in 1978.

TL431’s can most often be found hiding in switching power supplies. The Apple II switcher had one, and many current ATX supplies have 3. Uninformed parts scroungers may miss them, as they often hide in TO-92 or SOT-23 packages. The TL431 is no transistor though. The TL431’s operation is actually pretty simple. When the voltage at the reference pin is above 2.5V, the output transistor conducts. When the reference voltage falls below 2.5V, the device stops conducting. In a power supply, this operation would help the control electronics maintain a stable output voltage.

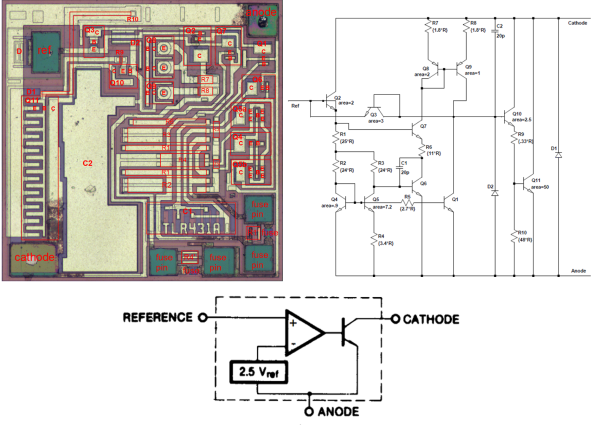
The real subject of [Ken’s] article is the layout of the TL431 on its silicon die.  Rather than bust out the fuming nitric acid himself, [Ken] uses some of [Zeptobars’] decapped chip images. Inside the TL431, [Ken] discovers that transistors aren’t made up of the three layer NPN or PNP sandwich we’ve come to know and love. In fact, the base isn’t even in the middle. Transistors, including the BJT’s used in the TL431, can be assembled in a nearly infinite number of ways.

[Ken] moves on to the resistors and capacitors of the TL431. The capacitors are formed two different ways, one as a reverse biased diode, and the other as a more traditional plate style capacitor. The resistors include fuses which can be blown to slightly increase the resistance values.

The takeaway from all this is that once you get down to the silicon level, it’s a whole new ball game. Chip layout may look a bit like PCB layout, but the rules are completely different. [Ken] mentions that in a future blog he’ll go into further detail on the operation of the TL431’s bandgap voltage reference. We’ll be watching for that one, [Ken]!

The Design And Fabrication Of A Digital Clock

boarddesign

This clock is the first thing that [Kevin] ever made, way back before the Arduinofication of making, and long before the open hardware community exploded, and before the advent of cheap, custom PCBs. It’s an elegant design, with six seven-segment displays, a time base derived from line frequency, controlled entirely by 74-series logic chips. There was only one problem with it: it kinda sucked. Every so often, noise would become a factor and the time would be displayed as 97:30. The project was thrown in the back of the closet, a few revisions were completed, and 13 years later, [Kevin] wanted to fix his first clock.

The redesign used the same 1Hz timebase to control the circuitry, but now the timebase is controlled by a DS3231 RTC with an ATtiny85. The bridge rectifier was thrown out in favor of a much simpler 7805 regulator, and a new board was designed and sent off to OSHPark. Oh, how times have changed.

With the new circuitry, [Kevin] decided to construct a new case. The beautiful Hammond-esque enclosure was replaced with the latest and greatest of DIY case material – laser cut acrylic. Before, [Kevin] would put a jumper on the 1Hz timebase derived from the line frequency to set the clock – a task that makes plugging a clock in exactly at midnight a much simpler solution. Now, the clock has buttons to set the hours and minutes. Much improved, but still an amazing look at how far DIY electronics have come in a little over a decade.


green monochrome CRT vector display

Vector Graphic Flappy Bird Harder Than It Should Be

The dark room at Maker Faire was loud,  after all it’s where Arc Attack was set up plus several other displays that had music. But if you braved the audio, and managed not to experience a seizure or migraine from all the blinking you were greeted with these sharply glowing vector displays on exhibit at the TubeTime booth. We did the best we could with the camera work, but the sharpness of the lines, and contrast of the phosphorescent images against the black screen still seems to pop more if viewed in person.

This isn’t [Eric’s] first attempt at driving high-voltage tube displays. We previously covered his dekatron kitchen timer. But we’d say he certainly stepped things up several notches in the years between then and now. He blogged about Asteroids, which is running on the same hardware as the Flappy Bird demo from our video above. An STM32F4 Discovery board is running a 6502 emulator to push the game to [Eric’s] CRT vector driver hardware.

Just before we were done at the booth, [Eric] turned to us with a twinkle in his eye. He confessed his delight in purposely leaving out any button debounce from the Flappy Bird demo. As if it wasn’t hard enough it tends to glitch after passing just a few of the pipe gates. Muhuhahaha!

Achievement Unlocked: Drill A Square Hole With A Rotary Broach

There are times in a man’s life when he needs to drill a square hole through an 8mm thick piece of steel. If that man doesn’t have one or two thousand dollars to spend on commercial tooling to do this, he might just shrug his shoulders and make do with round holes. But if that man is [Chris], he rolls up his sleeves and makes his own tool to drill square holes with a rotary broach.

This tool that [Chris] has named the Wobble Drive drills a square hole by applying force to each of the corners of a square bit one a time. How, you might ask, did he achieve this? With a two-part tool and the power of offset driving. He took a cylindrical chunk of steel and bored a little cup for a ball bearing to move around in. He didn’t have one rolling around his tool box, so he liberated one from a 2209 double row self-aligning cylindrical bore with a screwdriver. Then he hammered a square rod of steel into a hole in the other end and made the rod’s bottom a little bit concave on the grinding wheel. He also took a little off the sides to aid the weeble wobble action. A second steel cylinder with a ball bearing cup sits in the chuck of his Bridgeport mill and wobbles the tool bit through the power of a 1/4″ offset.

[Chris] tested it on the same sacrificial plate he used to demonstrate the awesome power of Lil’ Screwy, his 100-ton homebrew press. He drilled a 3/8″ round pilot hole and then went to work with the Wobble Drive. The tool bit side proved to be too long to provide the requisite stroke, so he cut it down by about half. Once the tool has chewed through the steel, the tool bit decouples at the ball bearing and [Chris] has himself a square hole and that much more hacking cred.

Continue reading “Achievement Unlocked: Drill A Square Hole With A Rotary Broach”