Sous Vide Brewing

Brewing Beer With A Sous Vide Cooker

[Ken] found an interesting use for his sous vide cooker. He’s been using it to help him with his home brewing. It’s unlikely that the manufacturer ever intended it to be used in this manner, but as hackers we don’t really care about warranties.

Beer brewing is as much of an art as it is a science. There are a lot of variables that go into the process, and tweaking any one of them can result in your beer tasting different. There is one process during brewing that is called mashing. Mashing is when you soak malted grains in hot water to pull out the sugar. The amount of sugar that gets extracted is very dependent on how long the grains are soaked, and the temperature of the water. If you want your beer to taste a certain way, then you want to ensure that the water stays at constant, repeatable temperature.

As a home brewer, [Ken] has been using his stove top to heat the water. This gets the water warm, but in order to keep the temperature consistent, he has to constantly monitor the temperature and adjust the knob accordingly. Who wants to sit around and do that all day? He needed something to control the temperature automatically. Enter the sous vide cooker.

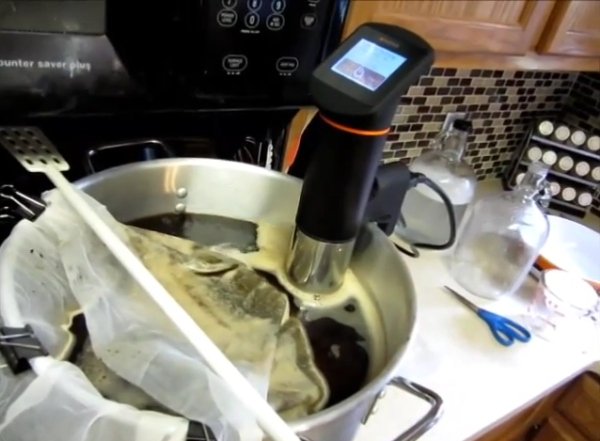
Sous vide is a method of cooking in which food is placed into an airtight bag and then submerged in a water bath with very strict temperature control. The process takes a long time to cook the food, but the result is supposed to be meat that is cooked perfectly even while also retaining all of the moisture and juices. [Ken] figured he might be able to use a sous vide cooker to control the temperature of the mash instead of a water bath.

His experiment worked wonderfully. He used the stove top to help get the mash up to the close temperature, then the sous vide cooker was used to fine tune things from there. [Ken] says he was able to achieve 75% efficiency with his mash, which is exactly what he was going for. Continue reading “Brewing Beer With A Sous Vide Cooker”

Goldilocks Climate Box Keeps Lager Fermentation Environment Just Right

September was warmish in many places around the world including [Ole]’s native Denmark. But that did not stop him from brewing lager flavored with plums from his own garden, and neither did his indifference to lagers in general.

Lager fermentation requires a consistent, low temperature. While many homebrewers might modify an electric refrigerator, [Ole] wasn’t interested in the cost of running a second one just for brewing beer. Instead, he built a climate box to work with the cool temperature in his garage. Starting with scrap wood from other projects, he lined the walls with polystyrene and put a layer of wood on the floor to help support the fermentation bucket.

Maintaining a consistent temperature in the box called for both heating and cooling. He pulled the Peltier from a 12V cooler meant to run off a car’s cigarette lighter, and used a spare ceramic heater that was lying around in case his primary reptile warmer went on the fritz.

An Arduino and a custom shield drive separate PID controllers for the Peltier and the heater. The shield has a temperature probe, and he extended the USB outside the climate box so the PIDs can be adjusted without disturbing the inside temperature. The schematic, board file, and code are all available in a zip you can get from his post.

The Peltier couldn’t quite compensate for the overly warm weather and the heat caused by the fermentation, but it was stable enough to produce a nice, plum-flavored lager he has dubbed Lektor Blom­mes malt­bol­che, which is a triple Danish pun he explains in the write-up.

Malting Kiln Controller For Preparing Beer Brewing Grains

A quick primer is in order: when it comes to hobby brewing there’s two main types, extract brewing and all-grain brewing. The former uses a syrup that has been extracted from the grains at a factory while the latter adds the steps to do this yourself. But in both cases the brewing grains have already been malted. This is a careful process of soaking the grains and then kiln drying them. [Richard Oliver] built his own malt kiln controller to add the preliminary step to his home brewing ritual. Now the only thing he’s not doing himself is growing the grains (and perhaps culturing the yeast).

His original design used a food dehydrator for the drying step, but this didn’t work because the temperature wasn’t at the correct level. The new build uses the ceramic heating element from a 300W hot air gun. A blower directs air through the element and into the wooden box that serves as the kiln. An Arduino monitors the heated air to keep it right in the sweet spot. He’s included a graphing GUI for easy monitoring, which is shown in the video after the break.

Continue reading “Malting Kiln Controller For Preparing Beer Brewing Grains”

All-in-one All Grain Brewing For Your Kitchen Counter

All grain brewing is a labor and equipment intensive endeavor, but it produces the highest quality beer compared to partial mash or extract brewing. [Jeff Karpinski] started out with the latter two methods, but as his enthusiasm for the hobby mounted he found himself brewing all-grain batches with just an electric kettle. He developed the system seen above as an easy method of automating the all grain process, and he managed to make it tidy enough to do in the kitchen.

All-grain brewing usually involves five or ten gallon (or more) boils. This type of volume is usually what demands that the brewing process move out of the kitchen. But since [Jeff] is the only beer drinker in the house he limits his sessions to three gallons. This means all of the equipment takes up less room. Here he’s got a five-gallon bucket, cooler, and brew kettle on just one small piece of the counter. In between the kettle and bucket you can see the controller box he built. This is responsible for switching power to the heating element in the brew kettle, and the electric pump in the bucket. The bucket has a permanent counterflow chiller which brings the wort down to a suitable temperature before pitching the yeast. It’s pretty amazing how well contained the liquid is from start to finish!

[Thanks ScottInNH]

Brewing Beer With LEGO

[Matt] sent in a set of YouTube videos walking us through his LEGO Mindstorms controlled brewery.

[Matt] is using a RIMS brewing setup that recirculates and heats the mash to extract more starch from the grain. This results in a Maillard reaction in the mash and creates a richer, maltier flavor.

To control his RIMS setup, [Matt] is using a LEGO Mindstorms brick with a few LEGO temperature sensors attached to his plumbing. The LEGO provides all the temperature and pump control for a proper RIMS setup, perfect for the homebrewer who doesn’t want to bother with an Arduino or other microcontroller board.

As a small aside, the astute Hackaday reader will note our beer hacks category is woefully underpopulated. It’s nearly summer now and the perfect time to start brewing. If you’ve got a beer hack, be sure to send it in.

After the break you can see all of [Matt]’s RIMS/LEGO brewery videos, or you can check out his YouTube channel.

Continue reading “Brewing Beer With LEGO”

Automated Beer Brewing

[Randyrob] is pretty serious about their beer. So serious, that he wanted to build a fully automated system for brewing. Dubbed the Halfluck Automated Brewing System, or HABS, it is actually his first micro controller project. You can follow along on the arduino forums to get a little more information, including the source code if you should want to build one of your own. There are a few videos on his youtube channel, but unfortunately, we didn’t notice any full tours of the entire thing.

Like some others we’ve seen, this one only handles the brewing aspect, not the fermenting stages. It would be interesting to see a system that handled it all. You could fairly easily get the machine to siphon it into a keg for final carbonation too.

Beer Brewer’s Temperature Controller

freezer_temperature_controller

Steady fermentation temperatures, usually at about 65 degrees Fahrenheit, are an important part of brewing beer. Because of this, the wort (unfermented beer) is often temperature controlled during fermentation. [android] needed a temperature controller for fermenting beer in a chest freezer. Much like the energy efficient fridge hack from last month, the chest freezer is switched on and off to achieve the desired temperature. Instead of buying a controller, [android] built around an existing design. His project uses a solid state relay to switch an outlet on and off.

The temperature is controlled by a home thermostat. He removed the thermistor from the unit and extended it with 24 gauge wire so that it can go inside of the chest freezer. Utilizing a junction box, the freezer is plugged into one switched outlet and controlled by the thermostat via the relay. The other outlet is unswitched and provides DC power for the relay using a wall wort transformer. Although this thermostat cannot be set cold enough for lagering, it is perfect for keeping kegs at the correct beer serving temperatures when not being used for fermentation.