Interfacing With A PS/2 Mouse

[David] sent in his implementation of reading a PS/2 mouse with a PIC microcontroller and some LED displays. Of course, this follows hot on the heels of using a PIC with a PS/2 keyboard so now might be the time to start digging out your old peripherals out of your junk pile.

[David] began his project trying to figure out how to connect a mouse to his breadboard. After hacking the plastic off a PS/2 mouse extension cord, he wired everything up according to the pinout. Programming the PIC to understand PS/2 commands was a little strange. [David] is used to having his microcontrollers provide the clock signal. The PS/2 protocol is a bit strange as the peripheral sets the clock. Since PS/2 is a bidirectional protocol, the mouse also accepts commands. The host – [David]’s PIC – must send the mouse a command to start sending movement data.

Because USB keyboards and mice are backwards compatible with PS/2 ports, [David] tried out a few USB mice with a USB to PS/2 adapter. Every attempt at using a USB mouse failed. Strangely, when a Bluetooth mouse was tried (via Bluetooth to USB to PS/2), everything worked perfectly. Check out [David]’s PIC mouse demo after the break.

Continue reading “Interfacing With A PS/2 Mouse”

Pinball Machine Eats Your Quarters, Tells Time

pinball_machine_clock

[alanamon] had an old pinball machine in his basement, and thought it would be cool to rig it up to serve as a clock as well. He didn’t want it to be just any clock however, he wanted the pinball machine to be the most accurate clock in his house.

Other than telling time using the game’s scoring reels, there were two other things that he wanted to ensure with this build – that the game functioned normally when desired, and that the clock mechanism made no permanent changes to the game. To accomplish this, he dug around inside the machine and made all of his connections using clips secured to the game’s Jones plugs instead of drilling holes and soldering wires.

The clock runs off an Arduino, which gets its its time data using an old GPS receiver he had kicking around. The receiver pulls time data from GPS satellites much like this clock we featured yesterday, updating the score reels once every minute. The clock can be programmed to turn the machine on and off at a scheduled time each day, and simply turning off the Arduino will allow you to play the game in its unaltered state.

We never really contemplated using a pinball machine to tell time, but it works for us! Check out a video of his pinball clock in action after the jump.

Continue reading “Pinball Machine Eats Your Quarters, Tells Time”

Automated Humane Pest Control

rat_trap_2000

[Tobie] seems to have a bit of a rat problem.

While most people would be inclined to simply buy the oversized Victor spring-loaded rat traps and call it a day, [Tobie] is a bit more humane. To help remedy his problem while also ensuring that no rats are harmed in the process, he built the Rat Trap 2000.

Self-described as completely over the top, the Rat Trap 2000 lures the rodents into its containment area with apples and corn, securing them inside using a servo-actuated trap door. The door is triggered by an Arduino that monitors the holding pen for movement using an IR sensor. All of the action is captured on video using the web cam on his Eee-PC, as you can see in the very short video below.

This certainly isn’t the most cost-efficient way to control your vermin problems, but if you’ve got some spare parts laying around, why not? It’s far more humane than some of the other rodent control solutions we have seen, and it sure beats living with rats!

Continue reading “Automated Humane Pest Control”

Weekly Roundup 9/24/11

In case you missed them, here are the most popular posts from this past week.

Our most popular post is about a hand-made security robot that any good hacker would be proud of. This robot was built by a father-daughter team and has an interesting holonomic drive train that allows it to drive in any direction at any time.

Our next most popular post was about eight breadboard hacks that let you do more with your breadboard than you previously thought possible.

Following that is a post dealing with what you can do with a dead laptop battery. Surprisingly, not all of the cells are dead so there is still useful life in some of them.

Next we have a post about an electronic cello that uses a combination of a magnetic pickup for the bow and resistive strips for the strings. There is even a video of it being played.

Finally, for those of you looking to grow things indoors throughout the year, we have a post about a hydroponic setup.

ATtiny Hacks: Robot Halloween Costume

When it comes to Halloween costumes, [Michael] doesn’t like buying expensive and poorly made bits of cloth and fabric that resembles [random Disney character]. Last year, his son decided to be a robot for Halloween and although gray spray paint and dryer vent hose make a very good costume, that only goes so far. The robot needed lights, so [Michael] spent a little time on this build that blinks a few LEDs in a random pattern.

The build is very simple; an ATtiny13 drives two 74HC595 shift registers. The code – all 30-odd lines of it – uses the random() function to shift high or low values to the shift registers. After pausing for a little bit, the cycle continues and a new patterns of LEDs light up.

The electronics of the robot costume could be easily transferred to another theme – astronauts need LEDs on their backpack, and of course aliens communicate with blinking lights. In any event, it would avoid last year’s fiasco with a dozen [Heath Ledger] Jokers. Check out the video of [Michael]’s intergalactic robot son after the break.

Continue reading “ATtiny Hacks: Robot Halloween Costume”

ATtiny Hacks: ATtiny10 Game – Doing More With Less

ATtiny Hacks Theme Banner

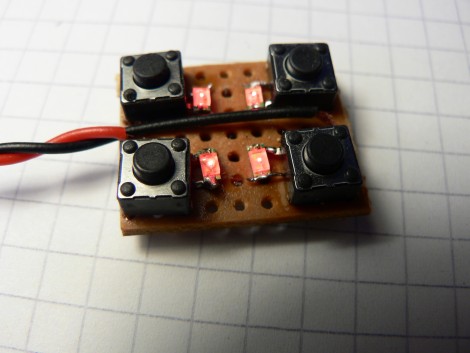
Okay, you’ve got a six-pin microcontroller with 1k of program memory, 32 bytes of SRAM, and it can’t be programmed using an In-System-Programmer. Do you think you can use it to develop a game? [Wrtlprnft] managed to build a Simon Says game based on the diminutive device that has four buttons and four LEDs. Judging from the video after the break, we’d say he nailed it!

There are so many design challenges here. First off, with only six pins total getting eight devices connected and working means doubling up on each I/O pin and using the reset pin as a doubled-up I/O. We’ve seen momentary push buttons on the same pins as LEDs before, so that’s not too hard to get working.

But if you’re using the reset pin how do you flash the thing? It doesn’t use the same ISP programming protocol that it’s bigger cousins do, so [Wrtlprnft] used an ATmega1284P to program it, hooking up to the three I/O pins and using a transistor to push 12V on the reset pin. But there’s still the matter of writing the code. It has half of the 32 registers you’d expect to find. He ended up ditching C and went straight to writing Assembly because of the diminished instruction set. It’s the first thing he’s written in Assembly, and a great way to learn the ropes.

It may not be as polished, but we do like it just as much as the Karate Chop Simon Says game which has a lot of other bells and whistles.

Continue reading “ATtiny Hacks: ATtiny10 Game – Doing More With Less”