Simon Says With An RP2040

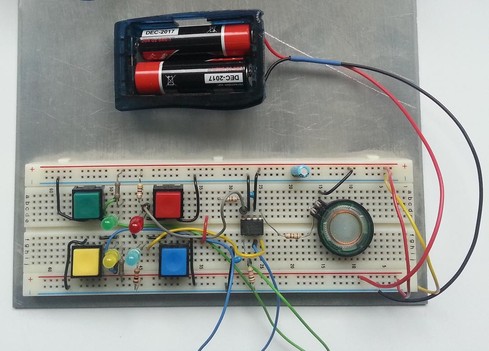
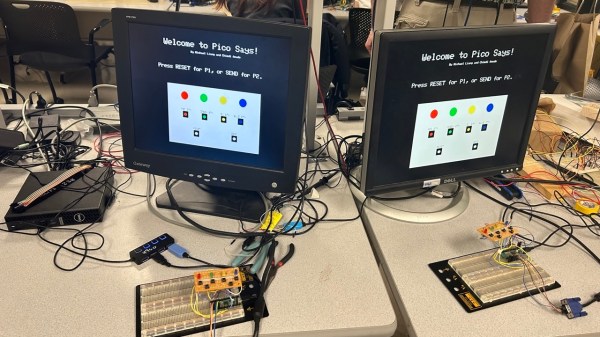
The team of [Michael] and [Chimdi] from Cornell’s Designing with Microcontrollers (ECE 4760) Fall 2023 session designed a version of Simon Says on an RP2040 which they call Pico Says. It uses UDP packets over WiFi to communicate between the players, and supports VGA graphics for output. Each player’s hardware consists of a Pico W module plus a control panel containing the four LEDs and buttons ( red, green, yellow, and blue ) plus send and reset buttons.

For purposes of this lab, the modules were build on a solderless breadboard and used perfboard for the control panels. They weren’t entirely happy with their choice of UDP because they experienced frequent datagram dropouts in the noisy environment of the microcontroller lab. They also planned to implement sound effects, but ran out of time after spending too much time on the WiFi implementation, and had to drop that feature. In the end, however, they wrapped up their project and demonstrated a working game. We can only speculate whether this bonus lesson in resource management was intended by [Dr. Hunter Adams] or not.

Two ECE 4760 course references are highlighted in the write-up that helped them jump-start the project: the UDP and VGA examples for the Pico. These are good links to put in your RP2020 toolbox for future projects, in addition to the ECE 4760 course home page itself. We’ve covered several of these projects recently, as well as the curriculum switch from the Microchip PIC32MX-based Microstick II to the RP2040 last Spring.

Continue reading “Simon Says With An RP2040”

Simon Says, But With Servos

How much easier would life be if you could just grab hold of whatever mechanism you wanted to manipulate, move it like you want, and then have it imitate your movements exactly? What if you could give a servo MIDI-like commands that tell it to move to a certain location for a specific duration? Wonder no more, because [peterbiglab] has big-brained the idea into fruition.

With just one wire, an Arduino, and some really neat code, [peter] can get this servo to do whatever he wants. First he tells the Arduino the desired duration in frames per second. Then he grabs the horn and moves it around however he wants — it can even handle different speeds. The servo records and then mimics the movements just as they were made.

The whole operation is way simpler than you might think. As [peterbiglab] demonstrates in the video after the break, the servo knows its position thanks to an internal potentiometer on the motor’s rotor. If you locate the pot output pin on the control board and run a wire from there into an Arduino, you can use that information to calibrate and control the servo’s position pretty easily. There are a ton of possibilities for this kind of control. What would you do with it? Let us know in the comments.

If you want to try this with a bunch of servos at once, might as well build yourself a little testing console.

Continue reading “Simon Says, But With Servos”

Simon Game Is A Story Of Rushed Deadlines And Holiday Cheer

Sometimes the Christmas season can feel like a holiday all about spending money to demonstrate your love for others. Many a maker has attempted to subvert these commercialistic overtones by giving handmade presents to friends and loved ones. [APA] is no exception, and has shared their story of producing a simple Simon game during the holidays.

The circuit is nothing wild – an ATtiny85 microcontroller interfaces a handful of buttons and LEDs to handle the basic Simon gameplay. The real value is in [APA]’s retelling of the development process. It’s an accurate recounting that makes us relive some of our own follies of early projects. There’s the confusion between SMD and through hole versions of the same part, forgotten pull up resistors, as well as hours lost trying to figure out why a chip won’t write, only to learn the bootloader hasn’t been burned yet.

In the end, [APA] was able to push through a rush order and deliver the gifts on time, despite the many pitfalls along the way. The final game provided some laughs around the dinner table at Christmas, so we’d say the mission was definitely accomplished.

We’ve seen similar work before, too – like this tiny Simon game on an ATtiny13.

A Business Card That Plays Simon Says

BusinessCard_01_08

When your name is Simon and you want to build your own circuit board business card, it makes perfect sense to incorporate a game of Simon Says, and that’s exactly what [Simon] did with his Business Card.

You may see a resemblance to the Engineer’s Emergency Business Card; that’s because [Simon] took inspiration from that card to build his own.  The game of Simon Says is played via 4 low-profile pushbuttons and 4 0805 LEDs.  The microcontroller of choice to run the game is an ATtiny45 set up to work with the Arduino IDE.  But with only 5 pins available for I/O, [Simon] had to give up 4 pins to the LEDs and configure the remaining pin as an analog input.  The buttons are tied into a voltage divider that feeds the analog input, so depending which button is pressed, a different voltage is read in, thus a value from 0 to 1023 determines which button was pressed.

One of the great things about this write-up is that it goes through the process of etching PCBs at home using the toner-transfer method.  We’re not sure how many home-etched business cards he’s willing to pass out, but surely whoever does get the card, will never forget his name.

Continue reading “A Business Card That Plays Simon Says”

Simon Says Learn How To Program ARM Chips

barebones-simon-says

This breadboard version of a Simon Says game is a great way to try your skills on a new microcontroller platform. The eight-pin chip seen in the center of the board is an LPC810 microcontroller which [Hartmut Wendt] is just getting started with. It’s a rare example of a low-pin count DIP package for an ARM device (Cortext M0). The breadboard friendly footprint makes it easy to work with, but you could pull off the same build with a dev board like one of the STM discovery offerings or the Stellaris Launchpad boards.

Why is this a good way to learn? It involves input, output, and generating waveforms which we’d assume means timers (we didn’t dig through the source code which is available form the page linked above). Each colored button has a matching LED which blinks out the pattern which you must replicate to keep the game going; you know how Simon Says works, right?. At the same time a different pitch is played by the speaker on the right.

Another good exercise would be to take [Hartmut’s] code and port it for a different chip, be it ARM or otherwise.

Continue reading “Simon Says Learn How To Program ARM Chips”

Music Challenge Has You Flapping Your Wrist To Make Sounds

glove-based-music-challenge

This glove controller let you play a musical game. The challenge is to perform the correct wrist motions at the right tempo to play the intro to the song Where is my Mind by the Pixies. This is demonstrated in the video clip after the break.

We often see flex sensors used on the fingers of glove projects, but this one does it all with an accelerometer. That module, along with the Piezo buzzer used for playback are affixed to the small breadboard on the back side of his hand. Rubber bands connect the Arduino to his third and forth fingers. The tempo and rhythm are pre-programmed but the tone generated is based on the gravity reading at the start of each note. If you don’t have your hand positioned correctly the wrong tone will be played.

The code was published in link at the top. It would be fun to see this altered as a hacked Simon Says game.

Continue reading “Music Challenge Has You Flapping Your Wrist To Make Sounds”

ATtiny Hacks: ATtiny10 Game – Doing More With Less

ATtiny Hacks Theme Banner

Okay, you’ve got a six-pin microcontroller with 1k of program memory, 32 bytes of SRAM, and it can’t be programmed using an In-System-Programmer. Do you think you can use it to develop a game? [Wrtlprnft] managed to build a Simon Says game based on the diminutive device that has four buttons and four LEDs. Judging from the video after the break, we’d say he nailed it!

There are so many design challenges here. First off, with only six pins total getting eight devices connected and working means doubling up on each I/O pin and using the reset pin as a doubled-up I/O. We’ve seen momentary push buttons on the same pins as LEDs before, so that’s not too hard to get working.

But if you’re using the reset pin how do you flash the thing? It doesn’t use the same ISP programming protocol that it’s bigger cousins do, so [Wrtlprnft] used an ATmega1284P to program it, hooking up to the three I/O pins and using a transistor to push 12V on the reset pin. But there’s still the matter of writing the code. It has half of the 32 registers you’d expect to find. He ended up ditching C and went straight to writing Assembly because of the diminished instruction set. It’s the first thing he’s written in Assembly, and a great way to learn the ropes.

It may not be as polished, but we do like it just as much as the Karate Chop Simon Says game which has a lot of other bells and whistles.

Continue reading “ATtiny Hacks: ATtiny10 Game – Doing More With Less”