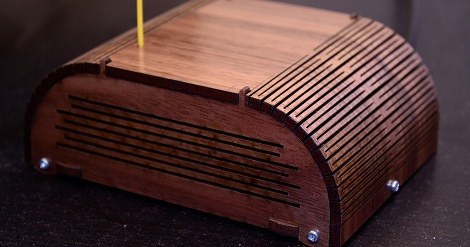
If you want to pretty up your project boxes, we can’t imagine anything better than [Shaun]’s walnut plywood, laser-cut, kerf bent Arduino case. Instead of the slot-and-tab construction of traditional laser-cut enclosures, [Shaun] used a technique to bend plywood without steaming, heating, and eventually scorching his somewhat expensive plywood.
This isn’t the first time we’ve seen this accordian style laser-cut kerf bend. By alternating laser cuts along the desired radius, the plywood can be bent by hand. The technique is called kerf bending and is perfect for putting an organic touch on the usual 90° angle project boxes we see.
[Shaun] has an Instructable for the smaller boxes that are part of his Arduino powered wireless sensor network. This Instructable goes over the pattern of laser cuts required to get a nice, smooth kerf bend, and also shows off how beautiful a laser-cut project box can be when cut out of aromatic cedar.


This looks like an excellent enclosure for retro style projects. Reminds me of an old radio.
The woodwork looks great, but those screws…
Please find something that looks better, or design the box so all the screws are hidden underneath.
Agree, it’d probably look nicer without the screws (but the photo makes them look worse because they pick up the flash). It’s hard to do hidden fastenings using a laser though. the laser can only do 2D so you either need to have a peg and a hole or a screw.
I guess I could have glued on the side pieces and used strong magnets to hold the curved piece in place. (I want to be able to open it up for access to the electronics.)
Currently, the nuts that the screws fasten into are hidden underneath so simply reversing the screws wouldn’t work too well.
Why not just use black screws then? No flash glare and they would somewhat blend in. Also could try countersinking and beveled screw-heads. Used in conjunction with one another would make this look fantastic.
You could countersink with brass slot screws – brass and woodgrain look nice together or you could just switch to a rounded top brass slot screw – for a sort of older look .
https://www.ebay.com/itm/4-x-3-8-Brass-Round-Head-Wood-Screws-Slotted-Drive-Qty-100-/231161986098
I love this enclosure.
As to the matter of fasteners, I agree, the screws shown detract from the beauty of the woodwork.
Why not countersink the holes and use flat head screws? Brass screws would look great with the wood.
Another option, which might even look nicer, would be black oxide screws with flat socket heads. Example:
http://www.grainger.com/Grainger/Socket-Head-Cap-Screw-4XU64?Pid=search
At least find some brass screws and sink them so the heads don’t stick out.
Or sink them in a little… should be ok :) not sure if you can get… not sure what they’re called “trumpet head”? Bolts. But that’d work too.
This seems familiar…
why was my message deleted?
Because you are a troll?
If you’re the original fartface then i can’t see why not.
Ok that might’ve been out of line, i apologise. I do not have the ability to delete posts so this will have to suffice.
Dupe?
Hi…when designing a box, is there a way of calculating the length of a side to accommodate the kerf bend based on the thickness of the material? Or should I make a model first using thick card of something?
Thanks,
Glenn
Yes, I recommend drawing out the side on paper. Then, take the radius of your curved sections and calculate their circumference using pi * 2 * radius and multiply by the fraction of a circle that you’re using. E.g. for a 90 degree curve that section would be radius * 2 * pi * 90/360.
Also, the curved portions are pretty springy so if you’re a few mm short then it’ll stretch to fill the gap.