Build An Eye Tracking Headset For $90

per_white_lines_faint_800

Eye tracking is a really cool technology used in dozens of fields ranging from linguistics, human-computer interaction, and marketing. With a proper eye tracking setup, it’s possible for a web developer to see if their changes to the layout are effective, to measure how fast someone reads a page of text, and even diagnose medical disorders. Eye tracking setups haven’t been cheap, though, at least until now. Pupil is a serious, research-quality eye tracking headset designed by [Moritz] and [William] for their thesis at MIT.

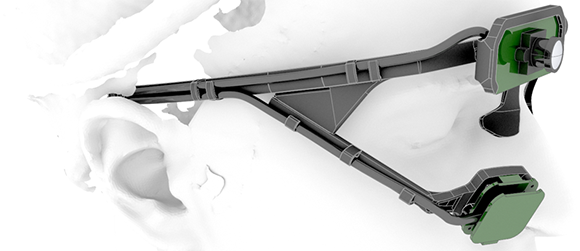
The basic idea behind Pupil is to put one digital camera facing the user’s eye while another camera looks out on the world. After calibrating the included software, the headset looks at the user’s pupil to determine where they’re actually looking.

The hardware isn’t specialized at all – just a pair of $20 USB webcams, a LED, an infrared filter made from exposed 35mm film negatives, and a 3D printed headset conveniently for sale at Shapeways.

The software for Pupil is based on OpenCV and OpenGL and is available for Mac and Linux. Calibration is easy, as seen in the videos after the break, and the results are amazing for an eye tracking headset thrown together for under $100.

Continue reading “Build An Eye Tracking Headset For $90”

Automatic, Custom Eagle Schematics

sch

It’s a simple fact that for every circuit you design, someone else has done it before. If you’re working on a high altitude balloon project, there’s already a project out there with a microcontroller, barometric pressure sensor, and an SD card somewhere out there in a corner of the Internet. Google will only help so much if you want to copy these previous builds, which led [Ben] to come up with a better solution. He took dozens of building blocks for basic digital projects and put them all into one really great interface called HackEDA.

The premise is simple: most electronic projects are just electronic Lego. You connect your microcontroller to a sensor, add in a battery, throw in a few caps and resistors for good measure, and hopefully everything will work. HackEDA takes all those basic building blocks – microcontrollers, power sources, and sensors – and creates a custom Eagle schematic with all the parts your project needs

HackEDA is still very much in beta, so there aren’t a whole lot of building blocks to choose from. That said, being able to generate an Eagle schematic with all the parts necessary for your next project is a boon. With this, all you need for a final circuit board is to create a new board file, hit the autorouter, and spend a half hour fixing whatever mess the autorouter made.

if firecracker-crossbows are outlawed, only outlaws will have firecracker-crossbows!

The Firecracker Crossbow

firecracker-crossbow

If there are two things that we love at [HAD], giant German firecrackers, and medieval weapons would have to be close to the top of this list. This clever hack gives us both, with a toy crossbow capable of both lighting and launching firecrackers to a safe distance. We didn’t see a blooper reel, but being ready to run in case of a malfunction is probably a good idea as well.

The post has some pictures of the mechanism, but at its heart, this hack consists of ripping up a grill igniter, and placing the contacts into a shortened-stock toy crossbow. Safety is of course encouraged, as much as it can be with this type of device. It’s especially important here as apparently “firecracker” roughly translates in German to “small sticks of high-explosive,” or possibly “road flare.”

Be sure to check out this modded crossbow in action in the video after the break!

Continue reading “The Firecracker Crossbow”

Hands On With The Super Tiny Arudino: FemtoDuino

photo(30)

We originally heard about the FemtoDuino last year. It looked good enough and tiny enough, but we didn’t really have a need for it. Recently though, we started on a new project (which you can follow on the forums!) which required an easy modification to an existing circuit. Space and weight were quite important so we decided to pick up a couple femtoduinos at $25 each, and give them a try.

Continue reading “Hands On With The Super Tiny Arudino: FemtoDuino”

Cracking A SAM7XC Cryptographic Coprocessor

attacking-RFID-crypto-coprocessor

[Adam Laurie] spent time tearing into the security of the SAM7XC chip produced by Atmel. Even if he hadn’t found some glaring security holes just reading about his methodology is worth it.

The chip is used in a secure RFID system. The chip is added to the mix to do the heavy lifting required when using encryption. [Adam] grabbed a couple of open source libraries to put it to the test. The firmware is locked down pretty tight, but his explorations into the content of the RAM yield a treasure trove of bits. After investigating the sample code for the chip he’s shocked to learn that it uses RAM to store the keys at one point. The rest of his journey has him dumping the data and sifting through it until he gets to the “Master Diversification Key”. That’s the big daddy which will let him decrypt any of the tags used.

He reported his findings to Atmel in September of 2011. Their response is that they have no way of protecting RAM from exploit. [Adam] asserts that the problem is that the sample software wasn’t designed with the vulnerability of RAM in mind. The keys should never be stored there specifically because it is vulnerable to being dumped from a running system.

Automatic Volume Control Puts The Kibosh On Loud TV Commercials

automatic-tv-volume-control

If you’re having a hard time tuning out those loud commercials why not let your electronics project do it for you? This is an Arduino-based setup which adjusts television volume when it goes above a certain threshold. It uses a microphone, rather than a direct audio signal, so you can set it based on what is actually heard in the room.

The control scheme uses the IR LED and IR receiver seen on the breadboarded circuit above. The receiver lets you teach your volume up and down buttons from your remote control to the system. The one failing we see in the design is that the volume level is hard-coded, requiring you to flash new code to make adjustments (perhaps an enterprising reader could add a potentiometer for making easy adjustments?).

We can’t help but be reminded of the setup which reads the closed caption info to mute topics you’ve added to a blacklist.

Script Lets You Import Eagle Boards For Use In FreeCAD

eagle-designs-imported-for-freecad

[Christian Aurich] wanted to use his Eagle CAD circuit board design in a proper CAD program in order to design enclosures. There are already a few options along these lines, but they didn’t quite fit his needs so he developed a script to import Eagle boards into FreeCAD. The script is packaged as a python macro for FreeCAD.

In describing the shortcomings of what’s already out there [Christian] does mention the use of EagleUp to model boards in Google SketchUp. But he feels the way the data is produced by SketchUp makes these models work well with 3D printing, but says they’re not easy to use with mechanical design CAD software. He also feels that the photo-realistic renderings are useless when developing enclosures.

It’s worth mentioning that this approach is only possible because CadSoft’s migration to XML makes it dead simple to get at the data.