Wall Wart Computer Mouse

SAMSUNG

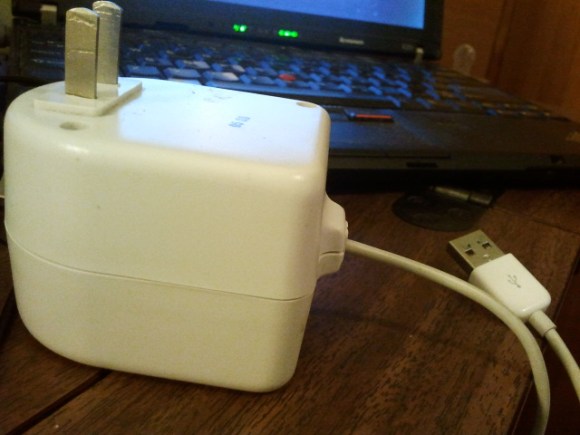
This rather bulky looking wall wart is actually a computer mouse. Sure, it may cause your hand to cramp horribly if used for any length of time. But some would say it’s worth that for the hipster value of the thing.

The rather odd shape is somewhat explained by the fact that this was sourced from Ikea. After gutting the transformer found inside the plastic case he had plenty of room to work with. He drilled a hole so that the sensor from a Logitech USB optical mouse can pick up the movement of the mouse. He also got pretty creative when it came to the buttons. The two prongs of the wall plug pivot horizontally to affect the momentary press switches inside.

After the break you can see a quick demo of the project. [Alec] doesn’t consider it to be complete. He wants to make a couple of improvements which include adding weight to make it feel more like the original wall wart, and finding a way to hide the hole he drilled for the sensor.

Continue reading “Wall Wart Computer Mouse”

Recurve Bow Make From Wood And Skis

bow-made-from-ski

A little face protection is a great idea when first testing out your homemade bow. [Austin Karls] made this recurve bow during what he calls an engineer’s Spring break.

He settled on the idea after seeing a few other projects like it on Reddit. After first drawing up a plan he headed down to the shop to cut out the wooden riser (the middle part of a bow). Unlike traditional recurve bows this is made up of three parts. Traditionally you would laminate different types of wood to achieve the flexibility and tension levels desired. But [Austin] went with a synthetic material: the tips of two skis. Each were cut to the final length and affixed to the riser with a pair of bolts.

After a few test shots he gained confidence in the design and did away with the face mask. Now if you’re in the market to take your existing bow and add some firepower to it you’ll want to look in on this shotgun enhanced compound bow.

[Thanks Schuyler]

The RedBull Creation Contest Begins!

http://www.youtube.com/watch?v=D9WPZjcEOdI

The RedBull Creation contest begins today.

Last year, we had a ton of fun competing in the RedBull creation contest. The idea is that RedBull hosts this big contest where teams compete by making awesome stuff. Finalists get to take a trip to Brooklyn for a build off extravaganza. Frankly, we think this is how ALL advertising budgets should be spent.

This year, however, we will not be participating as a team in the contest. We’ll be helping judge it!

The hardware:

In previous years, RedBull has sent out some custom hardware for people to use. Last year it was basically an Arduino on a custom PCB with some cool touch sensors. This year, they’ve sent out this multi purpose LED controller shield that looks pretty impressive.

You can see all the details along with a breakdown of the board from the creator himself, after the break.

Continue reading “The RedBull Creation Contest Begins!”

Synthesizing Graphene In Your Basement Laboratory

We’re surprised that we haven’t come across any of [Robert Murray-Smith’s] projects before. Looking through his collection of YouTube uploads proves that he’s a very active amateur chemist (we assume this is a hobby because he performs the experiment in a mayonnaise jar). The video we’re featuring today is about ten minutes of his technique for synthesizing graphene. The video can be watched after the break. Be warned that the audio doesn’t sync with the video because he overdubbed the presentation to fix up the poor audio quality from the original.

Graphene is something of a compound-du-jour when it comes to electronic research. You may remember reading about using DVD burners to make graphene film that will go into thinks like super-capacitors to replace batteries. [Robert] starts off his process with a jar of 98% sulfuric acid and 75% phosphoric acid. He pours in powdered graphite (chemical proportions are important here) and gives it a swirl. Next some potassium permanganate is added over about five or ten minutes. From there it goes on the stir plate for three days of constant stirring. During this time the solution will go from green to brown, indicating the presence of graphene oxide.

He goes on from there, but it’s clear he hasn’t found an iron-clad route to his end goal of isolating the graphene for use in constructing things like those super-capcitors we mentioned earlier. If you’ve got a home lab and some interest perhaps you can contribute to his efforts.

Continue reading “Synthesizing Graphene In Your Basement Laboratory”