Turning Grandpa’s O-scope Into A Clock

clock

Around 1960, [Aaron]’s grandfather decided to try his hand at a new career in electronics repair. It didn’t pan out, but before he gave up he built a beautiful Heathkit oscilloscope, a model OR-1. Grandpa’s electronics career never took off, but years later it would serve as the impetus for [Aaron]’s own career in electronics. Now [Aaron] has too many oscilloscopes, but still wanted a way to preserve his grandfather’s legacy. An oscilloclock was just the project to do that.

Of course to turn an oscilloscope into a clock requires some interesting control circuitry, and [Aaron] didn’t skimp on his build. He created a custom control board that is able to draw any shape on the CRT screen using just circles; squashing circles to draw a line, and cutting the beam entirely to slice a circle in half.

This isn’t [Aaron]’s first oscilloclock by a long shot. He previously created this amazing clock completely from scratch. Still, using Grandpa’s old tools is a great way to make this oscilloscope useful again, even if [Aaron] is already up to his gills in test equipment.

Hackaday Looking For A Good Home

hackaday

Below is a statement from [Jason Calacanis], the owner of hackaday ———————-

HackADay.com, an awesome maker community, is looking for a new home
——–

tl;dr: HackADay is a passionate community of hackers doing awesome stuff. It deserves more attention than I can give it right now, as I’m ultra-focused on the launch of Inside.com. So, we’re looking for a caring new owner with a stellar track record of not f@#$ing up brands to take it over.

——–

We created HackADay back in 2004 because one of Engadget’s awesome bloggers, Phil Torrone, wanted to do super-geeky projects every day and the Engadget audience wasn’t exactly into that frequency.

In a phone call with PT I said, “So you want to do a hack a day?”

He was like, “Yeah, a hack a day.”

And I was like, “OK, let’s do hackaday.com.”

When we sold Weblogs Inc. to AOL, we took HackADay out of the deal because it was doing stuff that a corporate parent’s legal arm might not feel comfortable with (e.g., hacking cable boxes!).

So, I bought it and kept it safe and warm inside of Mahalo.com for the past couple of years. However, since I’m super focused on the Inside.com launch, I need to find a new home for it.

It’s doing over $14k a month in advertising without a sales force (just AdSense mainly), and it’s got an amazing stable of bloggers. Given its 6m pageviews a month and with an advertising sales force doing a modest $15 RPM, Hackaday could do $90k a month.

We’ve got 5,674 members of our email list after just five months (should have started it 10 years ago, would have been at 100k+ by now!).

We’ve started doing some epic videos on YouTube. Collectively the videos have over 5m views and 31k subscribers: www.youtube.com/hackaday

This awesome video broke 1m views: http://youtu.be/LZkApleQQpk

Our Twitter handle has 29k followers.

We’re hoping someone like Maker, DemandMedia, InternetBrands, AOL (without Time Warner involved!), Gawker or another publisher can carry on this awesome, profitable and limitless brand.

If you’re interested, send a note to jason@inside.com.

Also, HackADay is looking for a new editor-in-chief. Please send sample projects, posts and whatever else you got to neweditor@hackaday.com.

Thanks for allowing me this and for your help with any new home ideas.

best @jason

Briefcase Mill

briefcase-mill

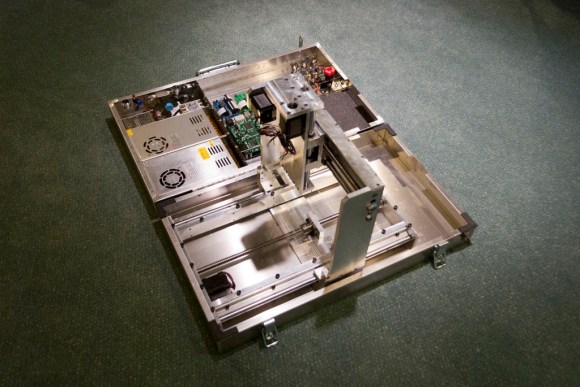
Take the machine shop with you; that’s the mantra which drove [Ryan] to build this CNC mill in a briefcase. That album will give you a taste of the final product. But you’ll want to dig through two pages of his forum thread starting with this post in order to behold the build process.

The image above is only part way through the fabrication, but we thought it gave the best overall view of his work. It’s missing the cables which connect to the control circuitry in the lid. The bed has also not been installed and this was before he fabricated the protective case for the PCBs.

Getting everything to fit inside of a folding case was quite a trick. Of course he used CAD to make sure it was possible. There are several places where the clearance when closed is about 2mm. We’re shocked by the build quality of the mill itself. It’s a novel idea to make it portable, but the accuracy and reliability of the machine didn’t suffer for the concept.

If you need a desktop mill that’s not quite as portable here’s a project which will dish out some inspiration.

Raspberry Pi Automates Your Tomato Farm

rpi-tomato-farming

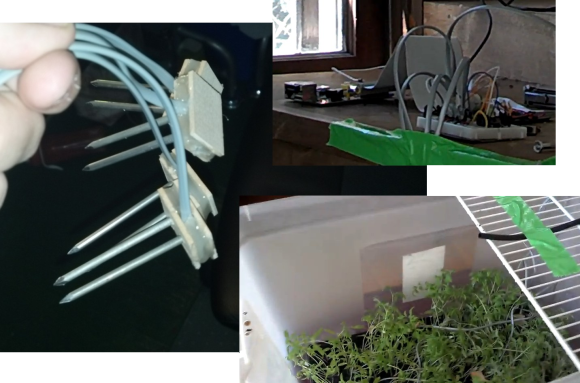
Check out the tomato plants [Devon] grew using a monitoring system he built himself. It’s based around a Raspberry Pi. As far as grow controllers go it falls a bit short of full automation. That’s because the only thing it can actuate is the black water line seen hovering above the plants. But [Devon’s] work on monitoring and collecting sensor data should make it easy to add features in the future.

The moisture sensors pictured above monitor the soil in which the plants are growing. But he also has temperature and light sensors. These are very important when growing from seed and could be used in conjunction with a heating mat for plants that require higher soil temperatures (like pepper plants). The tomatoes are also pretty leggy. Now that he’s monitoring light levels it would be good to augment the setup with a grow light. A long term goal could even be a motorized bed which could raise the plants right up to the bulbs so they don’t reach for the light.

Don’t let the stars in our eyes distract you though. He’s done a ton of work on the project both with the physical build, and in plotting the data collected by the system. Great job!

Continue reading “Raspberry Pi Automates Your Tomato Farm”

Goodbye Hackaday, I’ll Miss You.

Farewell Hackaday, the time has come for me to move on. Don’t worry, hackaday will keep going, just like it did when [Eliot] moved on, and [Phil] before him.

I wrote my first post on July 9th, 2008. Since then I’ve had so much fun, and written a total of 1,552 posts (including this one). In my opinion, there is simply no other site like Hackaday.com, our readers are passionate and knowledgeable and it shows, even if some of you are incredibly rude to each other(that’s a sign of passion right?).

While some projects stand out in my mind, it is the people I have enjoyed the most. The people I met when I went to all the different hackerspaces, my co-writers[Mike Szczys] and[Brian Benchoff], past hackaday employees, our commenters,  and even my boss [Jason Calacanis].

If you want to find me, I’ll be at calebkraft.com or on facebook or G+. I have a twitter too, that I guess I’ll start using today.

Join me after the break just one more time while a take a trip down memory lane with a few of my favorite moments from the last few years.  Oh, and yes, I think saying “after the break” is stupid. What else do you say though?

Continue reading “Goodbye Hackaday, I’ll Miss You.”

Working With Very Cool LCD Modules From Sharp

LCD

Here’s some interesting hardware for you: Sharp came out with a very cool series of LCD displays, gong by the name Sharp Memory LCD. Not only are these displays very low power – on the order of about 5 microAmps to keep the display alive – but some of the smaller displays are reflective, making them eminently readable even in daylight. [Mike] decided he’d take a look at these displays and liked what he found.

While these displays are still pretty new, there are a few breakout boards available to make them accessible to desktop tinkerers. The folks at MakerDyne have a breakout board available and there’s one by kuzyatech over on Tindie.

While these displays are readable in daylight and are extremely low power, don’t expect to display LCD video on them anytime soon. The refresh rate is still fairly slow, but you might be able to get away with simple animations with interlacing and so forth. Still, outside of eink, you’re not going to find a better display in terms of power consumption and daylight readability.

Continue reading “Working With Very Cool LCD Modules From Sharp”

Designing A Marble Track From Scratch

Woodworker extraordinaire [Matthais] was approached by a toy company to create a ‘marble run’ toy. [Matthais]’ jig-building skills are beyond reproach, so whipping up a prototype for this toy was pretty easy for him.

The basic unit of construction for this marble run is a simple ramp block with inputs and outputs at either end. These were crafted from blocks of wood, with the ramp carved out with a slot mortising machine. To make the side cuts on each block, [Matthais] used his pantograph router and a jig that cuts the wood for marble inputs on either side.

After taking his creation to a hackerspace for some very large kids to play with, [Matthais] found a few problems with his initial design. The blocks didn’t want to stay aligned when marbles were moving down the ramps, so a small mortise and tenon – looking very much like a piece of Lego – were added in several locations on the underside of each block.

Making one of something is relatively easy, but [Matthais] is making hundreds of pieces for his marble run prototype, each interchangeable with another. That’s impressive for something crafted by hand, but when you’re a master at making jigs like [Matthais], everything goes by pretty easily.