Fail Of The Week: Unconnected Nets In KiCad

fotw-unconnected-net

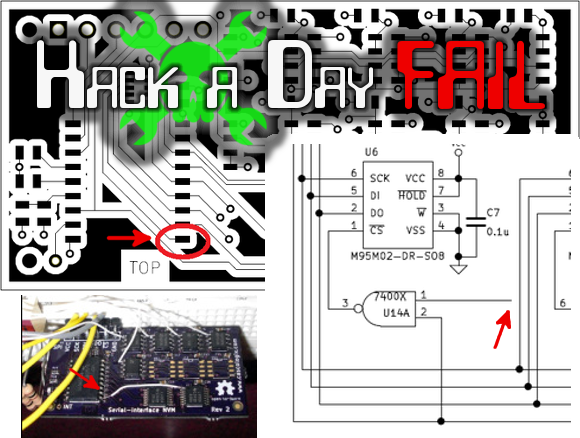
From the title and the image above you surely have already grasped this Fail of the Week. We’ve all been there. Design a board, send it to fab or etch it yourself, and come to find out you’ve missed a connection. Automatic checks in your software should prevent this, but when making small changes it’s easy to overlook running the checks again. This is exactly what [Clint] did with this board; leaving a net unconnected in the schematic, which made its way through to the board layout and into the OSHPark boards.

Okay, so fix it with jumper wire which is clearly what he did (white wire in the lower left image above). But since this is rev3 of his PCB it’s pretty upsetting that it happened. The meat and potatoes of the fail is the missing software feature that led to it. KiCad doesn’t have a pin swap tool in the board layout. Really? We use KiCad frequently and didn’t realize that the feature was missing. Needing to simplify his board layout, [Clint] went back to the schematic to swap some resistor network pins by hand. He pushed the change through the netlist and into the board layout, not realizing he had left an input gate unconnected.

A bit of searching proves that pin swapping may be coming to KiCad soon. It’s on the CERN roadmap of features they plan to add to the open source PCB layout software. We remember hearing about CERN’s plans quite a while ago, and thought we featured it but the only reference we could find is [Chris Gammell’s] comment on a post from back in December. It’s worth looking at their plans, these are all features that would make KiCad a juggernaut.

EDITORIAL NOTE: We’ll soon be out of story leads for this series. If you have enjoyed reading weekly about fails please write up your own failure and send us the link. Of course any documented fails you find around the internet should also be sent our way. Thanks!


2013-09-05-Hackaday-Fail-tips-tileFail of the Week is a Hackaday column which runs every Wednesday. Help keep the fun rolling by writing about your past failures and sending us a link to the story — or sending in links to fail write ups you find in your Internet travels.

Manual Pick And Place

picknplacePopulating a large surface mount PCB can take forever. [craftycoder] from Freeside Atlanta has built a great looking manual pick and place machine, removing the need for tweezers. No more will passives stick to your tweezers while you are trying to place them on your PCB!

We have seen a lot of pick and place machines in the past few years. What makes this one stand out is its simplicity and the no-nonsense build. This pick and place is built on an MDF platform, uses bearings from Amazon, standard 12 mm rails, and has a small camera for a close-up look at your part placement. Sure it is a manual method, but it beats painstakingly placing each part with tweezers. It would be interesting to see how much this entire build cost; we expect that it was not too expensive. See this thing in action in the video after the break.

We hope this project has inspired you to go out and make something cool! If so, let us know what you have made!
Continue reading “Manual Pick And Place”

Automatically Accept Membership Fees Or Donations

MoneyMachine

Whether you run a club or a hackerspace, collecting membership fees and accepting donations can be a pain. [MRE] from TokyoHackerspace has the solution, an automated machine that can accept cash from anyone who is walking by.

Members can choose to either donate or pay their membership fee even when the hackerspace administrator is not around.  The interface consists of two buttons, an LCD display, a place to put your cash, and a thermal printer that prints out two receipts (one for you, one which goes right back into the box). One of the coolest parts of this build is the banknote validator, which can work with over 100 currencies (in this case, it is programmed to accept Japanese bills). Despite the simple interface, a lot of thought went into this build. There are backup batteries for the real time clock, an EEPROM to keep track of all the accounting, and an Arduino as the brains of the operation. If you take a look at the project page, there is a lot of information on the Arduino code, the PCB layout, how to interface with the banknote validator, and more! Check out the machine in action after the break.

We would love to see the banknote validator used in other projects. Have you used one before or built something similar?

Continue reading “Automatically Accept Membership Fees Or Donations”

Make An HD Projector For Next To Nothing!

Need a high definition projector? Don’t have a thousand bucks sitting around? Then this hack is for you! [TheJinxster] threw together this awesome HD projector, and it cost him absolutely nothing to build!

He started by picking up an old overhead projector off of Freecycle. Freecycle is a great grassroots network, kind of like Kijiji or Craigslist — but everything is free. It’s all about reuse and keeping useful things out of the landfills. Anyway, he also had an old LCD monitor sitting around gathering dust…

Putting two and two together he took apart the LCD, laid the bare screen on top of the glass and, well, that’s it! It’s seriously that simple. The hardest part was taking apart the monitor — the overhead projector and mounted lens took care of the rest. The beauty with a system like this is you can get high definition out of a relatively small and cheap LCD panel! The only thing is it won’t last forever — LCDs (especially monitor LCDs) aren’t designed to pass through that much light.

Don’t believe us? Check out the following video.

Continue reading “Make An HD Projector For Next To Nothing!”

USB-ify Your Old Cell Phone Chargers

phoneChargerUSBd

If you’re like us, you probably have a box (or more) of wall warts lurking in a closet or on a shelf somewhere. Depending on how long you’ve been collecting cell phones, that box is likely overflowing with 5V chargers: all with different connectors. Bring them back to life by doing what [Martin Melchior] did: chop off the ends and solder on a bunch of USB jacks.

You’ll want to use chargers rated for at least 500mA (if not 1A) for this project, or you may be wasting your time considering how much current devices pull these days. Get your polarity right, solder on a USB jack, and you’re finished. Sure, it’s a no-brainer kind of project, but it can clean out some of your closet and give you a charging station for every room of your home and the office. [Martin] glued the USB jack directly onto the adapters, so there are no tangled cords to worry about. iPhone users will need to do the usual kungfu if you want your Apple device to charge.

Build Your Own Elektrosluch 2 And Save €45

[Jonas] over at LOM Instruments is running an Indiegogo campaign for his newest creation, Elektrosluch 2. Like it’s predecessor, Elektrosluch 2 is a means to listen to the electromagnetic sounds of the world around you. Fans, computers, cell phones, routers, and just about anything electronic create strange and interesting sounds when probed with Elektrosluch 2. The campaign seems to be doing well enough with its target audience of experimental music and audio folks. However at €45 ($62.37) it’s a bit pricey for our blood. Unfortunately, [Jonas] hasn’t open sourced the project. All hope is not lost though, as Elektrosluch 2 appears to be simple enough that our astute readers should be able to build their own.

The concept is easy to understand: a coil of wire placed within a magnetic field will have an induced current proportional to the strength of the field. Electric Guitar pickups operate on the same basic principles. [Jonas] appears to be using two coils – probably tuned to different frequencies. We’re talking about relatively small magnetic fields here, so the signal will need to be amplified. In the Elektrosluch 2, the amplifier is an 8 pin SOIC which we can’t quite make the label out on. A few capacitors and resistors limit the bandwidth to audio frequencies.

[Alan Yates] created a similar circuit to diagnose dead Christmas lights. In [Alan’s] case, he used a pin instead of a coil. Two transistors and a handful of discrete components performed the amplification duties.

Continue reading “Build Your Own Elektrosluch 2 And Save €45”

Staff Update

staff-update-march-2014

Has it really been three months since our last Staff Update? Even though you’ve been enjoying posts from these guys for quite some time now a proper introduction is in order. From left to right, please join me in welcoming [Bil Herd], [Rich Bremer], [Nick Conn], and [Abe Connelly] to the team.

[Bil] started out with a guest post on the C128 which I absolutely loved. We got to talking and he mentioned an interest in putting out some video content. His first offering for Hackaday was the segment on calculating component heat. He has a few more in the pipeline and I’m sure he’d love to hear your ideas for the subjects of future videos.

I like to choose contributors who have a wide range of interests: [Rich] has a mechanical engineering background. Nick, who is working on his Ph.D., has quite a bit of experience with medical devices. This is not to be confused with the type of bio-medical hacking which [Abe] is interested in. Learn more about all of their backgrounds over on the Hackaday Staff page.

All of the people who have joined us over the last six months came form a pool of applications received after a September hiring announcement. I posted another one last week and have received numerous applications. I’m still reviewing them so don’t worry if you haven’t heard from me, you will soon!