Hackaday Meetup With HeatSync Labs And The Tymkrs


hackaday-meetup-tymkrs-hsl

We know a lot of hackers will be heading to Maker Faire next weekend. If you find yourself passing through Mesa, AZ on your way or you’re a local hacker enthusiast then please feel compelled to drop by HeatSync Labs on May 15th between the hours of 5pm and 9pm for an informal gathering. You will get to meet HeatSync Labs hackerspace members and The Tymkrs (Whiskers and Addie) who are founders of The Rabbit Hole hackerspace in Rochester, Minnesota. Sorry for the late notice, I thought it would be a great opportunity to organize an impromptu hacker meetup in order to include The Tymkrs as they pass through town on their epic summer road trip.

If people have a project or photos of a project they’re working on I would enjoy hearing all about it and I’m sure others would as well. I’m looking forward to visiting everyone that can attend!

For those who show up early there should be plenty of pizza, soda and Hackaday swag to go around. I’d like to thank the members of HeatSync Labs for kindly letting me schedule a Hackaday style meetup at their hackerspace on such short notice. There will be some food and drink so don’t be too late or you might go hungry.

Meetup address: HeatSync Labs 140 West Main St. Downtown Mesa, AZ


Raspberry Pi Boiler Control Uses A Webcam To Read The Analog Gauge

sub-image

One of the biggest problems with home automation is trying to interface with old or analog devices. Do you upgrade the device just so you can automate it? Or do you find a workaround like [Seb] did?

[Seb] doesn’t have on-demand hot water, and as such has to turn on his boiler if he wants to have a hot bath or shower. Not very convenient having to wake up an hour early in the morning just to turn the boiler on so he can have a morning shower! Nonplussed with having to continue putting up with this, he decided to try his hand at home automation using a Raspberry Pi.

The problem is there’s no easy way to have feedback on what the boiler is doing — sure he can turn it on and off using a mains relay with the Pi’s GPIO, but how can he easily measure the temperature inside the boiler?

Continue reading “Raspberry Pi Boiler Control Uses A Webcam To Read The Analog Gauge”

Augmented Laser Cutter Removes Design Technology Barriers

augmented laser

Laser cutters, 3D printers, CNC routers — they’re all great technology in the right hands, but unfortunately the learning curve sometimes puts would-be makers at a distance.  [Anirudh] from MIT’s Media Lab is attempting to break down at least one of those barriers with his augmented laser cutter system called, Clearcut.

The system consists of a webcam, a projector, and a semi transparent work space on top of the laser cutter. By placing objects on the surface, the webcam can identify them, duplicate them with the projector, and then laser engrave them. In addition to the “copy and paste” idea of this, you can also use infrared emitting pens to physically draw your design on the work surface to be engraved. It starts to bridge the gap between complex CAD and pencil and paper, something anyone is capable of.

Continue reading “Augmented Laser Cutter Removes Design Technology Barriers”

GPIB To USB, With A Python API

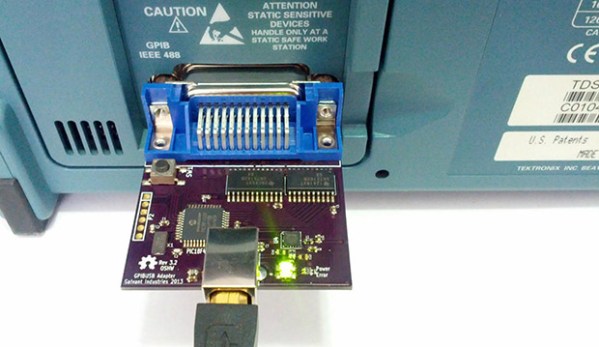
If you’re not so daft as to think Arduino-based oscilloscopes and multimeters are actually useful for all but the simplest tests and measurements, you just might have some big iron sitting around your workbench from the likes of HP, or Tektronix. You might have noticed a strange port on the back of these machines, labeled GPIB or IEEE-488. This is the standard interface for these devices, and if you’ve ever priced out a USB to IEEE-488 converter, you can see why [Steven] thought it would be cheaper to build his own.

This build is an update to an earlier version we saw a few years ago. Since then, [Steven] has taken some advice from the community and replaced a bunch of resistors with proper GPIB line driver ICs, and generally cleaned up the firmware.

Because a USB to GPIB adapter is only one small part of the tools necessary to connect these old measurement devices to a modern computer, [Steven] has also been working on InstrumentKit. It’s a Python library that takes all the standardized instrument commands and wraps them up in an easy to use API. You can check out the docs for InstrumentKit here, or just look through the board files and firmware on the Github

The PebblyPi: A Smart Doorbell

PebblyPi

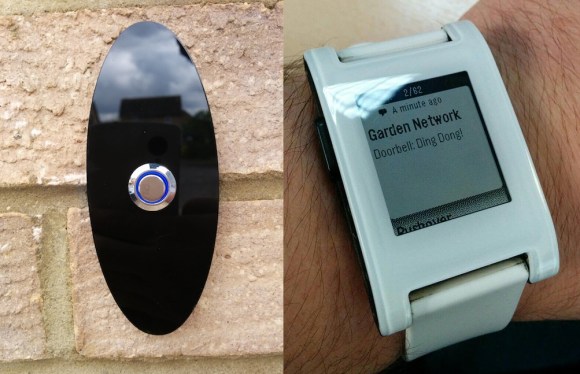
A Pebble smart watch, and a Raspberry Pi. They are a perfect match. This is probably what [Daniel] thought when he embarked upon his latest project, a smart doorbell called the PebblyPi (tip submitted by [Ben]).

The actual project is quite easy to implement. All you need really need is a Raspberry Pi, a switch, a resistor, and a Pebble Smart Watch (plus a smart phone). Using a simple Python script on the Raspberry Pi, button press notifications are sent to Pushover, which allows the notification to arrive on your smart phone (and thus your Pebble Smart Watch). Pushover is a very cool notification service for Android devices, iPhones, iPads, and your Desktop. The concept behind this project is great, and the fact that it is so simple to implement opens up many other possibilities for interfacing your home electronics with the Pebble Smart Watch (or even just your smart phone). The ability to create custom notifications on any of your devices using any internet connected system is amazing!

You could receive notifications from your absurdly accurate weather station, or even your soil moisture monitor. Have you used Pushover in any of your projects? The possibilities are endless!

Continue reading “The PebblyPi: A Smart Doorbell”

Testing The Efficiency Of PCB Etchants

etchIn the interest of the scientific method [Feynmaniac] (great name, btw) over on Instructables has posted a little experiment on something we all, no doubt, care about: putting PCB traces in copper clad boards with the most common etchants out there.
The experiment used the ‘ol standard, ferric chloride, and the safe, inexpensive newcomer, vinegar, hydrogen peroxide, and table salt. Finding the most efficient mixture of ferric chloride is easy: just use what’s in the bottle. The vinegar and H2O2 requires some stoichiometry, though, and [Feynmaniac] calculated that with an 8% acetic acid solution and the most commonly available 3% peroxide solution, a 2:3 ratio of peroxide to vinegar is the best. Salt to taste, or until everything turns green.

Four copper clad boards were used for the test, masked off in a ‘barcode’ pattern. Two methods of applying the etchant were used: either rubbing the etchant on with a sponge, or immersing the boards in a bath of the etchant being tested.

In terms of speed, ferric chloride was by far the fastest, with 3 minutes until the board was etched using the rubbing method, or 10 minutes when simply immersed. Vinegar/peroxide took longer with 11 minutes rubbed, and 20 minutes immersed. No differences in the quality of the etch were noticed.

While ferric chloride was by far the fastest etchant, it does have the downside of being environmentally unfriendly and fairly expensive. The vinegar and peroxide etchant is safe, cheap, and can be found in any grocery store on the planet.

This experiment didn’t test other common etchants like HCl and H202, or cupric chloride (which is is the byproduct of HCl and H202). Still, it’s a good confirmation that the vinegar and peroxide method actually works, in case you were wondering.

The P.u.l.s.e Parking Light

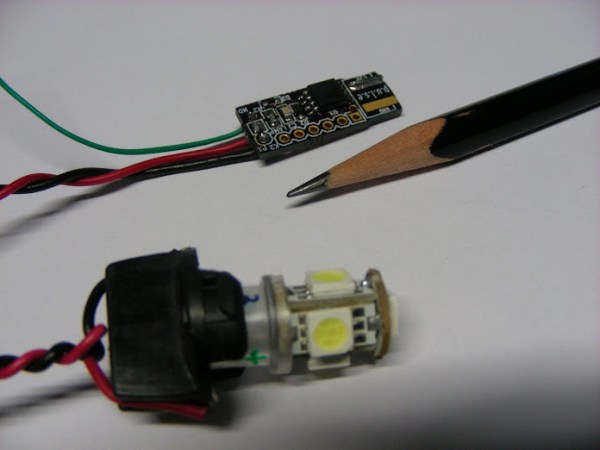
[Anool]’s brother loves his motorcycle, and when he came across a ‘breathing LED’ mod for the brake light, he had to have one. Being tasked with the creation of a pretty cool mod, [Anool] came up with p.u.l.s.e., an extremely small LED controller and a slight tip ‘o the hat to Pink Floyd and the second or third greatest CD packagings.

The circuit is a slightly Apple-inspired mod for the  parking light that keeps the lamp fully lit when the Neutral Detect line on the bike is high, and slowly pulses the LED in a ‘breathing’ pattern when the Neutral Detect line is low. Not a lot of logic is needed for something this simple, so [Anool] turned to the ATtiny45 and the Arduino IDE to accomplish his goal.

[Anool] created a circuit in KiCAD that would plug in to the lamp socket of his brother’s bike. A cluster of LEDs replace the T10 lamp inside the parking light, and a small amount of code takes care of the logic and breathing effect. It’s a great mod, and the astonishingly small size of the board puts him in the running for the smallest Arduino we’ve ever seen.

Videos of the light in action below.

Continue reading “The P.u.l.s.e Parking Light”