Over the last few years we’ve seen a few commercial products that aim to put an entire PCB fab line on a desktop. As audacious as that sounds, there were a few booths showing off just that at CES last week, with one getting a $50k check from some blog. [Connor] and [Feiran] decided to do the hacker version of a PCB printer: an old HP plotter converted to modern hardware with a web interface with a conductive ink pen.
The plotter in question is a 1983 HP HIPLOT DMP-29 that was, like all old HP gear, a masterpiece of science and engineering. These electronics were discarded (preserved may be a better word) and replaced with modern hardware. The old servo motors ran at about 1.5A each, and a standard H-Bridge chip and beefy lab power supply these motors were the only part of the original plotter that were reused. For accurate positioning, a few 10-turn pots were duct taped to the motor shafts and fed into the ATMega1284p used for controlling the whole thing.
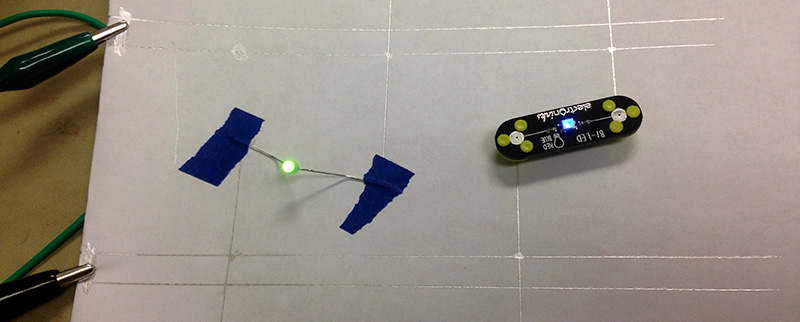
One of the more interesting aspects of the build is the web interface. This is a small JavaScript app that is capable of drawing lines on the X and Y axes and sends the resulting coordinates from a server to the printer. It’s very cool, but not as cool as the [Connor] and [Feiran]’s end goal: using existing Gerber files to draw some traces. They’re successfully parsing Gerber files, throwing out all the superfluous commands (drills, etc), and plotting them in conductive ink.
The final iteration of hardware wasn’t exactly what [Connor] and [Feiran] had in mind, but that’s mostly an issue with the terrible conductivity of the conductive ink. They’ve tried to fix this by running the pen over each line five times, but that introduces some backlash. This is the final project for an electrical engineering class, so we’re going to say that’s alright.
Video below.


Nice ductape job. Didn’t the plotter already have encoders for feedback (or linear pots perhaps)? Also, I am pretty sure the DMP-29 was made by Houston Instrument not HP.
Impressive tape, the piece on the right looks like Vermont.
The feedback hardware that had been in place was actually based on tunable capacitors. It required an AC supply from the old power system on the plotter that we were avoiding. Replacing the capacitive feedback system with a resistive one simplified the design and avoided the need for exact timing constraints on the MCU
Additionally, the plotter is made by Houston Instrument. Not sure where they got HP from.
Given that it uses specialized ink, I wonder if you’re trying to run it too quickly. The pen appears made for hand use, I don’t think they expected people to try to draw so quickly.
Was no attempt made to find the code to operate the plotter as-is? I don’t know if this is complete enough to work, but there’s a chance it could have done the job: http://www.atarimagazines.com/creative/v9n10/59_Houston_Instrument_HiPlot.php
unfortunatly the software world seems to have forgotten how to speak HPGL, or any varriant, I have a few large format pen plotters that are quite a challange to do anrything with on account of having to convert for them.
You can use inkscape (development version). Here is how: http://www.timewasters-place.com/your-cutting-plotter-and-inkscape/
Eagle happily exported HPGL, as far as I have seen.
This project almost makes me want to try this out on my roland GX-24 fitting it with a pen, Plus side is that on the hardware side I can choose the speed and pressure at which it plots/cuts which may yield better results?
Replace thee pen with an engraver and ‘plot’ traces around the conducting parts on a copper-clad board.
It’s going to be noisy though, and needs a blower to blow away debris.
Not to mention going through diamond bits like an elementary schooler goes through pencil tips.
It’s dead simple to send an HPGL file to an HP or other HPGL compatible printer. Open a command prompt (or equivalent on your OS) then copy the *.plt file to the serial port the plotter is connected to.
HPGL is all standard ASCII text characters. To plot an HPGL/2 *.plt file you need to use Binary mode when copying the file to the port because HPGL/2’s extensions use some extended ASCII characters.
Instead of hacking up the hardware of a plotter the neat trick would be a Gerber to HPGL/2 converter/driver that acts as a wedge between the port and the OS, but only is activated when it detects a file with a .plt extension being sent to the port.
Look around online and you can find some examples of .plt files to experiment with. Do note that the paper size is set in the file. If you try to plot an A4 .plt onto US Letter the plotter will throw the sheet onto the floor.
Lots of great stuff going on in this project!
Might be interesting to explore using rotary optical encoder discs (harvested from a couple of scrap ink jet printers) in place of those analog pots which are coupled to the drive shafts. (Avoids a bunch of troublesome nonlinearities and analog stuff.)
Alternatively, use the linear encoder strips (from the same scrap printers) and directly sense the position of the X and Y arms of the plotter.