
[thelostspore] was experimenting with resin casting, and discovered that he needed a pressure casting chamber in order to get clear casts. There are commercial solutions for sale, and they are really nice. However, many hackers are on a budget, and if you’re only casting every now and then you don’t need such a fancy set-up.
Re-purposing equipment like this is pretty common in the replica prop making community. Professional painters use a pressurized pot filled with paint to deliver to their spray guns. These pots can take 60-80 PSI and are built to live on a job site. By re-arranging some of the parts you can easily get a chamber that can hold 60 PSI for enough hours to successfully cast a part. Many import stores sell a cheap version, usually a bit smaller and with a sub-par gasket for around 80 US Dollars. [thelostspore] purchased one of these, removed the feed tube from lid and plugged the outlet. He then attached a quick release fitting to the inlet of the regulator.
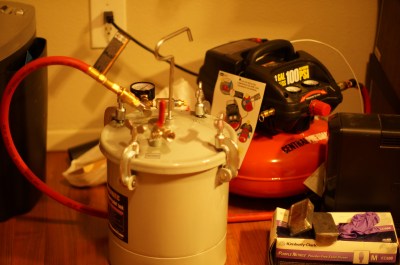
We used this guide to build our own pressure casting set-up. Rather than plug up the outlet on ours, we put a ball valve with a muffler in its place to quickly and safely vent the chamber when the casting has set. We recommend putting a female quick connect coupling or another ball valve in combination with the male fitting (if your hose end is female). It is not super dangerous to do it the way the guide recommends, but this is safer, and you can disconnect the compressor from the tank without losing pressure.
All that was left was to test it. He poured an identical mold and it came out clear!


How does one discover you need a pressure vessel to get clear casts? Wouldn’t that information be available from the resin manufacture? Or is the user trying to do something the resin isn’t normally capable of? Truly, I do not know.
It’s standard practice in industry for several processes using resins
Isn’t it more common to degas your resin after mixing? I work with PDMS on a regular basis, and we always pull a vacuum after mixing with the hardener. Once the bubbles stop appearing, we just vent to atmosphere and pour into the mold. Bubble-free every time.
Whoops, should have RTFA. He definitely states that this is a process to be done following vacuum degassing, as pouring into the mold introduces bubbles. I haven’t worked with resin very much, so I’ll defer to his knowledge.
Alternative would be to use vacuum infusion after degassing the resin, that way we’re doing it for fibre reinforced plastics. But that might be too slow or require too much equipment compared with pouring.
Ive used these painting vessels as vacuum degassing chambers for the last 10+ years. Very affordable and easy to rig up.
Hideously expensive in the UK though. I was extremely lucky to find a batch of used ones cheaply. Out of the five, one was still able to be safely used.
Tip1. Get an electric blanket and pull the heating element out. Wrap it around the pot and it will cure in no time (this is really helpful if you are working with polyurethanes).
Tip2. If you are pressure curing encapsulated SMD electronics, pour the resin, put it in the pot and pull a vacuum first to get the air out from under the chips. If you don’t, then that air compresses when you pressurise and tries to pop the chip off the board when you release the pressure.
THIS
heat also helps the bubbles to go out. not as professional as a vacuum degassing, but works well enough for me. bubbles at the very top can be removed with a lighter or hot air fan
For some reason I was reading about Bakelite on Wikipedia (I know, livin’ the life) and it has to be cured the same way, in a pressure vessel, without it it will come out all foamy.
I used these professionally for casting for about 7 years. That’s really all we do in production environments. Resins were poured and pressurized. Once the container reaches pressure,(30PSI is all you need ) you close the ball valve to the compressor. Had a second ball valve controlling the exhaust, which had mufflers that I built on them. For finely detailed work, I had a slightly more complicated set up that vacuumed the resin after pouring into the mold. There’s a trick to that that would take 1,000 more words than I would care to write to explain, but if you screw it up, you end up with foam. Do it right, and it takes out bubbles much better than pressure.
Important to have an over pressure valve on your pot too. Don’t forget that.
I work on cars quite a bit. Needed a way to suck transmission fluid out of a transmission that does not have a dipstick. Used a harbor freight version of one of these. Air powered venturi-type vacuum pump meant for a.c., also from HF. Run plastic line from output of pot to transmission, hook vacuum pump to other side, connect air, sucks fluid out and into pot. Take off vacuum pump, fill out with fresh fluid, apply air, new fluid is pumped into transmission. Has come in handy for other fluids I either need to remove or put in something. Well worth the time and effort to put it together.
It was a Ford, right? Bloody idiotic thing to eliminate the dipstick and require a special thing to be screwed into the drain hole to be able to re-fill it. The only reason for that is to try and force people to go to a Ford dealer to have their transmission fluid changed.
While this is a fun trick, you would get a larger pressurized/vacuum volume, for less – with a cheap/used pressure canner/cooker. Most are rated for 20psi, some higher. I imagine there is a large margin for safety, because selling faulty pressure vessels to consumers will get you pwned in court. I haven’t tried testing one to failure, and I wouldn’t want to be in the same building with one that did fail – just blowing out the safety plug was enough fun for me.
Nothing wrong with using a spray can though – it may even work better, because you can draw down a vacuum more quickly from the smaller volume.
That won’t eliminate bubbles from many resins. 40 PSI is the minimum I’ve had success with on thicker resins like Crystal Clear 202.
Running a pressure cooker anything above its label rating is an absolute nuh-uh hell no. Not even if you do add a pop-off valve. Look what they did at the Boston Marathon.
Those full of fireworks, so a non-specified mixture of black power and various flash powders. The people that got off unharmed can only be thankful that the attackers didn’t bother looking up how to make real explosives on the internet…
40PSI air can’t do anything even remotely close to that kind of destruction…sure if the lid goes off in your face, you’ll have a very bad day, but no shrapnel and no torn limbs.
Torn eardrums would probably be an issue, but not using hearing protection when doing something like this would just be asking for it…
Haha, unless your polymer resin is a high explosive that you accidentally fuzed, I don’t think you’ll have that particular problem.
I don’t do vacuum degassing. Not on the resins or on RTV silicone. The stuff I use starts to kick too quickly for that, and I mold many things that have sharp inside corners that *will not* fully fill with resin or silicone without using pressure.
I’ve thought about trying vacuum after pouring the resin into molds but I’d have to make the molds much taller so the bubbles wouldn’t blow resin out of the fill sprue and vents. That would use a lot more silicone per mold.
I used a metal lathe to turn a few chunks of 202 into sprue formers, with a bevel on one end, tapering to about a 1/4″ diameter. The large diameter is sized so a LuMax 8oz funnel will securely fit into the sprue hole of the assembled mold.
http://www.lumax.com/main/product.php?productid=94 <-flexible and strong so it's fairly easy to peel cured resin off. After a while of using pliers to squeeze the nozzle ends of the funnels to break the resin out, they can split. If it's just at the end, take some off with a bench grinder. If it's split up the side, toss it and buy another, they're cheap.
You can see my mold making process here. http://partsbyemc.com/pub/mold-making.htm
Since I posted that I've come up with another method of making the form. I apply cheap clear packing tape to plain cardboard then hot glue it together. Works better than the shiny surface cardboard and of course works with any corrugated cardboard.
It's also much more affordable than using foamcore. A dollar store roll of packing tape will make many more mold forms than a piece of more expensive foamcore.
Interesting comments guys, my eldest son & I are putting together an HDPE extruder with a couple of smarts & if even moderately successful can post the project here. Reason for HDPE is its resilience/strength is use as 3D printing method for short run mold/enclosure fabrication which then takes a thermoset/resin for proof of concept to pilot production for all sorts of devices from electronics to marine electrical enclosures etc.
Gradually gaining experience working with HDPE and keen to find info re price/availability for 3D printers using that material in Australia, comments welcome :-)