In the 1970s and 1980s, a lot of us learned to program using good old-fashioned BASIC on machines ranging from Altairs, Commodores, Apple IIs, and the like. Sometime in the 80’s the IBM PC running MSDOS because the de facto standard, but it was still easy enough to launch BASIC and write a simple little program. Of course, there were other programs, some serious like C compilers, some semi-serious like flight simulators, and some pure fun like Wolfenstein 3D.
If you read Hackaday, you’ve probably noticed that a lot of people emulate old computers–including old MSDOS PCs–using a variety of techniques, including Raspberry PI boards running DOSBox or another emulator. Honestly, though, that’s a lot of effort just to run some old software, right? You can load up DOS emulators on your desktop too. That’s a little easier, but you still have to find software. But if you are as lazy as we are, you might want to check out the MSDOS collection at archive.org.
We’re pretty far away from a world full of wall-warts at this point, and the default power supply for your consumer electronics is either a microUSB cable or lithium batteries. USB ports are ubiquitous enough, and lithium cells hold enough power that these devices can work for a very long time.
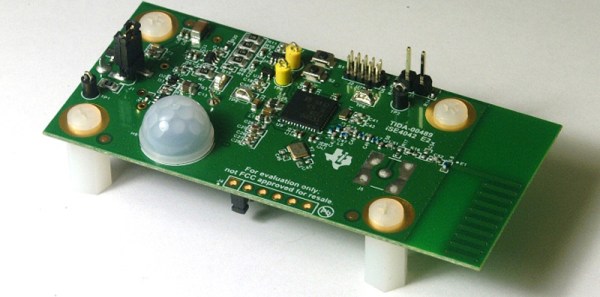
USB devices are common, and batteries are good enough for most devices, not all of them. There is still a niche where& extremely long battery lifetimes are needed and tapping into mains power is impractical. Think smoke detectors and security systems here. How do power supplies work for these devices? In one of the most recent TI application notes, TI showed off their extremely low power microcontrollers with a motion detector that runs for ten years with a standard coin cell battery. This is one of those small engineering marvels that comes by every few years, astonishing us for a few minutes, and then becomes par for the course a few years down the road.
The first thing anyone should think about when designing a battery-powered device that lasts for years is battery self-discharge. You’re not going to run a battery-powered device for ten years with a AA cell; the shelf life for an Energizer AA cell is just 10 years. Add in a few nanoAmps of drain, and you’ll be lucky to make it to 2020. The difference here is a CR2032 lithium-ion coin cell. Look at the datasheet for one of these cells, and they can easily sit on a shelf for 10 years, with 90% of the rated capacity remaining.
With the correct battery in the device, you’ll need a microcontroller that runs at a sufficiently low power for it to be useful in the mid-2020s. The product for this is the CC1310, a very, very low power ARM Cortex-M3 and sub 1GHz transmitter in one package.
Once that’s settled, it’s simply a matter of putting a sensor on the board – in this case a PIR sensor – and a few analog bits triggering an interrupt occasionally. Have the microcontroller in sleep mode most of the time, and that’s how you get a low-power device with a battery that will last a decade.
It seems [Kevin] has particularly bad luck with neighbors. His first apartment had upstairs neighbors who were apparently a dance troupe specializing in tap. His second apartment was a town house, which had a TV mounted on the opposite wall blaring American Idol with someone singing along very loudly. The people next to [Kevin]’s third apartment liked music, usually with a lot of bass, and frequently at seven in the morning. This happened every day until [Kevin] found a solution (Patreon, but only people who have adblock disabled may complain).
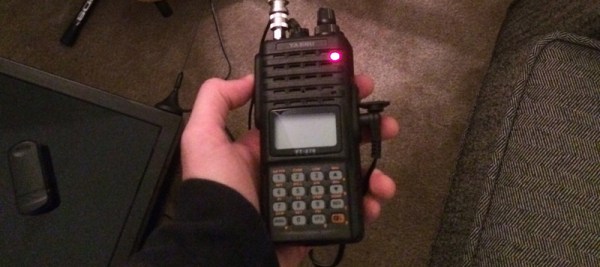
In a hangover-induced rage that began with thumping bass at 7AM on a Sunday, [Kevin] tore through his box of electronic scrap for every capacitor and inductor in his collection. An EMP was the only way to find any amount of peace in his life, and the electronics in his own apartment would be sacrificed for the greater good. In his fury, [Kevin] saw a Yaesu handheld radio sitting on his desk. Maybe, just maybe, if he pressed the transmit button on the right frequency, the speakers would click. The results turned out even better than expected.
With a car mount antenna pointed directly at the neighbor’s stereo, [Kevin] could transmit on a specific, obscure frequency and silence the speakers. How? At seven in the morning on a Sunday, you don’t ask questions. That’s a matter for when you tell everyone on the Internet.
Needless to say, using a radio to kill your neighbor’s electronics is illegal, and it might be a good idea for [Kevin] to take any references to this escapade off of the Internet. It would be an even better idea to not put his call sign online in the future.
That said, this is a wonderful tale of revenge. It’s not an uncommon occurrence, either. Wikihow, Yahoo Answers and Quora – the web pages ‘normies’ use for the questions troubling their soul – are sometimes unbelievably literate when it comes to unintentional electromagnetic interference, and some of the answers correctly point out grounding a stereo and putting a few ferrite beads on the speaker cables is the way to go. Getting this answer relies entirely on asking the right question, something I suspect 90% of the population is completely incapable of doing.
While [Kevin]’s tale is a grin-inducing two-minute read, You shouldn’t, under any circumstances, do anything like this. Polluting the airwaves is much worse than polluting your neighbor’s eardrums; one of them violates municipal noise codes and another is breaking federal law. It’s a good story, but don’t do it yourself.
Editor’s Note: Soon after publishing our article [Kevin] took down his post and sent us an email. He realized that what he had done wasn’t a good idea. People make mistakes and sometimes do things without thinking. But talking about why this was a bad idea is one way to help educate more people about responsible behavior. Knowing you shouldn’t do something even though you know how is one paving stone on the path to wisdom.
–Mike Szczys
[thelostspore] was experimenting with resin casting, and discovered that he needed a pressure casting chamber in order to get clear casts. There are commercial solutions for sale, and they are really nice. However, many hackers are on a budget, and if you’re only casting every now and then you don’t need such a fancy set-up.
Re-purposing equipment like this is pretty common in the replica prop making community. Professional painters use a pressurized pot filled with paint to deliver to their spray guns. These pots can take 60-80 PSI and are built to live on a job site. By re-arranging some of the parts you can easily get a chamber that can hold 60 PSI for enough hours to successfully cast a part. Many import stores sell a cheap version, usually a bit smaller and with a sub-par gasket for around 80 US Dollars. [thelostspore] purchased one of these, removed the feed tube from lid and plugged the outlet. He then attached a quick release fitting to the inlet of the regulator.
Alternative pressure casting set-up.
We used this guide to build our own pressure casting set-up. Rather than plug up the outlet on ours, we put a ball valve with a muffler in its place to quickly and safely vent the chamber when the casting has set. We recommend putting a female quick connect coupling or another ball valve in combination with the male fitting (if your hose end is female). It is not super dangerous to do it the way the guide recommends, but this is safer, and you can disconnect the compressor from the tank without losing pressure.
All that was left was to test it. He poured an identical mold and it came out clear!
News comes from The Guardian that the iPhone 6 will break because of software updates due to non-authorized hardware replacements. Several thousand iPhone 6 users are claiming their phones have been bricked thanks to software updates if the home button – and the integrated TouchID fingerprint sensor – were replaced by non-Apple technicians.
For the last few iPhone generations, the TouchID fingerprint sensor has been integrated into the home button of every iPhone. This fingerprint sensor provides an additional layer of security for the iPhone, and like everything on smartphones, there is a thriving market of companies who will fix broken phones. If you walk into an Apple store, replacing the TouchID sensor will cost about $300. This part is available on Amazon for about $10, and anyone with a pentalobe screwdriver, spudger, and fine motor control can easily replace it. Doing so, however, will eventually brick the phone, as software updates render the device inoperable if the TouchID sensor is not authorized by Apple.
According to an Apple spokeswoman, the reason for the error 53 is because the fingerprint data is uniquely paired to the touch ID sensor found in the home button. If the TouchID sensor was substituted with a malicious TouchID sensor, complete and total access to the phone would be easy, providing a forehead-slapping security hole. Error 53 is just Apple’s way of detecting devices that were tampered with.
This is a rare case where Apple are damned if they do, damned if they don’t. By not disabling the phone when the TouchID sensor is replaced, all iPhones are open to a gaping security hole that would send the Internet into a tizzy. By bricking each and every iPhone with a replacement TouchID sensor, Apple gets a customer support nightmare. That said, the $300 replacement cost for the TouchID sensor will get you a very nice Android phone that doesn’t have this problem.
I keep up with the trends in 3D printing reasonably well. The other day my friend mentioned that filament thickness sensing had been added to the latest version of the Marlin firmware. I had no idea what it was, but it certainly sounded cool. I had to find out more.
In industrial settings, filament is made by pulling extruding molten plastic at a certain speed into a cooling bath. The nozzle for 2.85mm filament and 1.75 mm filament is actually the same size, but the filament is stretched more or less as it leaves the nozzle. By balancing these three variables the extrusion machine can produce any size filament desired. Like any mechanical system, it needs constant adjustment to maintain that balance. This is usually done by measuring the filament with a laser after it has cooled, and then feeding this information back into the system. The better filament manufacturers have multiple lasers and very fast feedback loops. Some of the best offer +-0.04mm or less variation in thickness between any two points on the filament. Some of the worst have larger errors such as +-.10mm. Because the plastic is fed into the extruder at a fixed linear speed, this makes a variation in the volume of the plastic coming out of the nozzle per second. With the best we see a 4.41% variation in the volume of plastic extruded. With the worst we start to see 10.51% or more.
Filament variation showing up as a cosmetic defect.
A printer is dumb. It works under the assumption that it is getting absolutely perfect filament. So when it gets 10.51% more plastic, it simply pushes it out and continues with its life. However, if the filament is off enough, this can actually show up as a visible defect on the print. Or in worse cases, cause the print to fail by over or under extrusion of plastic.
So, what does a filament thickness sensor do to correct this issue? To start to understand, we need to look at how the filament is dealt with by the software. When the slicer is compiling the G-code for a 3D print, it calculates the volume of plastic it needs in order to deposit a bead of plastic of a certain width and of a certain height per mm of movement. That was a mouthful. For example, when a printer printing 0.2mm layers moves 1mm it wants to put down a volume that’s 1.0mm long x 0.4mm wide x 0.2mm high. The filament being pushed into the nozzle has a volume per mm determined by the diameter of the filament.
The volume out per mm of filament in.
The equation we are trying to balance.
Our goal is to integrate the thickness sensor into these functions to see what the thickness sensor is doing. This is a linear equation, so there’s nothing fancy here. Now, the layer height, layer width, and length of the move are determined by settings and model geometry respectively. These are fixed numbers so we don’t care about them. That leaves us the diameter of the filament and the length of filament extruded. As we mentioned before, typically the filament is assumed to be a fixed diameter. So all the software has to calculate is the length of filament that needs to be extruded per mm of combined movement in the x and y so that our volumes match.
But, we know that one of these variables is actually changing per millimeter as well. The filament diameter! So now we have a problem. If the filament diameter is changing all the time, our equation will never balance! In order to fix this we can add a multiplier to our equation. Since we have no control over the width of the filament we can’t modify that value. However, if we know the width of the filament, and we know the value its supposed to be, we can change the length of the filament extruded. This is because unlike the filament, we have control over the stepper motor that drives the extruder. This value is called the extrusion multiplier, and its determination is what the thickness sensor is all about.
So all the filament sensor does is measure the filament’s current diameter. It takes expected diameter and divides it by the value it just measured to get a simple percentage. It feeds that number back into our system as the extruder multiplier and slows or speeds up the stepper motor as needed. Pretty simple.
The ideal filament the printer thinks it is seeing.
The printer is unable to compensate for the variations.
By adjusting with the extrusion multiplier the printer is able to approximate perfect filament.
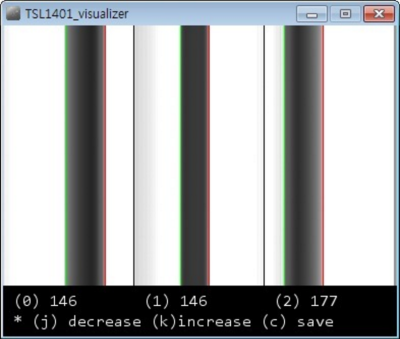
Shadows on the sensor from [inornate]’s variation.There are a few thickness sensors being toyed with right now. The first, as far as I can tell; let me know if I am wrong in the comments, was by [flipper] on thingiverse. He is in his third version now. The sensor works by casting a shadow of the filament as it passes by onto an optical sensor. The firmware then counts the pixels and works backwards to get the diameter. This value is sent to the Marlin firmware on the printer which does the rest. As is usual and wonderful in the open source community, it wasn’t long before others started working on the problem too. [inoranate] improved on the idea by casting more shadows on the sensor. The technique is still brand new, but it will be interesting to see what benefits it reaps.
Now comes the next question,”Is it worth upgrading my printer with a thickness sensor?” If you typically run poor filament, or if you extrude your own, yes. The current sensors can only measure +- .02mm. So for the best filament, you won’t really see a difference, but for worse stuff, you might. The latest firmware of the Lyman filament extruder, for making your own filament, also supports these sensors, letting you feed back into your production system like the industrial machines. All in all a very interesting development in the world of 3D printers.
According to this report at FOX News Technology, the FAA may use “deadly force” against your remote-controlled quadcopter, ahem, “drone” if you’re flying within a 36-mile radius of the Super Bowl this weekend. We call shenanigans on using “deadly” for things that aren’t alive to begin with, but we have no doubt that they intend to take your toys away if you break the rules. We are curious to see how they’re going to do it, though.
The actual Notice to Airmen (NOTAM) has the details, and seems pretty comprehensive. You can’t fly your sea plane or go crop dusting either. Model rocketry is off the table within the circle on Sunday afternoon. It tickles our superiority-bone to note that only “drones” made the headlines.
But we also see our loophole! The ban only extends from the ground’s surface up to 18,000 ft (5,500 m) above sea level. (No, we’re not thinking of flying quadcopters in tunnels under the stadium.) They didn’t rule out high-altitude balloon flight over the Super Bowl? Don’t even think about it.