The general process of circuit board assembly goes like this: You order your PCBs. You also order your components. For surface mount components, you apply solder paste to the pads, put the components on top, and then heat the board up so the solder paste flows and makes a bond. Then for through hole components you put the leads through the holes, and solder them with an iron or a solder wave or dip. Then you do an inspection for defects, program any microcontrollers, and finally test the completed board to make sure everything runs.
The tricky part is in volumes. If you’re only doing a few boards, it’s usually easiest to assemble them by hand. In the thousands you usually outsource. But new tools, and cheap hacked tools, have made it easier to automate small batches, and scale up into the thousands before outsourcing assembly.
In this new series which we’re calling Tools of the Trade we’ll be covering a variety of tools used for building products, and we’re starting with circuit board assembly. Let’s investigate our tools of the trade: solder paste dispensing.
The general theory is that you want to take a tub (or syringe) of solder paste, which is basically a gooey suspension of flux and solder, and apply it to just the pads of the PCB in a consistent thickness. It turns out there are a lot of ways to do this.
Hand Syringe
The absolute easiest way to put solder paste on a PCB is just using the syringe and carefully placing a small blob on the pad. No extra tools required.
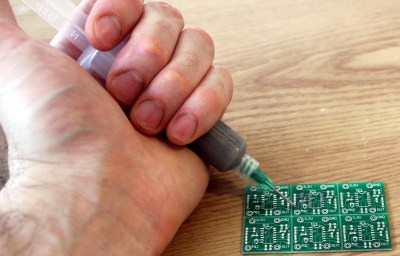
On microcontrollers with a small pitch, you can get away with a small bead along the length of the side, and generally the paste will flow right to the pads and separate without much bridging. The downside to this very quick and easy method is that the syringe isn’t easy to press with your thumb. It can get tiring with a large board, and your hands become cramped arm stumps. Some have gotten around this by using a linear rod and switch to do the pushing action, which is a nice solution, but I’d argue that by the time you get to the point where you need this solution, you should be upgrading to something else.
Automated Syringe
Others looked at pick and place machines, which can put the components down in exactly the right spot, and 3D Printers, which are cheap and easy to build and are really good at extruding stuff. They figured: why not have a 3D printer put the paste down? A few companies have tried this, with a couple going so far as to lay down the whole PCB and traces as well. This is great for small volumes and prototypes, and the integration with PCB layout software makes it a pretty smooth transition from computer design to pasted board. 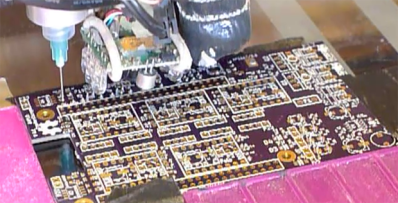
The problems with syringes, though, are that they are slow and imprecise. It’s difficult to control the amount of paste that is dispensed, and if the nozzle is small enough for fine pitch components, it won’t be able to dispense on larger pads quickly. Holding the syringe in the hand warms it up to the point it oozes out on its own, but if it’s not warm enough (because you store it in the fridge for longevity), then getting it out of the syringe is like doing a bench press with your thumb, and automated syringes have similar problems. This unknown viscosity makes it very difficult to automate the dispensing with any degree of precision. So let’s move past the syringe and onto the screen.
Screens
The idea behind a screen is to have a thin material that has holes where you want the paste. You take a blob of solder paste and a squeegee and get the paste into the holes. Aligning the screen over the circuit board and keeping it aligned is a little tricky, but the application is very fast, and doesn’t really matter whether the board is densely populated or has only a few components, so it is extremely efficient as a paste application method.
3D Printed Screen
Yes it is possible. You can make a .1mm thick layer which is the right thickness, but it’s really only good for large pads when you have a lot of them on a dense board. Otherwise do something else.
Mylar Screen
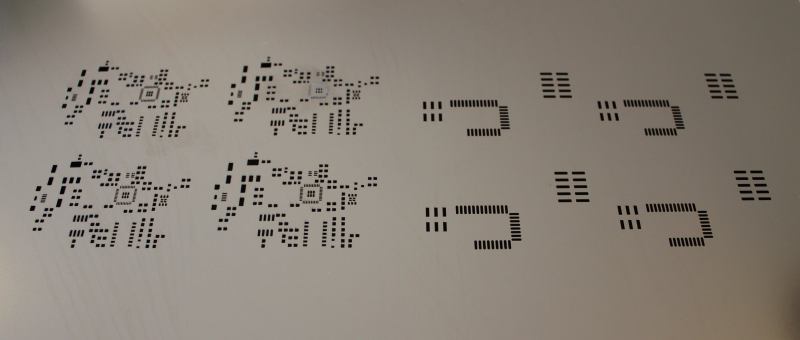
This method involves a laser cut mylar sheet around .005″ thick. If you have access to a laser cutter and are only doing a few boards, then this method is fantastic (read the comments especially). You export the paste layer to a DXF, import into your cutter, and go. Care should be taken on a few things; focus needs to be spot on or else your corners won’t be very good, and power level needs to be high enough to get rid of the mylar but not so high that it melts the edges. I’ve also found that engraving works better than cutting because it just blasts away the parts you don’t want and doesn’t spend any time dwelling where it will melt the edge.
The downside to this method is that the screens are delicate. For fine pitch you are better off just making a rectangle the size of the whole side because the separators on the individual pads will break. I have successfully reused a mylar screen up to about 100 times, but you shouldn’t expect to use it more than 25-50 before the stress of the squeegee eventually breaks it down.
If you don’t have a laser cutter, there are services online that will make your mylar screen for you.
Aluminum Can Screen
We have covered the next step up from mylar, the etched aluminum can or the milled aluminum can. This gives you a strong metal screen for the cost of the coke and acid or mill. There are two obvious problems with this method, though; you are limited to a board the size of a can, but you also have to figure out how to turn a cylinder into a flat sheet that likes to stay flat.
Stainless Steel Screen

Some PCB manufacturers are starting to offer stainless steel laser cut screens shipped with the boards, and for a few extra bucks they’ll even come in an aluminum frame. For the cost and effort saved, this is by far the best option. The screens last forever, they are extremely precise, and it’s the technology the big boys use in the factories. This is where commercial methods have really become accessible to the hobbiest. I’d offer some downsides, but there are none. They even make great wall art.
Applying Paste To The Screen
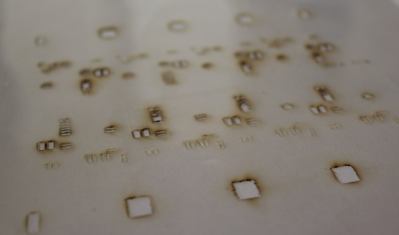
Assuming you have a screen, there is quite a bit of technology around putting the paste onto the board with the screen. The easiest way is to use tape to hold things in place while you squeegee. Just tape a bare circuit board down, then tape the screen over it. A squeegee can be anything from a razor blade (my favorite) to a putty knife, or even an old hotel key, which works surprisingly well.


When you get to a point where volume is important, there are screen printing jigs that will hold the screen. They can be hard to tune for a perfectly flat and repeatable pasting experience, but they do the job. Fortunately positional accuracy doesn’t have to be absolutely perfect as the solder will flow to the pads. In factories they will often use an automated machine to apply the paste with a squeegee. These machines are inline, too, which means you put a bare PCB in a slot in the side and it goes on a conveyor belt through the machine and out the other side directly into the pick and place machine.
Once you’ve got the paste on the board, it’s time to place the components, and that’s the topic for the next article.


Aluminium screens are accurate: one drawback is that the frame itself sometimes is not practical. I have had a frame that had the frame bars underneath the aluminium, and then I had to raise the PCB underneath. Then it’s difficult to position the PCB accurately to the squeegee holes, fumbling around. Also, the aluminium frame don’t fit in any machine except what the manufacturer themselves use, although for hobbyists, that’s not a problem.
I use laser-cut vellum paper from my local office supply store
How is the durability for reuse? Or do you cut a new screen for each run?
Depends on a number of things, but I’ll use Vellum for anything under 25 panels or so..
“The absolute easiest way to put solder paste on a PCB is just using the syringe and carefully placing a small blob on the pad”
I think this is absolutely the hardest way. It took me hours just for a couple dozen of 0603 resistors and caps. Lots of cursing involved.
I also don’t see any mention of cutting the stencils out of transparencies using a vinyl cutter.
http://hackaday.com/2013/03/11/pcb-stencils-for-200/
See here for the software flow:
http://dangerousprototypes.com/forum/viewtopic.php?f=68&t=5341
Absolutely, plus whatever rework you have to end up doing because you over estimated on the amount of solder in a couple places. If you are already ordering PCBs, there is absolutely no reason not to also order a kapton/mylar stencil. If you are making your own PCBs, there is a different trade-off of course. If you are doing multiple PCBs, you can save a bit of money by packing several layouts (or both sides of the one layout) into a single stencil.
It mentions that aligning the stencil can be hard, it’s actually very easy, just make a jig with 4 blank PCBs and masking tape, then align the stencil with masking tape on one edge, done.
Peter Monta, the author of the gerber2graphtect utility that is used to cut the sheets, mentions to shrink the solderpaste layer by 1-2 mil for overhead transparancies. But the same goes for the aluminium or mylar stencils you can order. the paste layer needs to be adjusted for the thickness of the stencil.
Overhead transparancies are ok for small runs (<10) and prototyping. For more serious work cut an other or get proffessional stencils :)
Yes! I don’t like the syringe dispensing. Even a crude ‘quick hack’ stencil from mylar (overhead transparency sheet from the paper store) is much better if you have any access to a laser cutter (local hacker space :-) ).
I had an internship where we used overhead projector sheets cut with a laser engraver. Even with the melting along the edges, it worked really well.
Yes, definitely better than syringe dispensing.
What about a Cricut or similar craft cutter, vinyl or thin plastic, and Inkscape?
From what I have read the Cricut worked pretty good until they dropped support for the software pack for doing this (Sure-cuts-alot)
Forgetting the software implementation then (solvable with certain tricks Google can provide). Why couldn’t it work?
The silhouette cameo machines are what you want, with some custom software, start your learning here:
http://dangerousprototypes.com/forum/viewtopic.php?f=68&t=5341
They look very distorted. I think mechanical cutting is not very good, especially for fine pitch. But of course still much better than syringe dispensing if you do not have access to a laser cutter.
The problem for hobby is that solder paste is expensive and does not last long, even in the fridge.
Someone has to invent a cheap long lasting solder paste
My first and current jar of paste is still working great on boards over 1 year after I acquired it, and about 16 months after the manufacture date. I fridge it when I’m not using it, let it thaw to room temp and mix before using, and get it back in the fridge as soon as possible after spreading.
I’m probably pushing it though, and hope I can get rolling on production of my board before then so I can finish it off.
Absolutely it doesn’t stay in good condition for long. Can still use “no-clean” kinds after a year or so anyway. Or I’ve seen someone do it anyway, can’t recommend it personally.
This two part mix has a longer shelf life, but has the same problem after it’s mixed. For me, the most expensive part is the shipping. Digikey recommends that it be shipped express because they ship it with a cold pack. It looks like this two part mix doesn’t have to be refrigerated until after it’s mixed. I am not sure what the performance is of this solder paste is…
well, since solder paste is just a mix of fine mesh solder particles and paste flux, and this kit just gives you the two components and lets you mix them yourself I would imagine that it performs as well as you manage to make the mix correctly. The solder powder is stable, its the flux that goes bad. If you could find a supplier for the fine mesh powder solder and one for the flux paste, you could order the paste as needed and even experiment with your solder to flux ratios.
I have a tube of 5cc SMD291SNL I have used for years. I would estimate it has more than half left. I keep it refrigerated while not in use and let it warm to room temp before using. I estimate I do about 3 boards every month or two. Additionally, I do not use the paste sparingly, I always have more waste then ends up on the boards. Getting this new from digikey is about $15.
I will say it has declined in quality a bit due to it being 4 years old iirc, the main difference the amount of tack, however, it still works just fine. I use 0402s and small pitch QFNs for my projects wherever possible.
https://photos.google.com/share/AF1QipM2BPv6W8CfE2nbg9LMAukdQfPFEvByjbl-yFXav8k4T5yjiQVGE6JTjyH4XfmbtA?key=X3Rld3BKd2h4NE1XVHJoQ3BQNEp0clo3RG56YVBB
Interesting comment.
I have a tube of leaded, no-clean paste that was manufactured in Oct 2008. I’m still using it today and it has always been kept in the refrigerator when not in use. I can’s speak for the tacky factor as I don’t solder anything in an inverted position. What I can say is that I compared this solder paste to a similar MG chemicals paste I bought last week and I can’t tell the difference between them. They reflow exactly the same way even after all this time.
Of course, it cost me something like $70 to get that tube of Kester back then because it had to be shipped over night, in an insulated container, with a cold pack, and probably a temperature logger to make sure it was still good when it got here. Had I known that it would be this stable, I would have told the vendor to save me a few bucks and I’ll take the risk…
The tackiness is something I notice when placing 0402’s, when I first got the paste it was very cream like, now it’s more wet clay like.
In between a hand syringe and a robotic paste applicator is a common device called…not very surprisingly…a solder paste dispenser. Search eBay and they can be found in the $50-$100 range, with inputs for a foot switch, air pressure line, and vacuum line. The vacuum line is optional, and a small tank of compressed air lasts a long time.
Eaxctly. My hackerspace has one like that. Strange that there is no mentioning of the techique in the article.
Still, I find using a syringe etc as completely worthless. It takes ages to plut out the solder, then you have to place your components and then they have to run in the oven, and since it very often doesn’t work (at least not when I tried) you still need to use your soldering iron to fix the errors. Instead, you could just solder the components directly. A stencil however, is worth it from a certain point of complexity of the board (like 50 components and upwards). I used a laser cut stencil at my previous work (we did have a laser cutter), and it worked great! Those boards where like 100+ components, so it was well worth it.
Hmm, tried to put in a comment with links to cutting stencils with a vinyl cutter (one link was a HaD post from 2013, the other to the DangerousPrototypes forum) but apparently they were treated as spam.
NM. They show up now :)
One word: Toothpicks.
I considered ordering a jar of paste and using this method but ended up going with a syringe. I’ll squeeze out a blob next time and give the toothpick method a try. Any tips?
Not really, just let it set there for a couple minutes before going at it. I refrigerate my solder paste so I usually let it sit there for about 10 mins before going at it. Picking it up, sometimes it’ll stretch out you can lay the stretchies over areas of pads, etc.
I use the toothpick method for prototyping. I let the paste come to room temperature (stored in a cheap contact lens case) then I preheat the board with my hot air workstation for a moment. Dip toothpick in solder being careful not to get too much and then I put the tip of the toothpick to the pad. The heat from the board slowly melts the paste onto the pad and I simply remove it when there’s enough to cover. Place component, more hot air to reflow the solder and I’m done. I just learned this technique on Sunday. I’ll never go back to using room temperature techniques again I don’t think.
This works for even the tiniest of pads. It just takes some time to learn how much solder you really need and many times it is far less than you think.
Does anyone here have some tips on how to clean the framed stainless steel stencils after use?
They seem to have some leftover solder paste still in the holes, which i found difficult to remove.
IPA (isopropyl alcohol) works well. With some kim wipes or other fabric that doesn’t leave fibers in the holes.
Or a toothbrush.
Thanks, I ordered some IPA.
Should have been able find some without the rubbing alcohol additives it in the pharmacy first aid isle.
Missing the air-powered hand syringe. Pedal operated, and makes hand application much easier.
+1 on the air operated hand syringe. They are easy to build a usable one. using a syringe with your thumb is beastly for a board of any complexity.
Or a mechanical one like this: https://www.tindie.com/products/marjan_mike/solder-paste-dispenser-v3-/?pt=full_prod_search
Well timed article! I am looking for a solder paste printer. The lower cost models get mixed reviews.
Is the unit shown in the article picture recommended? From the picture it’s not clear how the PCB maintains alignment with the framed stencil.
The one shown is not that great. We glue some PCBs down on the surface and use those to align the PCB we are stenciling. One issue we have is that tightening the screws on the the screen moves it out of alignment slightly, so it takes forever to dial it in and we can’t adjust the table so we have to adjust the screen. Once it’s dialed in then it’s fine, though. Also, it was WAY bigger than we needed. But it was also pretty cheap, which is why we got it over the nicer ones. In retrospect that was a mistake and the amount of time saved by being able to adjust the table is worth an extra chunk of dough.
Shameless self-plug, but if you want to go the 3d-printed stencil route, there’s a web app with a much simplified flow (gerber file in, STL file out): https://hackaday.io/project/9550-solder-stencilme
Hey, that’s great! I like the ledge you added to index the board to the stencil. Do you clamp them down in some way before using the squeegee?
The ledge requires a little bit of fiddling (there’s an option on the site to increase the distance between ledge and board) – if you get it right it sits very tightly on the board and aligns all the holes correctly. With that, I haven’t really found the need for clamping the stencil, though it might reduce waste if you did.
I’m also thinking of allowing the ledge to go all the way around the board which will probably help some more as well.
Has anyone tried aluminum shim stock to eliminate can size limitation and effort to remove coatings?
http://www.amazon.com/Aluminum-Stock-Temper-0-003-Length/dp/B005I59FHG/
I’ve just recently started using some surface mount parts in my boards and I’m currently soldering them with just an iron and thin solder. Any recommendations on what to look for in a solder paste?
A question (still) not answered here:
I do lots of 5 or 10 boards a time. Can I apply paste (with a stencil) in all 10 boards, keep them at room temperature and apply the components during the day? Or should I put them in fridge? I’m trying not to do stenciling 10 times a day applying paste, saving the rest, cleaning the stencil, applying again, etc… Thanks!
A few hours is ok. Expect 24 hours to be too long. About 8 hours can be just fine but you might start to notice poor reflowing characteristics and you may end up reworking a few parts.
I tried here, potato. Up to 96h is OK. More than that, the paste solidifies and doesn’t work well anymore. Now I apply paste on 10-15 boards, build them in 1-2 days, reflow and everything is OK. I discovered a new world. Thanks everyone! :D
I can’t imagine using anything other than OSH Stencils. They’ve got Polyimide and now Stainless Steel, domestic based, lightning fast shipping and pricing is pretty hard to beat, even in most cases against low cost China competitors. We compared their latest Stainless product on the same design with ones we bought from China and there’s no question OSH Stencils is using better metal and better precision equipment. We had better paste release, and under a microscope the difference was clear, OSH was ahead of the game. I love these guys and they are all we use now. http://www.oshstencils.com