Tools Of The Trade – Thermoforming

Chances are good that you’ve already lost some blood to thermoforming, the plastics manufacturing process that turns a flat sheet of material into an unopenable clamshell package, tray inside a box, plastic cup, or leftover food container.  Besides being a source of unboxing danger, it’s actually a useful technique to have in your fabrication toolchest. In this issue of Tools of the Trade, we look at how thermoforming is used in products, and how you can hack it yourself.

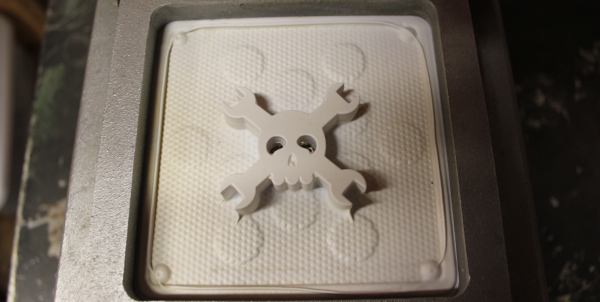
The process is simple; take a sheet of plastic material, usually really thin stuff, but it can get as thick as 1/8″, heat it up so that it is soft and pliable, put it over a mold, convince it to take all the contours of the mold, let it cool, remove it from the mold, and then cut it out of the sheet. Needless to say, there will be details.

https://commons.wikimedia.org/wiki/File:Thermoforming_animation.gif

Continue reading “Tools Of The Trade – Thermoforming”

Tools Of The Trade — Injection Molding

Having finished the Tools of the Trade series on circuit board assembly, let’s look at some of the common methods for doing enclosures. First, and possibly the most common, is injection molding. This is the process of taking hot plastic, squirting it through a small hole and into a cavity, letting it cool, and then removing the hardened plastic formed in the shape of the cavity.

The machine itself has three major parts; the hopper, the screw, and the mold. The hopper is where the plastic pellets are dumped in. These pellets are tiny flecks of plastic, and if the product is to be colored there will be colorant pellets added at some ratio. The hopper will also usually have a dehumidifier attached to it to remove as much water from the pellets as possible. Water screws up the process because it vaporizes and creates little air bubbles.

Next the plastic flecks go into one end of the screw. The screw’s job is to turn slowly, forcing the plastic into ever smaller channels as it goes through a heating element, mixing the melted plastic with the colorant and getting consistent coloring, temperature, and ever increasing pressure. By the time the plastic is coming out the other end of the screw, and with the assistance of a hydraulic jack, it can be at hundreds of tons of pressure.

Finally, the plastic enters the mold, where it flows through channels into the empty cavity, and allowed to sit briefly to cool.  The mold then separates and ejector pins push the part out of the cavity.

Continue reading “Tools Of The Trade — Injection Molding”

Tools Of The Trade – Test And Programming

In our final installment of Tools of the Trade (with respect to circuit board assembly), we’ll look at how the circuit board is tested and programmed. At this point in the process, the board has been fully assembled with both through hole and surface mount components, and it needs to be verified before shipping or putting it inside an enclosure. We may have already handled some of the verification step in an earlier episode on inspection of the board, but this step is testing the final PCB. Depending on scale, budget, and complexity, there are all kinds of ways to skin this cat.

Continue reading “Tools Of The Trade – Test And Programming”

By Christian Taube - Own work, CC BY-SA 2.5, https://commons.wikimedia.org/w/index.php?curid=1503038

Tools Of The Trade – Through Hole Assembly

In our last installment of Tools of the Trade, we had just finished doing the inspection of the surface mount part of the PCB. Next in the process is the through hole components. Depending on the PCB, the order may change slightly, but generally it makes more sense to get all the SMT work done before moving to the through hole work.

Through hole used to be the standard, but as the need for size reduction and automation increased, SMT gained favor. However, there are still a lot of reasons to use through hole components, so they aren’t going away entirely (at least not any time soon). One of the biggest advantages of THT is mechanical strength, which makes it better suited for connectors than SMT. If you’ve ever popped a microusb connector off a PCB by breathing on it heavily, you’ll understand. So, how do we most efficiently get through hole components on a PCB, and how do the big boys do it?

Continue reading “Tools Of The Trade – Through Hole Assembly”

Tools Of The Trade – Inspection

In the last episode, we put our circuit boards through the reflow process. Unfortunately, it’s not 100% accurate, and there are often problems that can occur that need to be detected and fixed. That’s what the inspection step is for. One could insert an inspection step after paste, after placement, and after reflow, but the first two are icing on the cake — the phase where most mistakes can be caught is after reflow.

There are a number of problems typical with a surface mount reflow process: Continue reading “Tools Of The Trade – Inspection”

Tools Of The Trade – Reflow

In our previous issues in this series on making circuit boards, we covered placing solder paste and placing components. Now it’s time to bake our cake!

There are a variety of methods for reflowing a circuit board, but they all rely on a single principle: heat up the solder paste (a mixture of flux and solder) until the flux burns off and the solder becomes liquid, and then cool it down. Accomplishing this once or twice is easy; once you’ve played with a hot plate you’ll swear off through hole. Scaling it up and doing it repeatedly with high yield is extremely challenging, though. Continue reading “Tools Of The Trade – Reflow”

Tools Of The Trade – Component Placing

Recently we started a series on the components used to assemble a circuit board. The first issue was on dispensing solder paste. Moving down the assembly line, with the paste already on the board, the next step is getting the components onto the PCB. We’re just going to address SMT components in this issue, because the through hole assembly doesn’t take place until after the SMT components have gone through the process to affix them to the board.

Reels!
Reels!

SMT components will come in reels. These reels are paper or plastic with a clear plastic strip on top, and a reel typically has a few thousand components on it. Economies of scale really kick in with reels, especially passives. If you order SMT resistors in quantities of 1-10, they’re usually $.10 each. If you order a reel of 5000, it’s usually about $5 for the reel. It is cheaper to purchase a reel of 10 kOhm 0603 resistors and never have to order them again in your life than it is to order a few at a time. Plus the reel can be used on many pick-and-place machines, but the cut tape is often too short to use in automated processes.

Continue reading “Tools Of The Trade – Component Placing”