Most of our beloved tools, such as Slic3r, Cura or KISSlicer, offer scripting interfaces that help a great deal if your existing 3D printing toolchain has yet to learn how to produce decent results with a five headed thermoplastic spitting hydra. Using scripts, it’s possible to tweak the little bits it takes to get great results, inserting wipe or prime towers and purge moves on the fly, and if your setup requires it, also control additional servos and solenoids for the flamethrowers.
This article gives you a short introduction in how to post-process G-code using Perl and Slic3r. Perl Ninja skills are not required. Slic3r plays well with pretty much any scripting language that produces executables, so if you’re reluctant to use Perl, you’ll probably be able to replicate most of the steps in your favorite language.
Getting Started
All you need is Slic3r and Perl installed on your system. OSX and Linux users will already have Perl on board, while Windows users need to install a Perl package, Strawberry Perl for example. OSX users may download the example post-processing scripts from Slic3r’s GitHub repository, which only come with the Windows and Linux binaries.
The Main Loop
Once you’re set, create an empty text file `postprocessor.pl` in your user directory and fire up your favorite editor to fill it with the following basic structure:
#!/usr/bin/perl -i
use strict;
use warnings;

# the main loop
while (<>) {
  print; # implicitly print an unmodified G-code line back into the file
}
The first line clarifies the scripting language, strict disables some advanced Perl magic and warnings yells at you when you’re doing something wrong. The diamond operator <> lets the while loop iterate over the input file (our G-code) line-by-line. In this example, we just print back the unchanged content of the G-code line.
Perl uses a default variable $_, which is implicitly used in some places. Therefore in Perl, the following three snippets all mean (almost) the same:
while (<>){
  print;
}
while (<>){
  print $_;
}
while (my $_ = <>){
  print $_;
}
Windows users may need to add $^I = '.bak'; before the while(<>) loop to create a temporary working copy.
Running The Script From Slic3r
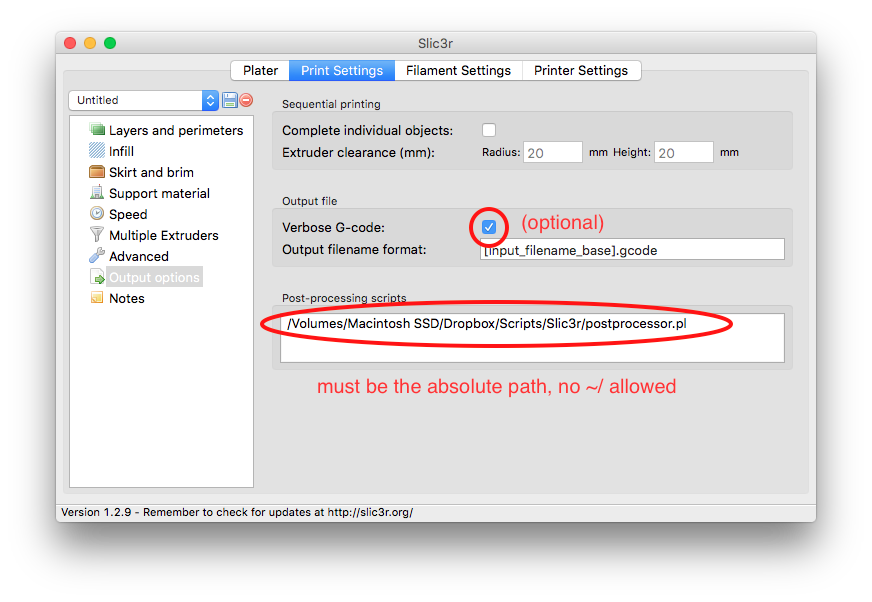
Slic3r runs the post-processing script for you after the model is sliced. All you need to do is making sure that the script is executable (chmod 755 postprocessor.pl) and specify the absolute path to the script in the output options of Slic3r.
Debugging
Instead of using Slic3r, you can also manually apply the script to an existing G-code file in the terminal:
perl path/to/postprocessor.pl path/to/some.gcode
This way, you’ll also get all the warnings and errors for debugging your script.
Example Script: Filament Counter
The above script doesn’t yet modify the G-code, so let’s write one that actually does something. The following script tracks the filament consumption during the print and displays it to the printer’s LCD (if it has one) using the M117 command. It simply filters all G1/G2 commands for the E (extruder) and Z (Z-axis) addresses using regular expressions. To keep this example simple, it works only with relative extrusion moves:
#!/usr/bin/perl -i
use strict;
use warnings;
use Math::Round;

my $consumedFilament=0;

while (<>){
  # a regular expression for the G0/G1 commmand (click it to see what it does)
  if(/^G[01](\h+X(-?\d*\.?\d+))?(\h+Y(-?\d*\.?\d+))?(\h+Z(-?\d*\.?\d+))?(\h+E(-?\d*\.?\d+))?(\h+F(\d*\.?\d+))?(\h*;\h*([\h\w_-]*)\h*)?/){
    # the match variables, just readable
    my $X=$2, my $Y=$4, my $Z=$6, my $E=$8, my $F=$10, my $verbose=$12;
    if($E){
      # tracking how much filament we're using
      $consumedFilament+=$E;
    }if($Z){
      # print the consumed filament to the LCD
      print "\nM117 ".round($consumedFilament)."mm\n";
    }
 }
 print;
}
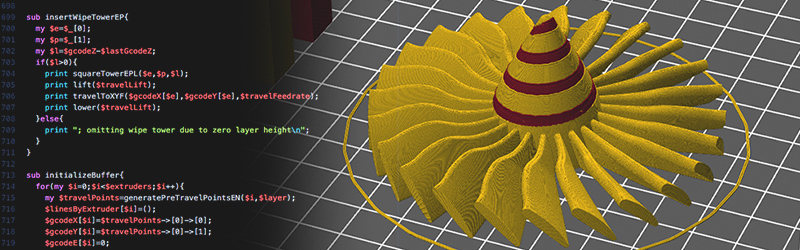
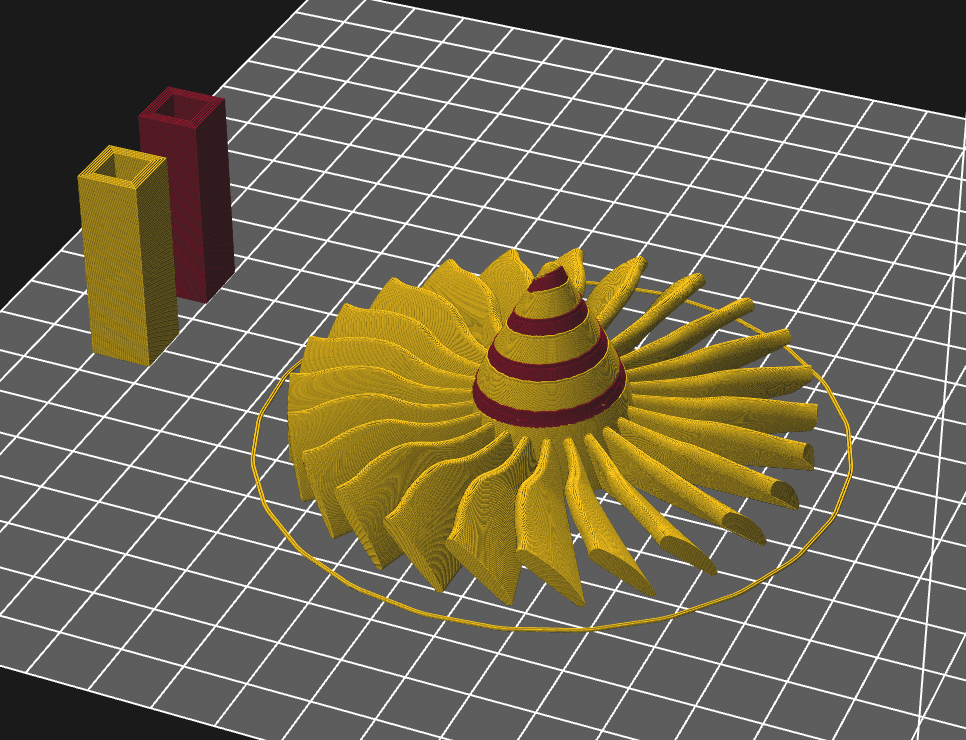
Wipe/Prime Tower Scripts
At this point, you can basically track any G-Code command and also insert arbitrary new G-codes, for example G1 printing moves (for wipe towers) or M280 commands to control a servo. Yet, it also becomes clear that this way, you’ll spend a lot of time writing code to track G-code moves and make sense of them. I’ve written some post-processing scripts using the above method, so if you need wipe/prime towers, you may check them out on GitHub. Wipe/prime towers are a great method to free the nozzle from oozed filament on tool changes in multicolor prints, or to prime an extruder before it starts printing after an idle phase. The latter is especially necessary when using color-switching nozzles, where the previous color needs to be purged from the nozzle. They are also a great example for what can be done with Perl postprocessing scripts.


A Universal Template
Since we need to parse a lot of G-Code before we can do anything more complex, I came to the conclusion that the best way is a template that makes the most common G-codes available as subroutines. For example, it would be nice to have a subroutine process_printing_move() in which you may specify how you want to process every printing move in a G-code file. You can download my template on GitHub, it’s supposed to make it easier to develop new single-file post-processing scripts. The following example implements the filament counter from the very first example in this post, only more readable:
Template Example: Filament Counter
my $consumedFilament=0;
sub process_printing_move
{
  # these arguments (XYZE and F) are passed to the subroutine
  my $thisLine=$_[0], my $X = $_[1], my $Y = $_[2], my $Z = $_[3], my $E = $_[4], my $F = $_[5];

  # tracking filament usage
  if($E){
    $consumedFilament+=$E;
  }

  # returning the unchanged line
  return $thisLine;
}

sub process_layer_change
{
  # the available arguments
  my $thisLine = $_[0], my $Z = $_[1], my $F = $_[2];

  # print the consumed filament to the LCD
  my $message="\nM117 ".round($consumedFilament)."mm\n";

  # return modified line
  return $thisLine.$message;
}
The template also buffers the entire G-Code and makes Slic3r’s printing parameters available to your code from an associative array %parameters. For example, the filament diameter specified in Slic3r becomes available through $parameters{"filament_diameter"}. The parameter names are the same as in the Slic3r configuration files. You can also specify your own parameters just by adding them to the Start G-code section in Slic3r as a comment (; some_parameter = 2). For our filament counter, that means we can also calculate the volume of the consumed material:
sub process_layer_change
{
  # the available arguments
  my $thisLine = $_[0], my $Z = $_[1], my $F = $_[2];

  # calculating the volume
  my $volume=$consumedFilament*$parameters{"filament_diameter"}**2*PI/4000;

  # printing the volume to the LCD
  my $message="\nM117 ".round($volume)."cm^2\n";
  return $thisLine.$message;
}
Other Experimental Applications
I hope you enjoyed this little introduction to Perl and G-Code post-processing. Eventually, there is a lot more you can do with G-Code post-processors. One more interesting application is interlocking non-planar printing. The idea is to use interlocking, non-planar layers to turn layer tension stress (the big weakness of FDM) into layer shearing and compression stress (a strength of FDM). Since Local Motors seemed to be looking for a way to generate stronger parts, I ran their Strati model through a G-code post-processor I had written a while ago (in Java, though) that displaces the layers along sinusoidal wave field. Since the displaced layers don’t intersect, this can still be printed on a regular 3-axis printer.


Tell me more about this non-planar layer business, has anyone printed some test parts with this process?
Hi my friend,
Ive printed a test file found on thingiverse and thats the result
Top layer are perfect and durability seems stronger than…
Take a look
http://gstechnoblog.altervista.org/non-planar-3d-surface/
I do tons of perl for my day job, and I tell you flatly that using a regular expression that way is the wrong solution.
The online site cpan.org has thousands of library modules available, and the CPAN command installed with perl will automatically download and install any of them by name.
Several packages exist which will parse G-code and give the novice easier access to the command arguments, such as:
Gcode::Interpreter::Ultimaker;
Regex’s have their place, but they’re difficult to create (especially for a novice), difficult to read, and almost impossible to debug. The debugger won’t “step through” a regex like it will do in code, and you can’t print intermediate results. It’s an opaque operation that either works or it doesn’t.
Even if the online libraries didn’t do exactly what you wanted, you’d be much better off saying something like:
my $Command = substr($GCodeLine,0,2);
This places the first 2 chars of $GCodeLine into variable $Command, which can be examined with an if() conditional:
if( $Command eq “G0” || $Command eq “G1” ) …
This is much easier to read and debug.
The regexes required for gcode are not going to be that complex, and once you’re done with the whitespace trimming and comment ignoring in explicit string manipulation code I’d say it is pretty much a wash, but since Perl has strong UNIX text processing roots regex seems like a fine way to go. But as the author said, there are many ways to do this and you could just as well do it with some gcode modules from CPAN or write an equivalent gcode parser in LUA or Brainf*ck or whatever you choose, the point is not the Perl utility functions, the point is that gcode is more malleable than people tend to realize off-hand, and it is not hard to modify it in post-processing.
Hey there, thanks for the addition and professional opinion. I agree, these packages might be useful tools in some cases. But I’ve tried them in a few projects, and I tell you flatly: They’re no good for this. In reality, the subtleties of 3D printer G-code, i.e. commented parameters and additional verbose output, coming in many flavors, require more flexibility. And just ironing over that with substr() will end in a catastrophe.
Would it hurt to explain what a “wipe/prime tower” is to the reader? I’m new to 3d printing, and the utility of this is not readily apparent to me.
It helps with oozing when printing multi colour parts. Possibly also prevents filament from getting stuck in the extruder, in the case that many layers with one colour is printed.
Preventing ooze: before switching from filament 1 to 2 the printer will print a bit on the cube, then retract while moving to get all that could ooze out. Then a bit of filament 2 will be printed to get the extruder pressure back to normal printing conditions. This ensures that each colour comes out of the extruder virtually as if there was only one colour, and the other colour does not ooze, or “drip” on the print.
Bonus, prevent burn in: If PLA is left in the hotend for too long it will carbonize (burn) leaving you with a clogged nozzle. Printing a bit on the wipe/prime tower for each layer ensures that this does not happen. For big layers I guess you have to print on it multiple times, if you want to fully ensure that carbonizing does not happen
Good explanation, thank you
I believes its to purge colors, when using a dual extrude that has a common nozzle.
Thanks Lucas. So not useful for doing two materials from a single extruder?
Got it! In the effort of keeping the prose concise, I had originally hoped the photographs would be enough. I’ve added a line or two to make it clear to the monochrome printing community.
The photos were good for inference, but i wasn’t sure why you’d want to waste much material. The explanations make sense now, thanks!
Please share more about this non planar printing. Sounds like an awesome tool to add to the toolbox.
Hum, there seems to be some interest on that topic. Let me think about that.
Yes please!
Yes! I think most of us use 3D printing for mechanical parts more often than decorative/artistic stuff, so any technique that promises to make parts stronger would be more than welcome.
I’m quite curious about this, too. Even for artistic purposes, a non-planar look might be more pleasing to the eye. I’m imagining using lay-wood, then changing say the PID vars or temp on the fly, to simulate wood grain, since the color varies a bit then.
Seconded.
I’m learning more about 3D printing every week and this method came out of left field for me. Very interested in solutions to make parts stronger and/or lighter.
How is 3D printering different from 3D printing?
It’s the name HaD came up with for all articles they do on 3D printing.
Please replace things like this:
my $thisLine = $_[0], my $Z = $_[1], my $F = $_[2];
with:
my ( $thisLine, $Z, $F ) = @_;
Does the same thing, and is much less code to read when you come back later. :)
Hey there, good point, I’ll clean this up.
Or, please stop using Perl :)
I know those canons. It’s the Perl.
I remember seeing this plug in for Cura some time ago http://www.thingiverse.com/thing:75735 although it does not appear to be supported by newer versions of Cura.
You could probably try the RapR3D visual gcode editor (soasystem.com) too, if coding (and/or perl) is not really your thing.
Another interesting way to make gcodes is the Grasshopper-Plugin Silkworm. I haven’t really used these tools myself yet, but i find it interesting to see the possibilities. Non planar printing sounds like an interesting concept to modify visual and mechanical aspects of your prints. Would be very cool if you could just control a few key parameters (waveform, amplitude, frequency,…) and let the slicer directly generate the complex gcodes out of your model.
Somewhere deep in the bowels of the HaD article archive is one on some people who were doing a non-planar slicer. They had a website but it’s gone. Appeared to be yet another one of those business ventures college students try starting, which evaporates when they graduate.
I think I know what you’re talking about but I don’t remember any key words that aid in finding it. They might have left videos onYouTube archives.
Ah, found it.
https://www.youtube.com/watch?v=Qkwkk1S-_Ek
https://hackaday.com/2014/04/13/printing-in-three-dimensions-for-real-this-time/
The topolabs site is certainly dead. It happens, unfortunately.
It looks like Joris worked on varying the Z. http://www.thingiverse.com/thing:75735
I think the “Bread” slicer might do this but I have to work now.
Hi guys,
Ive a project for One solution Mark colorized machine and im open for collaboration expecially Moritz Walter,
I wanna use post-processing script for choosing what servo can and have to move
My project http://gstechnoblog.altervista.org/no-spoiler-wip/