Flashlights are handy around the house, but what if you want a stealthier approach to illuminating the night? Infrared LED flashlights can be acquired at relatively low cost, but where’s the fun in that? To that end [johnaldmilligan] spent a couple hours building an infrared flashlight-gun with an LED display to venture into the night.
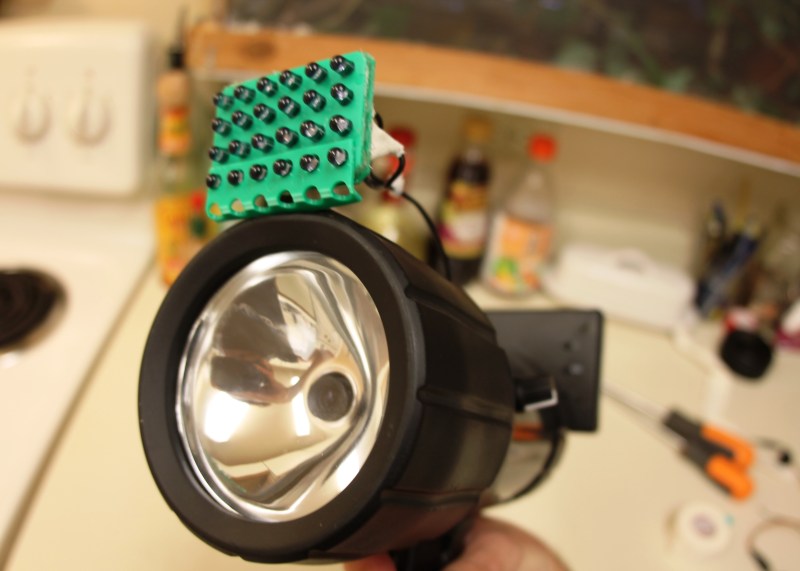
[johnaldmilligan] disassembled a handheld spotlight to use as the housing, leaving the trigger assembly and 12V DC charge port in place. A miniature camera was used as the video source after removing its infrared filter. Note: if you do this, don’t forget that you will need to manually readjust the focus! The camera was mounted where 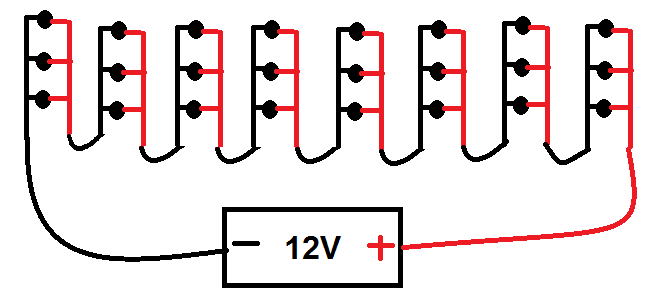 the flashlight bulb used to be instead of the LED array since the latter was impractically large for the small space — but attaching it to the top of the flashlight works just as effectively. The infrared LEDs were wired in eight groups of three LEDs in parallel to deliver 1.5V to each bank and preventing burnout. Here is an extremely detailed diagram if that sounds confusing.
 PWM is used to dim the LEDs when their brightness is not needed, and also to reduce the current drawn from the eight AA batteries. Connecting the components together, cramming everything into the flashlight and covering the LCD screen with some X-ray film to dim the display for its intended nocturnal purposes resulted in a functional device fit for a DIY spy.
For another stealthy — and multipurpose — option, a flashlight with swappable LED, infrared and UV light heads will also add some functionality to your kit.
[via /r/DIY]


Interesting…… one lost artefact I miss was an 80s text giving rules of thumb, maybe even formulas, for overdriving LEDs at various pulse durations… anyhoo need something like this in near future.
Just remember that the more current you push through a LED, the more efficiency drops. At 10X rated current, you might only get 3X the rated intensity. So for illumination – where it’s the average amount of light that counts rather than the pulsed peak – pulsed overdrive never yields a benefit.
Even using PWM at 100% rated current wastes a bit of power, since LEDs are more efficient when underdriven. If you want to maximize battery life, it’s best to have enough large IR LEDs (1W or 3W) to produce the typical amount of needed illumination when driven at no more than 33-50% of their max rating. And powered by an adjustable constant current supply, rather than with PWM.
But pulsed overdrive is quite useful for other tasks, like communication and rangefinding. I’ve seen a reference online providing the rules of thumb you describe. I didn’t save the address, but I’m sure it could be found by anyone interested.
This is still out there: http://www.cree.com/~/media/Files/Cree/LED%20Components%20and%20Modules/XLamp/XLamp%20Application%20Notes/XLampPulsedCurrent.pdf
As soon as I find a couple high resolution AMOLED screens in small enough diameter I’ll make goggles that do this. I’ve actually done it with PCB cameras though just by removing the filter..
Powering them isn’t hard either since it’s dedicated firmware.
if you drive a filament bulb with a PWM circuit it makes a great IR spot or flood light.
I modded my ARLEC one, just before the filament starts to glow red seems to be good for close range, just on red is better for a longer distance.
That’s exactly the *wrong* way to prevent burnout. The correct way would be to make three strings of 8 LEDs in series (ideally with a small current limiting resistor on each strand), and then connect those 3 strings of 8 LEDs in parallel.
The problem with LEDs is that the amount of current they draw at a given voltage can be highly variable from LED to LED. So if you put LEDs in parallel, the one with the lowest resistance will draw a lot more power than the others. Instead, if you put them in series, they are guaranteed to all draw the same amount of current. So in general, you want to put LEDs in series as much as possible. The design shown here instead puts them in parallel as much as possible, which seems designed to maximize the chances for burnout…
You’re 100% right, sir. This explanation should be printed and given to anyone buying leds. The number of people not using resistors with leds is too damn high!
Many cheap LED lights just rely on the internal resistance of the batteries. I had a camping light, a ring of 30 LEDs, all in parallel intended to be stuck around the stick of a parasol. The were powered by 4 AA’s when I inserted 4 NiMHs, one was pulled down in voltage very much and the thing sucked about 3Amps. With Alkalines it was much darker and some LEDs were extremely weak. Obviously it was not only designed badly, but also had very bad LEDs which needed around 100mA for even brightness and acceptable light output.
We’ve using phone charger for the LED supply it takes the all resistive duty of them and give the proper reliable supply to the circuit sir
I made a ring light for a 8x microscope that way. Four white leds in series, with three strings. And used a LM317 to control brightness, though I pretty much found I used maximum brightness every time.
Isn’t this the EXACT setup you need to see through clothes? Wasn’t that a thing with older cameras with the IR filter removed?
Nope. At best (i.e., if the dyes used in clothing only absorb visible wavelengths), coloured clothing will appear white. If you want to use this setup to see through clothes, they will need to be designed with this goal in mind (e.g., made of some dyed polymer film rather than fabric, with the dyes being transparent to IR).
They found that wet swimsuits were often translucent to IR. I pulled the IR filter off an old flip phone to have an IR viewer, but never tested this particular theory.
That was when you used an IR filter defeated CCD in daylight with diffuse IR backlighting, so IR that passed through material from behind would leave legs outlined, maybe some reflectance off skin surface too if on the sun side, which is powerful IR source.
So in those circumstances the camera used above might show similar things. BUT the IR illuminator is not going to enhance the effect, it will be like taking a flash photo through a window. Flash glares off window.
I like the idea with old flashlight housing.
But in this case I think LED setup can be improved significantly. LED drivers with constant current are cheap, and some even have PWM input so you can easily control the whole thing with some cheap ATTiny or PIC. For example PT4115 driver, ready-to-use modules are also available on eBay for a few bucks. Driving LEDs without any current limiting is not good idea.
Also LEDs used here are not very good for illumination purposes, they look to me like LEDs for TV remote. There are much better 1W (or 3W) LEDs, my experience with such IR LED flashlight is that it’s much stronger than cheap surveilance LED illuminators with 20-30 and more 5mm LEDs.
Even easier, just turn the device around and let the screen illuminate what you’re trying to see. Bonus: you can use your own eyes!
Joking aside, fun project, just the sort of thing I would make for fun, too.
Since you’re only going to get greyscale, anyway, you could make this even more “stealth” by replacing the LCD’s backlight with red LEDs, and add a dimmer so you can turn it way down.