A first-time visitor to any bio or chem lab will have many wonders to behold, but few as captivating as the magnetic stirrer. A motor turns a magnet which in turn spins a Teflon-coated stir bar inside the beaker that sits on top. It’s brilliantly simple and so incredibly useful that it leaves one wondering why they’re not included as standard equipment in every kitchen range.
But as ubiquitous as magnetic stirrers are in the lab, they generally come in largish packages. [BantamBasher135] needed a much smaller stir plate to fit inside a spectrophotometer. With zero budget, he retrofitted the instrument with an e-waste, Arduino-controlled magnetic stirrer.
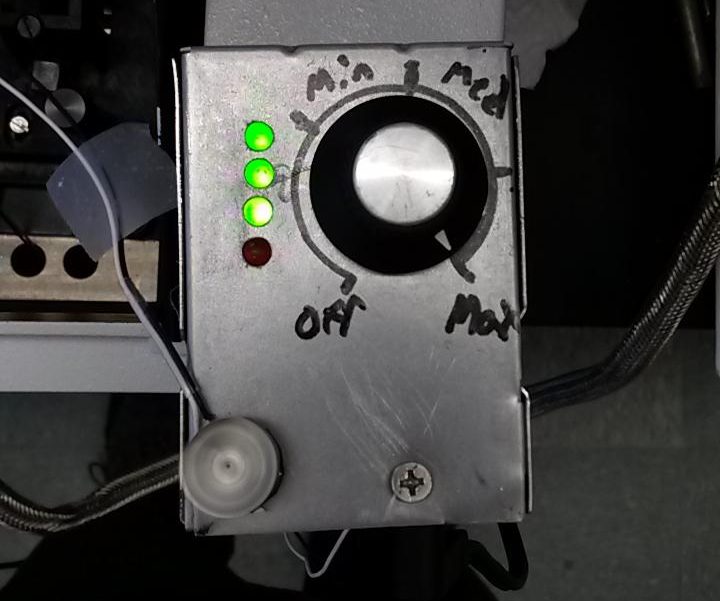
The footprint available for the modification was exceedingly small — a 1 cm square cuvette with a flea-sized micro stir bar. His first stab at the micro-stirrer used a tiny 5-volt laptop fan with the blades cut off and a magnet glued to the hub, but that proved problematic. Later improvements included beefing up the voltage feeding the fan and coming up with a non-standard PWM scheme to turn the motor slow enough to prevent decoupling the stir bar from the magnets.
[BantamBasher135] admits that it’s an ugly solution, but one does what one can to get the science done. While this is a bit specialized, we’ve featured plenty of DIY lab instruments here before. You can make your own peristaltic pump or even a spectrophotometer — with or without the stirrer.
[via r/Arduino]


Hey [bantambasher] why do you need a stirrer inside the spectrophotometer? I don’t get it. Aren’t you worried about getting bubbles in the cell path?
reaction-in-cuvette maybe for rate study? Bubbles is usually solved by tapping the cuvette, haha.
Leithoa,
I am doing bulk electrolysis experiments in a custom-built cell I made, and stirring is absolutely necessary. I am certain bubbles would be a problem if I were stirring very fast, but in fact I had to make this complicated build because I need a way to stir very slowly–the stirbar just sits there if I try to stir too fast. So, bubbles from cavitation are not a problem. Stirring does increase my baseline by about 0.1 absorbance (likely due to convection), but as long as I take my blanks under that condition Everything works out. The other bonus about building it this way is that my rate of stirring for each speed setting is always the same, so I can easily compare experiments done at the same setting.
Real interested in your work, got a blog post on them?
I have a poorly updated RG, but that’s it. I’m a PhD student, only a hacker by necessity. Here is the project, but it doesn’t tell you much.
https://www.researchgate.net/project/Development-of-open-source-open-access-prototype-spectroelectrochemistry-cell?updateId=58332d0c08ae5e4c8b362ea4
@Leithoa: Because it makes light work of the project.
As a regular HAD reader, I’m stoked to see this here. I would be remiss if I did not add that version 2 works perfectly, and I obtained my first set of potentially publishable results using it.
I am only trained as a chemist–all my electronics and fabrication know-how is self taught from sources like this. I hope others may take this as inspiration so that they can find creative ways to solve their own research problems.
But you used an arduino instead of a 555, so… ;)
No, seriously, this is great. A clever solution to slow the speed.
Actually, now that you mention it, I remember that I had originally attempted this kind of control for a 12V heater with a 555 and two knobs: One to change the duty cycle and one to change the frequency. It worked…barely. I still have the build knocking around my junk bin, I should plug it in just to see if it would work!
I hope that you get the extra credit that you should get for this work for thinking out side of the box that you said your main field is.
Great job.
And don’t for get to put this in your resume.
Could you tell a bit more about the PWM algorithm you used? I understand that BLDC fans don’t lend themselves to PWM control too easily.
Absolutely. Basically the end of the code outputs a HIGH and a LOW pulse, each with a specifically set delay as the duration of the pulse. This is different than a typical PWM control because it not only changes the duty cycle but also the overall frequency. The pulses as defined earlier in the code by which speed setting is selected, and there are two calibration buttons which allow the user to modify the pulses for each setting as well which then get loaded into the eeprom to be remembered for next time. The calibration is the best part–the motor is SO finicky that if the pulses aren’t exactly right down to the millisecond it won’t spin. In fact, any of the regular BLDC motors I used worked perfectly… it’s only when there are huge magnets glued to it, it’s stuffed into a tiny cavity with a plastic piece barely grazing it and a steel piece right next to it that it requires the fine control.
I can post the code if you want more info, it’s just a bit verbose since I am a crappy programmer.