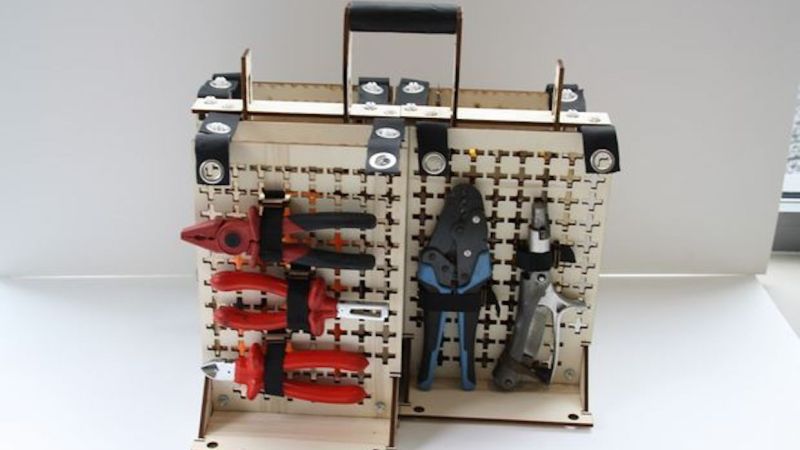
[ystoelen] created this modular wooden toolbox out of laser-cut 5mm plywood secured with leather hinges bolted into place. The leather strips secure the various tool boards with grommets connecting to plastic plugs. The toolboards use cross-shaped holes with laser-cut plugs and strips of elastic securing the tools, allowing each board to be uniquely configured depending on what tool is being stored there. There is a larger, “main” board, onto which smaller boards can be placed depending on what tools you’ll need.
While this is a clever approach to tool transport, we have some concerns about this project. Usually the problem with a box full of tools is that you’ve overloaded it and can’t readily lift it up. Often this involves a steel toolbox that won’t break, no matter what happens. But a plywood construct isn’t nearly that strong, and if overloaded or dropped it’s gonna take some damage.
For more toolbox inspirations, read our posts on a machine shop in a toolbox as well as this Transformers-themed portable workbench.


“Usually the problem with a box full of tools is that you’ve overloaded it and can’t readily lift it up.”
If your toolbox is so overloaded it’s not lift-able anymore, it’s time for either a toolcart with wheels or a drastic culling of unused tools. Because guaranteed there’s tools in there you’ve used never or maybe once and then never touched again. Tools you never or barely ever need don’t need to be in your toolbox. Proper planning means you know in advance what tools you need. Thus you can take only the specialty tools you need for a certain job.
As for this project, good luck with the elastic strips, they’ll be too weak to hold the tools in short order, meaning you have to redo all of them every couple of months. Elastic is good for clothing, not much else imho. This certainly wouldn’t be how I’d design it myself. But if it works for [ystoelen] then great.
I start out with a big, fully loaded tool bag at my desk. If I have to go fix something, I grab the tools I need and throw them in a smaller, lighter bag to bring with me. The big bag only comes along if I have to go off-site or home with me at the end of the day. (Tools grow legs overnight. That’s a fact. Besides, I might need them there.)
If I’m not careful it can easily turn into George Carlin’s “a place for my stuff” bit…
Just throw the tools in a standard tool box. Why go through all the trouble?
It’s … novel… but it is about the furthest thing from practical that I can conceive.
I often do some service-work in the field, and the best arrangement I’ve come up with is to buy a good commercial toolbag, which usually has pockets inside and out (for crimpers, pliers etc), and then I add a pair of those stacking parts bins inside as removable tool trays, and a cut-down plastic food container that holds vertical items like a file-set, a case of jewelers’ screwdrivers, etc.
+1
the tool back packs you see from the big manufactures are really nice. I can have all my hand tools, my toner and tester, my laptop, and a small parts bin all in one spot, and it folds out flat on the site so you can see everything and the pockets are tiered so everything is easy to get to. I was using the stiff tool bags with a shoulder sling, but it would still wreck my back. With the backpack style and weight is more evenly distributed and I can carry it around all day without back pain.
This is a cute little display case for a few hand tools, nothing more to see here.
But a nice standard tool bag will not get you onto Hackaday – quit making common sense
I used to carry some tools in the back of my car – had a small leather tool bag that I got from Brookstone back when they sold quality stuff – used the same bag when I did field service work – would fit inside my duffel bag – would crush down to save space if it was not full and no sharp corners – worked great
Agreed bags or anything only works well if everything has its place in the bag. All too often at the end of a long day or when I’m rushing off the job to beat traffic, my tool bag becomes a dumping ground. If everything has a place it is more likely to be put away, but even my tool belt gets a bit crowded and needs periodic editing.
When I was working field service, I purchased a bunch of small clear womens cosmetic bags. I was able to see what was in each bag and where it was quickly.
This looks like a miniaturized version of peg board which is a complete waste of money. You won’t ever use 90% of the holes that you spend all that time having cut. You’re better off putting plywood on your wall for half the price. Once you put things in a place they tend to stay for a considerable amount of time. Modular ability usually is only needed in during the designing phase of how you want things to be.
I hate peg board. The brackets are always falling off when you lift off the tools and it is the least efficient storage method I can think of. One good thing is you can always see your tools (or where they were before they fell off).
On this project maybe a fiberglass layer or at least a coat of epoxy would help make it more durable. I like the modular nature of this because what tools you have change over time. It would be nice to have storage your can reconfigure to meet future needs.
+1 Kabillion.
Plywood? You’re too classy!
In my shop, the wall behind the bench is covered with cheap OSB (chipboard) anchored to the wall. When I have a tool that needs hanging, I make a fitting out of wood and just screw it to the OSB. Infinitely placeable and re-placeable, and even including the cost of short wood screws, it was under $20 for the whole deal. Plus, it looks, well, “rugged”.
One thing I’ve noticed about “organizers”, they usually take up more room than they’re supposed to save.
Will this work for my dildo collection?