Having a child is perhaps the greatest “hack” a human can perform. There’s no soldering iron, no Arduino (we hope), but in the end, you’ve managed to help create the most complex piece of machinery in the known galaxy. The joys of having a child are of course not lost on the geekier of our citizens, for they wonder the same things that all new parents do: how do we make sure the baby is comfortable, how many IR LEDs do we need to see her in the dark, and of course the age old question, should we do this with a web app or go native?
 If you’re the kind of person who was frustrated to see that “What to Expect When You’re Expecting” didn’t even bother to mention streaming video codecs, then you’ll love FruitNanny, the wonderfully over-engineered baby monitor created by [Dmitry Ivanov]. The product of nearly two years of development, FruitNanny started as little more than a Raspberry Pi 1n a plastic lunch box. But as [Dmitry] details in his extensive write-up, the latest iteration could easily go head-to-head with products on the commercial market.
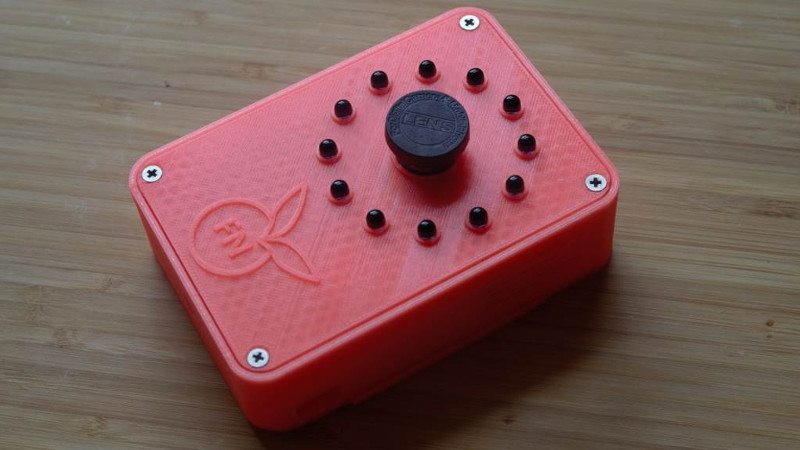
[Dmitry] gives a full bill of materials on his page, but all the usual suspects are here. A Raspberry Pi 3 paired with the official NoIR camera make up the heart of the system, and the extremely popular DHT22 handles the environmental monitoring. A very nice 3D printed case, a lens intended for the iPhone, and a dozen IR LEDs round out the build.
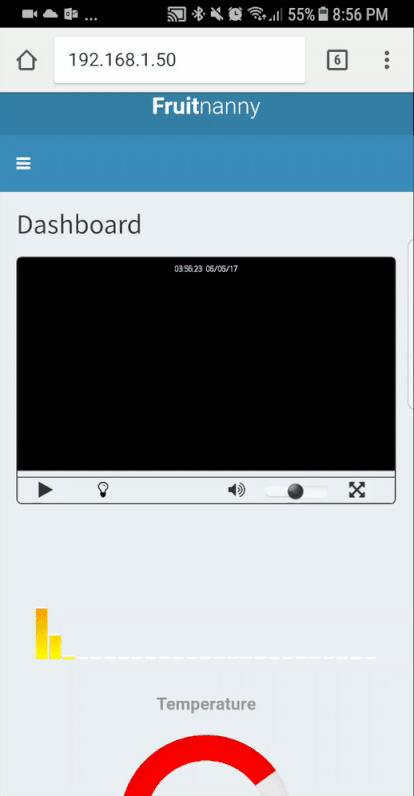
The software side is where the project really kicks into high gear. Reading through the setup instructions [Dmitry] has provided is basically a crash course in platform-agnostic video streaming. Even if a little bundle of joy isn’t on your development roadmap, there’s probably a tip or two you can pick up for your next project that requires remote monitoring.
It probably won’t surprise you that geeky parents have been coming up with ways to spy on their kids for some time now, and if you can believe it, some don’t even include a Raspberry Pi.


I like the look of the case, but I feel like a lot of 3D printed cases could be skipped entirely and a project box be used instead for a fraction of the cost and effort.
That said it’s a good introduction project for him in 3D printing as he noted, and the whole project itself is great. Completely overkill, but oh so much fun. :) I wonder if there’s any commercial product that’s comparable in function and price, although down the line the Pi3 could be way more versatile + re-purposed.
“3D printed cases could be skipped entirely and a project box be used instead for a fraction of the cost and effort”
I’d almost agree with “cost or effort” in which case it depends on your billable rates.
But if you want anything other than rectangular, the ability to 3D print a one-off case at home is priceless. Or in the thousands of dollars (for a custom injection mold and short production run).
The case in question is pretty near rectangular. It’s just a rectangle with rounded corners. That’s pretty standard faire among pre-made project boxes. The faceplate is pretty nice though. I might consider printing a faceplate for a pre-made box.
There is a lot to be said for DIY though. You can print exactly the box you want. You can print it when you want and have it a few hours later. Yes, pre-made boxes can be cheaper than printing one but usually that means you are ordering it from across an ocean and taking the free shipping option which can be months before arrival. I can’t speak for everyone else but it’s about an hour drive for me to a store that sells good quality filament at about the same price I see the no-name stuff for online and I have a friend in the area I can visit making the trip more worthwhile. Who needs China?
I suppose you COULD put pretty much every project into a gray plastic box from the Home Depot, but why? With as cheap as (relatively) small format 3D printers are anymore, they can pay for themselves after a handful of projects like this.
How would it pay for itself if it is cheaper to buy a project box than the printing materials cost?
Buying boxes is more expensive than buying filament, unless you’re housing all of your projects in junction boxes.
Making a square hole in a 3DP box that exactly fits the LCD screen is as easy as measuring twice, and typing once. Doing the same in a project box is 20 drill hits and some tedious work with a file.
In the interest of science I loaded up the STLs for his case in my slicer and checked the required filament against my PLA brand of choice which is currently selling at $17/kg.
Even rounding up, it would cost about 10 cents to print this case. So unless you’ve got a tip for where you can get some seriously cheap project boxes, I’m going to have to go with printing on this one.
Is using “self replication hardware” for its intended purpose truly a hack? (Maybe that’s why “hack” is in quote marks?)
Let us know when you are ready to join the human race.
For most people, NOT having a child is the hack.
I’m just imaging, somebody posts a picture of his/her newborn baby on Facebook and somebody answers: #notahack.
I had to reverse a vasectomy to have my daughter. So,it was quite the hack.
I would be a bit cautious with IR leds near a baby. You cannot see the light but it can damage your eyes. This is probably safe but I would do some calculations to check. Although I don’t now the necessary formulas.
It is possible that you confuse IR and UV? Some small IR-LED should be pretty save no?