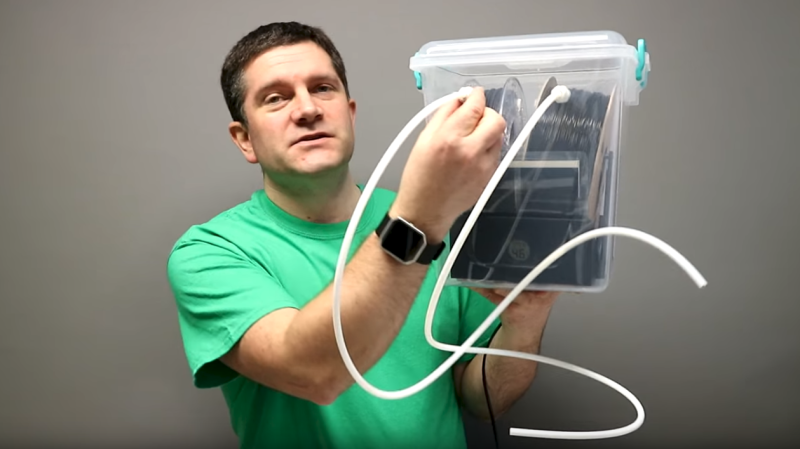
There has been a lot of activity from [Richard Horne] regarding 3D printing filaments lately; most recently he has shared two useful designs for upping one’s filament storage and monitoring game. The first is for a DIY Heated DryBox for 3D printing filament. It keeps filament dry not just by sealing it into a plastic box with some desiccant, but by incorporating a mild and economical heater intended for reptile habitats inside. Desiccant is great, but a gently heated enclosure can do wonders for driving away humidity in the right environment. The DryBox design also incorporates a handy little temperature and humidity sensor to show how well things are working.
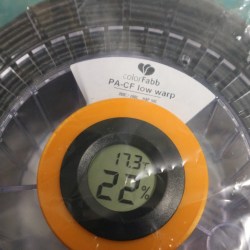
The second design is a simple spin-off that we particularly liked: a 3D printed adapter that provides a way to conveniently mount one of the simple temperature and humidity sensors to a filament spool with a desiccant packet. This allows storing a filament spool in a clear plastic bag as usual, but provides a tidy way to monitor the conditions inside the bag at a glance. The designs for everything are on Thingiverse along with the parts for the Heated DryBox itself.
[Richard] kindly shares the magic words to search for on eBay for those seeking the build’s inexpensive key components: “15*28CM Adjustable Temperature Reptile Heating Heater Mat” and “Mini LCD Celsius Digital Thermometer Hygrometer Temperature Humidity Meter Gauge”. There are many vendors selling what are essentially the same parts with minor variations.
Since the DryBox is for dispensing filament as well as storing it, a good spool mounting system is necessary but [Richard] found that the lack of spool standardization made designing a reliable system difficult. He noted that having spool edges roll on bearings is a pretty good solution, but only if one doesn’t intend to use cardboard-sided spools, otherwise it creates troublesome cardboard fluff. In the end, [Richard] went with a fixed stand and 3D printable adapters for the spools themselves. He explains it all in the video, embedded below.
Not long ago we saw [Richard] share his thoughts on making 3D printer filament packaging more sensible, an excellent topic that saw a lot of good discussion. And within a few hours, at least one German filament company was already shipping out zip-tied bundles. That’s fast.


Is environmental moisture that big of a problem? Printer filament as the core of a dehumidifier? Hopefully the printing process takes away some of that problem.
Not really, no. Some filaments like nylon are known to be problematic in high humidity environments, but most don’t need any special treatment.
Unless you’re living in some kind of tropical climate with 80%+ RH all the time, this sort of thing is absolutely overkill.
“Unless you’re living in some kind of tropical climate with 80%+ RH all the time”
DId someone called me?
Tropical climate, or the southern USA in the summer.
I assumed this was for a nylon setup, but then I watched the video and saw PLA. I am confused. Then again, I go through a spool rather fast.
I think he said PVA, not PLA.
Not at all. Print quality goes down the drain if you leave Nylon out just overnight. PETG starts having issues with stringing after just a few days. I live in Kalifornia so the humidity isn’t even that bad, yet I have to dry my filament.
It actually isnt. I live in a mild climate, but the humidity causes my filaments to get brittle. You would be suprised how much mousture comes out of a roll of pla that has been sitting for a month or so.
Except for PVA. Usually not. Except for very humid environments.
Unlike what most people experience, PLA in hot humid environments can cause some print quality issues. But a large part of the world doesn’t have those environmental conditions.
(For those that don’t know me. I work at Ultimaker)
I’ve noticed my filaments affected after a humid NJ summer. Wood PLA seems to get it the worst. Printing a water-carrying filament produces steam which makes the filament bubble on exit from the nozzle and wrecks the print. I bought a $15 unit which contains dessicant beads and when you need to dry them to recharge, you just plug it into the wall overnight.
Had a fresh spindle of Hatchbox loaded in my printer. Was printing perfectly several times over several days.
Had a heat wave and the humidity got in the 60’s in my apt for 2 days.
Now the same Hatchbox with the same settings is stringing like crazy.
Not data, but an anecdote. Looking into protection in the future. I can probably dial in a fix but it’s obnoxious.
I live in a swamp on the gulf coast, so I’m kind of on the extreme end here, but it’s useful information nonetheless.
PLA is mostly fine left out. if the indoor humidity breaks 80% or so for an extended period of time I’ll stick it in a dry box until conditions go back to normal.
PETG gets stringy after a while if left out, but nothing major. I usually leave it in a box with dessicant.
pure nylon is pretty much unprintable if left out for more than about an hour. it stays in my dehydrator, even while printing with it.
common 3D printing nylon is unprintable if left out for more than a day. if it’s a fresh spool and I plan to use most of it in one go I’ll print it from the holder in my enclosure (stays about 40c in there), if it’s not a fresh spool or I don’t plan on using it all in one go I print with it from my heated dry box.
I can’t print with PVA. such extreme humidity control is impossible with my setup in my climate.
I don’t use polycarbonate or ABS so I can’t really comment on those, but people I know who print with them have had moisture related difficulties
heating the filament in a sealed box doesnt seem like it would help.
I am not sure heater is enough. I’d try using a thermoelectric dehumidifier.
Too inexpensive and sensible. Call me when it’s $300 and I’ll buy the $99 knockoff that doesn’t really work. ;)
So what exactly are the benefits of the heated box over just a normal dry box?
It’s warmer
Are you from Reddit? Lol
I think the heat would help draw moisture out of the filament. Based on really old chemistry and material science classes.
So what benefits are there to a heated dry box over a normal one?
I’ll take “things that don’t work” for $20 Alex.
Clearly you’ve never Heard of a food dehydrator. You know, that process that removes water from food using connective heat that humans have used successfully for thousands of years.
When you need it, this is a good idea and works well. My printer is in a damp basement. I got tired of steam pops in the hotend and bubbles in both my PLA and PETG prints. So I built one similar to this over a year ago. I used a “Koolatron” thermoelectric cooler. I added magnetic strips (like a fridge door) for a near-airtight seal, and a kilo of silica gel.
Since I didn’t care for the fan running all the time, I replaced the peltier with a small heater and removed the exterior heatsink/fan. It’s thermostatically controlled to 35C, and also has a humidity and temperature monitor. It draws only 10 watts, and keeps relative humidity inside to less than 4%. I regenerate that kilo of silica gel every 6 months or so. No more steam pops, and no more yucky bubble texture in my prints. A huge improvement.
It’s strictly for storage though: I don’t draw filament directly from the enclosure.
If it’s sealed shut, I can’t see that the heater has any effect.
Fridges and Tupperware boxes seal airtight (probably not to NASA standards, but good enough), so whilst the silica gell will absorb moisture, the heater is just keeping your filament warm. Unless that’s an issue for filament? Can’t see how it does anything for moisture.
The vapour pressure of water at 35C is three times what it is at 15C (my normal basement temperature), so it’s much more likely to leave the filament and get into the air where the silica gel can grab it.
It raises air pressure which reduces its ability to hold water, and that dryer air then draws out moisture. Ever see a food dehydrator?
Just storing my filament in a sealed tote with silica beads seems to work fine. The totes cost about $10 at Target and can hold 4 spools. The silica beads turn blue as they absorb moisture and can be put on a cookie sheet in the oven to recharge.
I like this idea. Is there a good source for the silica beads?
This is the stuff I use: https://www.amazon.com/DRY-Replacement-Desiccant-Indicating-Reusable/dp/B019NN1GBG
It works extremely well in my fairly well-sealed box. It might be different from what “icanhaz” uses though: mine is blue when dry, and turns orange/pink when it needs regeneration.
I have a gas oven that is too humid to regenerate in that, and would not want to put it on anything I’d cook with anyway. I pop it in my reflow oven set to 120C for 3 hours. Works a treat.
Awesome. Thank you very much for the link.
Cat litter. Usually called “crystal cat litter ” or something llike that.
I had heaps of moisture issues with filament here (auckland NZ – routinely above 80% humidity). I ended up getting one of the commercial ‘print dry’ filament dryer/dispensers for about $99 from the states. Cheaper than buying and hacking a food dehydrator (surprisingly) and comes with lazy Susan style horizontal filament spook holders. The only problem was it’s hilariously bad temp control system. Crappy mechanical thermostat mounted BEFORE the heater. Daft. Cooked a couple of rolls of PLA to floppy noodles before I figured out what was happening. $15 digital temp controller from fleabay, some dremeling and a thermocouple mounted where the filament actually lives and boom. Solved. Excellent dryer. Makes a huge difference to PETG, Nylon and PLA. Highly recommend it.
Dian, which specific temp controller did you buy? Thx!
Good old stc-1000 knock off. Something like this: https://rover.ebay.com/rover/0/0/0?mpre=https%3A%2F%2Fwww.ebay.com%2Fulk%2Fitm%2F322369452016
They’re all pretty much the same. Wouldn’t trust the current ratings in the spec but the heater in the print dry thing is pretty small. I’ve got 100s of hrs on mine with no worries.
Stick it in place of the original thermostat and you’re good. I drilled a hole up from the base into the filament area and taped the thermocouple to the side of the chamber with some kapton.
Awesome, thanks! Didn’t mean to fat finger your name :)
No worries :-)
$30 will get you a cheap “food saver” on ebay (though you can probably get them a lot cheaper at local thrift stores… and $20 will get you a near lifetime supply of vacuum bags. (well roll of vacuum bag).
Just vacuum seal the stuff with some discharged desiccant when you want to store it.
I’d really like to see some one test completely soaked filament in a strong vacuum chamber… something that can get pressure down below the boiling point of water, and leave the temperature around room temp see if it can be recovered to “good as new” condition that way without affecting the strength of the stuff like heating can.
You’re in luck! https://www.youtube.com/watch?v=eqQRN9TUw08
tl;dw vacuum works OK, but heat works better.
Puts my disposable closet dehumidifier in a resealable 5 gallon bucket to shame.