Zen And The Art Of Foam Core

Some of our pastimes are so deeply meditative that we lose ourselves for hours. Our hands seem to perform every step, and sequence like a pianist might recite her favorite song. If [Eric Strebel]’s voice and videos are any indications, working with foam core can have that effect.

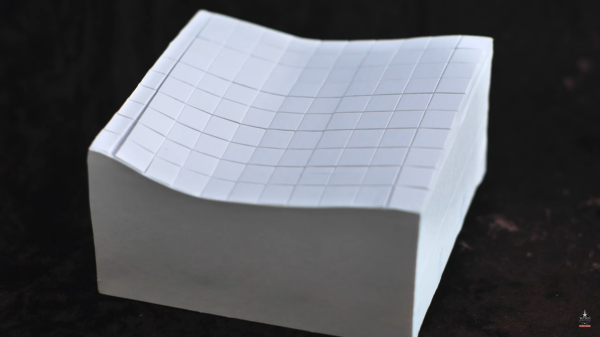
Foam core is a staple of art stores, hobby stores, and office supply stores. It comes in different colors, but the universal trait is a sheet of foam sandwiched between a couple of layers of paper. This composition makes a versatile material which [Eric] demonstrates well in his advanced tutorial making a compound surface and later on a speaker mockup.

After the break, you can catch a couple of beginner tutorials which explain the differences between a slapdash foam core model, and one which will draw appreciation. Proper tools and thoughtful planning might be the biggest takeaways from the first two videos unless you count the Zen narration. The advanced videos, linked above, show some ingenious ways to use foam core like offset scoring, adjustable super-structures, and paper transfers.

Each video is less than ten minutes long, so if you just started your coffee break, you can complete a video right now. Or look at another 2D material turned into amazingness with a papercraft strandbeest, then step up your game with another look at vinyl cutters.
Continue reading “Zen And The Art Of Foam Core”

Membership Ring Of The Electronic Illuminati

When the cabal of electronic design gurus that pull the invisible strings of the hardware world get together, we imagine they have to show this ring to prove their identity. This is the work of [Zach Fredin], and you’re going to be shocked by the construction and execution of what he calls Cyborg Ring.

The most obvious feature of the Cyborg Ring is the collection of addressable LEDs that occupy the area where gems would be found on a ring. What might not be so obvious is that this is constructed completely of electronic components, and doesn’t use any traditional mechanical parts like standoffs. Quite literally, the surface mount devices are structural in this ring.

They are also electrical. Here you can see a detail of how [Zach] pulled this off. We are looking at the underside of the ring, the part that goes below your knuckle. One of the two PCBs that are sized to fit your finger has been placed in a Stick Vise while the QFN processor is soldered on end, and the pairs of SMD resistors are put in place.

The precise measurements of each part make it possible to choose components that will perfectly span the gap between the two boards. In the background of the image you can see SMD resistors on their long ends — a technique he used to allow the LEDs themselves to span between one resistor on each of the two PDBs to complete the circuit. Incredible, right?

But it gets better. [Zach] ended up with a working prototype, but has continued to forge ahead with new design iterations. These updates are a delight to read! Make sure you follow his project and check in regularly; if you’ve already looked at this now’s the time to go back and see the new work. The gold pads for the minuscule coin cells which power the ring are being reselected as the batteries didn’t fit well on the original. Some layout problems are being tweaked. And the new spin of boards should be back from fab in a week or so.

Don’t miss the demo video found below. We really like seeing projects that build within the wearble ring form factor. It’s an impressive constraint which [Zach] seems to have mastered. Another favorite of ours is [Kevin’s] Arduboy ring.

Continue reading “Membership Ring Of The Electronic Illuminati”

What’s Coming In KiCad Version 5

Way back in the day, at least five years ago, if you wanted to design a printed circuit board your best option was Eagle. Now, Eagle is an Autodesk property, the licensing model has changed (although there’s still a free version, people) and the Open Source EDA suite KiCad is getting better and better. New developers are contributing to the project, and by some measures, KiCad is now the most popular tool to develop Open Source hardware.

At FOSDEM last week, [Wayne Stambaugh], project lead of KiCad laid out what features are due in the upcoming release of version 5. KiCad just keeps improving, and these new features are really killer features that will make everyone (unjustly) annoyed with Eagle’s new licensing very happy.

Although recent versions of KiCad have made improvements to the way part and footprint libraries are handled, the big upcoming change is that footprint libraries will be installed locally. The Github plugin for library management — a good idea in theory — is no longer the default. Spice simulation is also coming to KiCad. The best demo of the upcoming Spice integration is this relatively old video demonstrating how KiCad turns a schematic into graphs of voltage and current.

The biggest news, however, is the new ability to import Eagle projects. [Wayne] demoed this live on stage, importing an Eagle board and schematic of an Arduino Mega and turning it into a KiCad board and schematic in a matter of seconds. It’s not quite perfect yet, but it’s close and very, very good.

There are, of course, other fancy features that make designing schematics and PCBs easier. Eeschema is getting a better configuration dialog, improved bus and wire dragging, and improved junction handling. Pcbnew is getting rounded rectangle and complex pad shape support, direct export to STEP files, and you’ll soon be able to update the board from the schematic without updating the netlist file. Read that last feature again, slowly. It’s the best news we’ve ever heard.

Additionally, this is one of the rare times you get to hear [Wayne] speak. This means the argument over the pronunciation of KiCad is over. It’s ‘Key-CAD‘ not ‘Kai-CAD‘. You can check out the entirety of [Wayne]’s State of the KiCad talk below.

Continue reading “What’s Coming In KiCad Version 5”

ESP32 Weather Station On A PCB

We see lots of ESP8266 projects, but considerably fewer for the ESP32. So this good-looking weather station on a PCB using an ESP32 caught our eye. The board has a few sockets for common weather gear, but with a little modification, it would be a great carrier for an ESP32. Since the PCB layout is available, you could change things around to suit you. You can see a video from [Rui Santos] about his project and its progress from breadboard to PCB in the video below.

Continue reading “ESP32 Weather Station On A PCB”

Reverse Engineering A Bitcoin Miner

If you’re brave enough to have dipped your toes into the Wild West that is cryptocurrency, you probably know that people have long since abandoned trying to mine on their desktop computers. Farms of GPUs are all the rage now, but dedicated mining hardware has also enjoyed a following among those who are serious about their fictitious money. The state-of-the-art for such devices is moving just as rapidly as cryptocurrency itself is, which means older mining gear can now be picked up fairly cheap on the second-hand market. This is an excellent opportunity for those who want to experiment with this type of hardware and potentially utilize it for some other purpose, but first you’ve got to figure out how the thing works.

To that end, [Tomasz Wątorowski] wrote in to the tip line to tell us about the progress he’s made reverse engineering the control protocol for the Antminer S1. As is often the case, the documentation didn’t have all the details he needed, but it did have a schematic of the BM1380 chip at the heart of the device.

Performance of the Antminer S1 controlled via UART

The Antminer S1 contains 64 BM1380 chips on an internal UART bus. With the information from the schematic, [Tomasz] was able to tap into this UART bus with a USB adapter and start listening in on the conversation. He compiled a collection of commands and learned enough to be dangerous (which is always the goal here at Hackaday).

For example, he found that the could set the frequency of the BM1380 as high as he wished without any consideration for thermal overload. This could potentially allow somebody to run  the hardware to the point of destruction, à la Stuxnet.

Once he figured out how to give the hardware hashes to work on over the UART interface, he setup a little head-to-head competition between the software he wrote to command the Antminer S1 and the official control software. No drop in performance was found between his software and the real deal, which sounds like a win in our book.

Even if he can’t improve on the performance of this particular piece of outdated mining hardware, it still beats doing it by hand on a piece of paper.

USB To Quad Serial Port Adapter Offers TTL, Isolated Ports

[Felipe Navarro] wanted to add a few serial ports to his computer, but couldn’t find an adapter that suited his needs. So, he built his own.

His Quad Serial device is a nicely designed converter that offers four serial ports, two of which are isolated to avoid blowing up too much stuff if things go wrong. The other two are TTL ports, but with an interesting twist: feed them any voltage between 1.8 V and 5 V, and they will happily work with it, which is a lot easier than messing about with TTL to RS-232 converters.

It’s all built around an FTDI FT4232H chip, which has drivers available for most OSes, so it should work with pretty much anything. And, as [Felipe] notes, this chip has not been cloned, so you won’t have to worry about the FTDI drivers disabling your device without warning.  Well, not at the moment, anyway. We did cover a similar quad serial port adapter last year, but this one is a bit more developed, with both DE-9 and screw terminal connectors available.

Heated DryBox Banishes Filament Moisture For Under $20

There has been a lot of activity from [Richard Horne] regarding 3D printing filaments lately; most recently he has shared two useful designs for upping one’s filament storage and monitoring game. The first is for a DIY Heated DryBox for 3D printing filament. It keeps filament dry not just by sealing it into a plastic box with some desiccant, but by incorporating a mild and economical heater intended for reptile habitats inside. Desiccant is great, but a gently heated enclosure can do wonders for driving away humidity in the right environment. The DryBox design also incorporates a handy little temperature and humidity sensor to show how well things are working.

Spool-mounted adapter for temperature and humidity sensor (and desiccant) to monitor storage bag conditions.

The second design is a simple spin-off that we particularly liked: a 3D printed adapter that provides a way to conveniently mount one of the simple temperature and humidity sensors to a filament spool with a desiccant packet. This allows storing a filament spool in a clear plastic bag as usual, but provides a tidy way to monitor the conditions inside the bag at a glance. The designs for everything are on Thingiverse along with the parts for the Heated DryBox itself.

[Richard] kindly shares the magic words to search for on eBay for those seeking the build’s inexpensive key components: “15*28CM Adjustable Temperature Reptile Heating Heater Mat” and “Mini LCD Celsius Digital Thermometer Hygrometer Temperature Humidity Meter Gauge”. There are many vendors selling what are essentially the same parts with minor variations.

Since the DryBox is for dispensing filament as well as storing it, a good spool mounting system is necessary but [Richard] found that the lack of spool standardization made designing a reliable system difficult. He noted that having spool edges roll on bearings is a pretty good solution, but only if one doesn’t intend to use cardboard-sided spools, otherwise it creates troublesome cardboard fluff. In the end, [Richard] went with a fixed stand and 3D printable adapters for the spools themselves. He explains it all in the video, embedded below.

Continue reading “Heated DryBox Banishes Filament Moisture For Under $20”