The production capability available to the individual hacker today is really quite incredible. Even a low-end laser engraver can etch your PCBs, and it doesn’t take a top of the line 3D printer to knock out a nice looking enclosure. With the wide availability of these (relatively) cheap machines, the home builder can churn out a very impressive one-off device on a fairly meager budget. Even low volume production isn’t entirely out of the question. But there’s still one element to a professional looking device that remains frustratingly difficult: a good looking front panel.
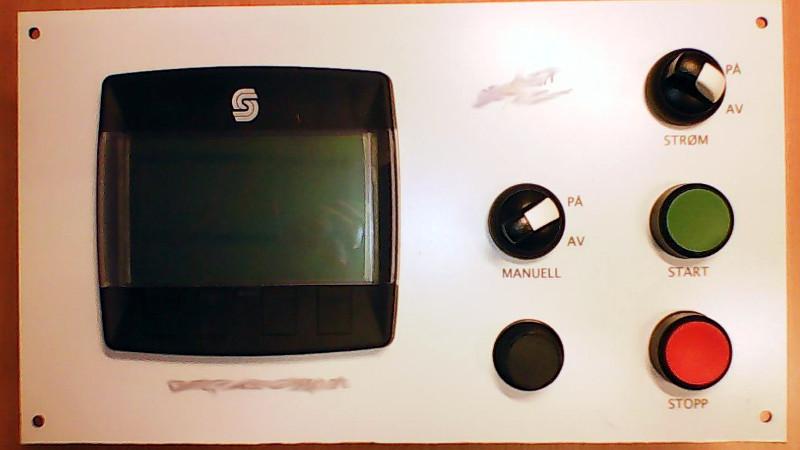
 Now if your laser is strong enough to engrave (and ideally cut) aluminum sheets, then you’ve largely solved this problem. But for those of us who are plodding along with a cheap imported diode laser, getting text and images onto a piece of metal can be rather tricky. On Hackaday.io, [oaox] has demonstrated a cost effective way to create metal front panels for your devices using a print service that offers Dibond aluminum. Consisting of two thin layers of aluminum with a solid polyethylene core, this composite material was designed specifically for signage. Through various online services, you can have whatever you wish printed on a sheet of pre-cut Dibond without spending a lot of money.
As explained by [oaox], the first step is putting together the image you’ll send off to the printer using a software package like Inkscape. The key is to properly define the size of the Dibond plate in your software and work within those confines, otherwise the layout might not look how you expected once the finish piece gets back to you. It’s also important to avoid lossy compression formats like JPEG when sending the file out for production, as it can turn text into a mushy mess.
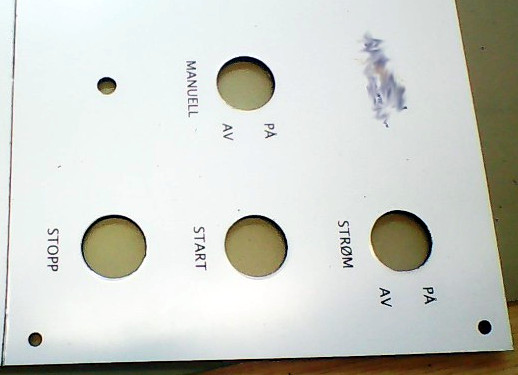
When you get the sheet back, all you need to do is put your holes in it. Thanks to the plastic core, Dibond is fairly easy to cut and drill as long as you take your time. [oaox] used a step drill for the holes, and a small coping saw for the larger openings. The final result looks great, and required very little effort in the grand scheme of things.
But how much does it cost? Looking around online, we were quoted prices as low as $7 USD to do a full-color 4×4 inch Dibond panel, and one site offered a 12×12 panel for $20. For a small production run, you could fit several copies of the graphics onto one larger panel and cut them out with a bandsaw; that could drop the per-unit price to only a couple bucks.
We’ve seen some clever attempts at professional looking front panels, from inkjet printing on transparencies to taking the nuclear option and laser cutting thin plywood. This is one of those issues the community has been struggling with for years, but at least it looks like we’re finally getting some decent options.


Sure – we always did it with Ferric Chloride (exactly the same as PCB production). But when such a service is available, why not. Looks great.
Is there a link to the service used?
Dibond can be cut reasonably well with a CNC router. I have a Shapeoko and use a flat endmill for cutouts and an engraving endmill for lettering.
So can aluminum sheet metal. Wood working bits do just fine in aluminum, smear a bit of wax along the cut if you’re worried or get carbide tipped bits.
Or a set of alpha-numeric punches. Though if you’re going to be making a lot of face plates, a CNC router might be cheaper. Good punches can be quite expensive & then you’re stuck with one font in one size.
Just print mirror Image with laser printteri.. and move Image to alunium with asetone..
I wanted to try that – using Acetone.
Instead I used toner transfer with a modified laminator and toner transfer sheets –
https://cdn.hackaday.io/images/2849461492781450271.jpg
https://hackaday.io/project/21344-toner-transfer-decals
The panel was ferric metal and painted white with a spray paint can. The toner bond strength isn’t the best so you have to put a coat or two of clear paint over the top.
Have you tried the acetone method?
Dymo plastic embossing label maker still pumping. Cheap and tactile. What? Not professional?
One may be surprised on how many production machines Dymo/Brother labels lives ;)
Johnson Plastics (https://tinyurl.com/y7mhwhkx) offers a wide variety of laserable plastics with a thin laminate on top. You select a core color (say, black) and a laminate (say, aluminum, though it’s a photo of aluminum, not real aluminum), then etch through the laminate to reveal the core to print your text (in this example it would be black text on aluminum), and switch the laser to cut so you can make all your cutouts, then have the laser cut out the panel. In some applications, the result can be your panel, but if you need it beefier, just laminate to something stronger. Really great stuff for front panels.
Of course, there’s also Front Panel Express for CNC’d cut and etched aluminum panels: http://www.frontpanelexpress.com.
I’ve used this material for a couple of projects. The company i used was happy to just cnc the various holes and cutouts. You just have to ask.
PCBs. As long as you can get a soldermask color you like, it’s got everything: routing and drilling for holes and cutouts, durable labels, extremely tough. And as a bonus, you can place surface-mount components on the back side.
https://hackaday.com/2015/02/27/custom-case-made-entirely-out-of-pcbs/
Something like that? :)
Yes, like that. And I like the yellow/orange/black color scheme you get with yellow soldermask and black silkscreen. And then, you can go a step further: https://hackaday.io/project/9692-ello-2m.
I own a sign shop and ive made quite a few instrument panels/comtrols (some made to match a particular logo/pattern/texture with text overlays) by wrapping di-bond and/or aluminum with printed vinyl decals (even wrapping around the edge of the faceplate to the back side to give it a better finish).
Straight lines can be cut with a utility knife and (safety) straight edge, and then snapped over an edge. Jig saws with a fine metal tooth blade at high speeds work well for curves. I’ve also used the utility knife to whittle off a sliver/burr and to “file” the edges (it seems to make the polyethylene core more evenly colored). I even roll the edge with a large ratchet socket sometimes to make it less likely to cut into your hand.
It also comes in different thicknesses and colors too. One caution to be aware of is that the core in regular dibond is flammable (Grenfell tower is a prime example), but they do make a fire resistant version.
This guy did his front panel the same way:
https://hackaday.com/2017/03/22/well-engineered-radio-clock-aces-form-and-function/
He wrote, the photoservice he used scaled automatically his first attempt “fit to page” so it came back 95% in size. He had to tell them to use the data 1:1 and it worked fine.
Nail polish :)
Anyone try using ID-Mark?