MouSTer Brings USB To Retro Computers

Folks who like the take the old Amiga out for the occasional Sunday drive usually do it because they have wistful memories of the simpler times. Back when you could edit documents or view spreadsheets on a machine that had RAM measured in kilobytes instead of gigabytes. But even the most ardent retro computer aficionado usually allows for a bit of modern convenience.

Enter the mouSTer. This tiny device converts a common USB HID mouse into something older computers can understand. It even supports using Sony’s PlayStation 4 controller as a generic game pad. While the firmware is still getting tweaked, the team has confirmed its working on several classic machines and believe it should work on many more. Considering the prices that some of these old peripherals command on the second hand market, using a USB mouse or controller on your vintage computer isn’t just more convenient, but will likely be a lot cheaper.

Confirmed retrocomputing superfan [Drygol] is a member of the team working on mouSTer, and in a recent post to his retrohax blog, he talks a bit about what’s happened since his last update over the summer. He also talks a bit about the challenges they’ve faced to get it into production. Even if you’re not into poking around on vintage computers, there are lessons to be learned here about what it takes to move from a handful of prototypes to something you can actually sell to the public.

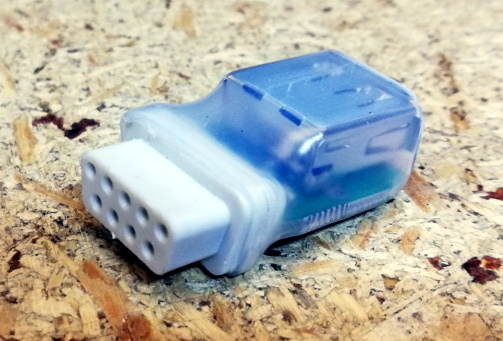
We especially liked the details about the mouSTer enclosure, or lack thereof. Originally [Drygol] says they were going to have the cases injection molded, but despite initial interest from a few companies they talked to, nobody ended up biting because it needed to be done with relatively uncommon low pressure injection. While 3D printing is still an option, the team ended up using clear heatshrink tubing to create a simple conformal protective shell over the electronics. Personally we think it looks great like this, but it sounds like this is only a temporary solution until something a bit more robust can be implemented.

As you might imagine we’ve seen DIY projects that aimed to bring modern input devices to vintage computers like the Atari ST, but the diminutive proportions of the mouSTer and the fact that it’s a turn-key product is sure to appeal to those who want to minimize headaches when working with their classic gear.

Continue reading “MouSTer Brings USB To Retro Computers”

Automatic Component Tape Cutter For When Your Electronics Kit Hits The Big Time

Even for the simplest of products, production at scale can be big challenge. For example, you might find yourself spending many hours manually counting and cutting strips of component tape to go with the DIY electronics kit your selling on Tindie. [Tom Keddie] found himself in similar position some time ago, and built himself an automated component counter and tape cutter.

[Tom] posted the video of his old machine (see it after the break) after a call for help from another Twitter user who found himself with a lot of component strips to cut. The frame of the machine is made from 20×20 aluminium extrusions and laser cut plexiglass. The tape is pulled off the reel by a stepper motor using a 3D printed sprocket, with the tape held on by Lego wheel and tension spring. A second idler sprocket with tensioner is used to guide the tape through two photo-interrupters that can count holes in opaque tape or the components in clear tape. The cutter itself it an Exacto blade mounted on a wooden block in a guillotine-like arrangement, driven by another stepper motor and a threaded rod as lead screw. Everything is of course controlled by an Arduino. Although not used any more, [Tom] says it worked very well in its day.

The availability of cheap laser cutting, 3D printing and components like aluminium extrusions and stepper motors have really made it possible for anyone to add some automation to production in the home workshop. You won’t be surprised that we’ve seen something like this before, but we’ve also seen similar machines for wiring prep and through-hole resistors. Let us hear your production hacks in the comments, or drop us a tip if you’ve documented it!

Continue reading “Automatic Component Tape Cutter For When Your Electronics Kit Hits The Big Time”

Cheap Front Panels With Dibond Aluminium

The production capability available to the individual hacker today is really quite incredible. Even a low-end laser engraver can etch your PCBs, and it doesn’t take a top of the line 3D printer to knock out a nice looking enclosure. With the wide availability of these (relatively) cheap machines, the home builder can churn out a very impressive one-off device on a fairly meager budget. Even low volume production isn’t entirely out of the question. But there’s still one element to a professional looking device that remains frustratingly difficult: a good looking front panel.

Now if your laser is strong enough to engrave (and ideally cut) aluminum sheets, then you’ve largely solved this problem. But for those of us who are plodding along with a cheap imported diode laser, getting text and images onto a piece of metal can be rather tricky. On Hackaday.io, [oaox] has demonstrated a cost effective way to create metal front panels for your devices using a print service that offers Dibond aluminum. Consisting of two thin layers of aluminum with a solid polyethylene core, this composite material was designed specifically for signage. Through various online services, you can have whatever you wish printed on a sheet of pre-cut Dibond without spending a lot of money.

As explained by [oaox], the first step is putting together the image you’ll send off to the printer using a software package like Inkscape. The key is to properly define the size of the Dibond plate in your software and work within those confines, otherwise the layout might not look how you expected once the finish piece gets back to you. It’s also important to avoid lossy compression formats like JPEG when sending the file out for production, as it can turn text into a mushy mess.

When you get the sheet back, all you need to do is put your holes in it. Thanks to the plastic core, Dibond is fairly easy to cut and drill as long as you take your time. [oaox] used a step drill for the holes, and a small coping saw for the larger openings. The final result looks great, and required very little effort in the grand scheme of things.

But how much does it cost? Looking around online, we were quoted prices as low as $7 USD to do a full-color 4×4 inch Dibond panel, and one site offered a 12×12 panel for $20. For a small production run, you could fit several copies of the graphics onto one larger panel and cut them out with a bandsaw; that could drop the per-unit price to only a couple bucks.

We’ve seen some clever attempts at professional looking front panels, from inkjet printing on transparencies to taking the nuclear option and laser cutting thin plywood. This is one of those issues the community has been struggling with for years, but at least it looks like we’re finally getting some decent options.

Test Beds And Jigs With Pogo Pins

Pogo pins – spring-loaded pin contacts are pretty fun to play with and even cooler when they get used in electronic devices like Adafruit and SparkFun’s test jigs. Check after the break for how these two companies have created their own production hacks. Continue reading “Test Beds And Jigs With Pogo Pins”