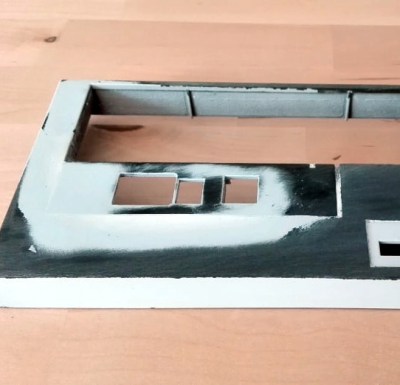
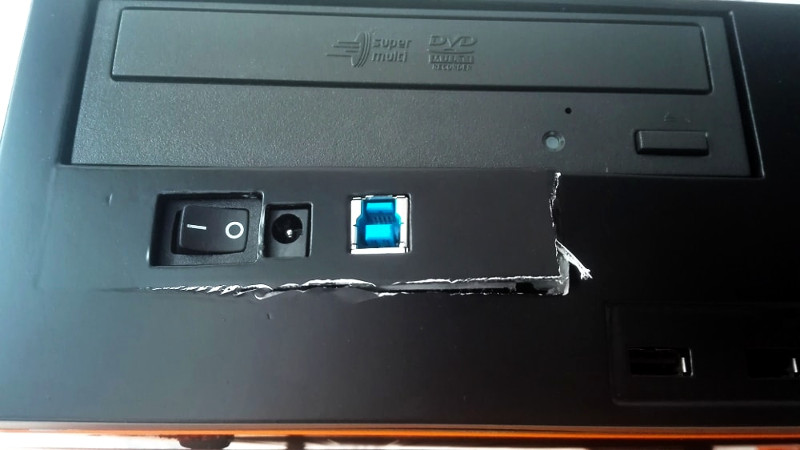
Today’s entry comes to us from [Robert Tomsons], who was kind enough to document this crushing tale of woe so that we might all learn what true heartbreak is. If you’ve ever toiled away at getting that perfect surface finish with body filler, this one is going to hurt. In fact, you might just want to hit that “Back” button and head to safety now. There’s probably a pleasant story about some 3D printed thing being used with a Raspberry Pi of some sort that you can read instead.
 For those of you brave enough to continue on, today we’ll be looking at what [Robert] thought would be a simple enough project. Seeing the board from a USB 3.0 external hard drive kicking around his parts bin, he had a rather unusual idea. Wanting to add an extra drive to his computer, but liking the idea of being able to independently control its power, he decided to integrate the external drive into machine’s front panel. This would not only allow him to power off the secondary drive when not in use, but it meant he could just plug his laptop into the front panel if he wanted to pull files off of it.
All [Robert] needed to do was make it look nice. He carefully squared off the edges of the external drive’s back panel to roughly the size of the computer’s 3.5 inch drive bay opening. He then glued the piece in place, and began the arduous task of using body filler to smooth everything out. It’s a dance that many a Hackaday reader will know all too well: filler, sand, primer, sand, filler, sand, primer, sand, so on and so on. In the end, the final result looked perfect; you’d never have thought the front panel wasn’t stock.
It should have been so easy. Just snap the case back together and be done with it. But when [Robert] finally got the machine buttoned back up and looked at the front, well, it’s safe to say his day couldn’t get much worse. Maybe the glue was not up to the task. Perhaps it was how excited he was to get the case put back together; a momentary loss of muscular coordination. A few extra foot-pounds of energy per second, per second. Who can say?
[Robert] says he’ll return to the project, but for now he needs a break. We agree. Interestingly, he mentions in his post that his body filler work was inspired by [Eric Strebel], a name that is well known around these parts. Considering how good it looked before it exploded, we’ll consider that high praise.


The fact it was ‘only’ that broken speaks highly of his restraint.
Guy for which I made an Athlon XP/GeForce3 pc (don’t laugh, it was 2001) got so ticked off at his exceedingly lackluster Hidden and Dangeous skills he quite literally beat and kicked the pc to death in less than a month. I didn’t know till then you could fracture a MoBo by kicking the ‘open here’ side of the case. Steel toed boots, heatsink mass, and Newton. Not a good combo.
Who wears/needs steel toed boots at home in front of his computer?
The kind of person who throws a physical hissy fit when they suck at a video game…
The kind of person who needs steel toes at work, and doesn’t take them off when they get home?
He did an excellent gob of the aesthetics.
The weak points were the thinness of the plate and the small surface area of contact.
An alternative may be to use an original blanking plate that has lots of surface area to securely glue in place and greater rigidity.
Then mount the USB to SATA interface inside – perhaps on half the shell of a stripped floppy drive case. Cut the holes and when it all lines up glue the blanking plate in place and do the prime – fill – sand – paint thing.
He should have roughen up the plastic first (scratch it with a knife) or used abs slurry.
Remember to choose the right glue
Not using hot glue would be a start, epoxy and some reinforcing is required here I feel.
Its good for keeping things aligned for proper fixing
Instead of going the brute force route with epoxy (epoxy always works, but is always a bit messy to work with). In my experience PVC glue works really well. As it bonds with the other plastics, fills gaps, and becomes really tough.
Pipe glue? Bit messy.
PVC glue is usually made of Tetrahydrofuran, also known as THF. It’s a solvent for some plastics, like PVC and PLA (that’s why you can use it to vapor-smooth your PLA 3D-prints). It is however, just like Acetone, not attacking all plastics. Since most injection molded pieces of consumer hardware are made of ABS, using Acetone (or acetone with some dissolved ABS, aka ABS-slurry) as solvent/glue is probably a better option.
Good blog post! Beautiful work, nice attention detail, nice to reflect on the lessons learned.
– Some computer cases are crap.
– Don’t use “bog” or Bondo or similar products as a load-bearing, structural material.
– Make it strong first, and then make it pretty.
Personally I would have “keyed” the surfaces by drilling/dremelling some small “pockets” for glue to grab onto, followed by generous amounts of JB-Weld (the world’s finest no-bullshit adhesive) to make it very strong.
Then use bog/Bondo etc to do the cosmetics.
You have to make sure that the bog / paint layer can’t flex or move, because it will crack easily. It has to be on a rigid foundation.
I totally agree with your comment.
I really like hotglue in the way it’s totally reversible and can be quite strong in case you apply a lot of it.
BTW my server came from the trash with no optical/floppy drive cover, so I made my own out of acrylic sheet.
http://monorailc.at/data/diy/hp_dc5800/acrylic_cover.jpg
I have a tip for working with bondo/car filler: if you’re going to spray paint it, don’t mix it in a way that will put little air bubbles in it – because no amount of sanding will ever get it truly smooth if you do that.
And yeah, it cracks easily.. :/
Typically you would not use car filler and then use paint straight onto that.
You’d use another layer(s) of spot putty, spray putty, primer etc, and lots of patient application, drying, sanding and repeating, to get out all the small flaws (such as bubbles in the filler) and get a perfectly smooth surface for the paint.
Just put a HaD sticker over the offensive break. Old trick.
I’m wondering if something like fiberglass cloth should have been utilized for strength.
I’ve been using a 3D Printing Pen (3Doodler) instead of hot glue for anything that’s ABS. You can use the tip of the pen like a soldering iron to melt or soften the existing plastic then engage the feed mechanism and inject molten ABS. It works wonders to reinforce and build up surfaces. I highly recommend it.
The “press-fit” construction of the plastic fascia on some computer cases, where you *have* to whack it to make it go together, is seriously not helpful for this sort of thing.