two hands holding a wider version of a purple gameboy advance

The Stretch Limo Of Game Boys

Here at Hackaday, we see all sorts of projects, some born out of a deep necessity or itch that couldn’t be scratched. Others are born out of a world of “why not” and it is perhaps these projects that put the biggest smile on our faces. The WideBoy Advance by [Elliot] of Retro Future is one such project.

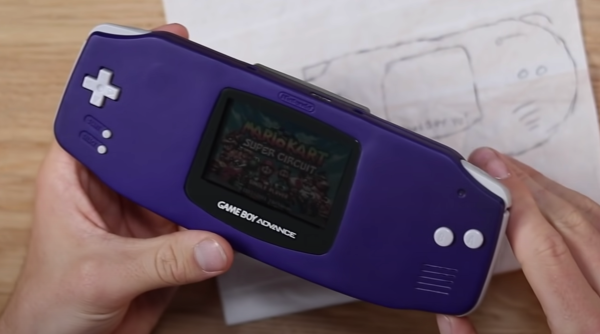
Starting with a working Game Boy Advance and a donor one with a busted motherboard, the frankenstein-ification could start. A Dremel split one case in half and removed the sides on another, while trusty old car body filler helps fill and smooth the gaps. A particularly clever trick is to use the Dremel to create channels for the filler to adhere easier. Several areas had to be built up with filler and glued in bits of plastic as a base. As you can see in the video below, the countless hours of sanding, priming, sanding, and more priming led to a beautifully smooth finish. The choice of purple paint really sells the impression of a factory-fresh Game Boy Advance.

The working circuit board was desoldered and the donor board was cut into pieces to fit in the extended sides. Using some magnet wire, connections were bridged over to the original motherboard via the test points on the PCB. [Elliot] didn’t opt to swap the screen to an IPS display or add a backlight. These quality of life improvements are nice, but a dead giveaway that Nintendo didn’t make it. The goal is to get the user to wonder, even if just for a second, what if Nintendo just happened to make this wide one-off handheld console.

[Elliot] made it simply because he found it interesting and enjoyed the form of the thing he made. Is it a hack? Is it art? Probably a little bit of both. This isn’t his first modified Nintendo handheld either. He previously made a long Nintendo Gameboy DMG-01. We love seeing all the wild hacks and tweaks made to Game Boy line, such as this Game Boy Color inside the DMG-01.

Continue reading “The Stretch Limo Of Game Boys”

Fail Of The Week: Careful Case Mod Is All For Naught

Today’s entry comes to us from [Robert Tomsons], who was kind enough to document this crushing tale of woe so that we might all learn what true heartbreak is. If you’ve ever toiled away at getting that perfect surface finish with body filler, this one is going to hurt. In fact, you might just want to hit that “Back” button and head to safety now. There’s probably a pleasant story about some 3D printed thing being used with a Raspberry Pi of some sort that you can read instead.

For those of you brave enough to continue on, today we’ll be looking at what [Robert] thought would be a simple enough project. Seeing the board from a USB 3.0 external hard drive kicking around his parts bin, he had a rather unusual idea. Wanting to add an extra drive to his computer, but liking the idea of being able to independently control its power, he decided to integrate the external drive into machine’s front panel. This would not only allow him to power off the secondary drive when not in use, but it meant he could just plug his laptop into the front panel if he wanted to pull files off of it.

All [Robert] needed to do was make it look nice. He carefully squared off the edges of the external drive’s back panel to roughly the size of the computer’s 3.5 inch drive bay opening. He then glued the piece in place, and began the arduous task of using body filler to smooth everything out. It’s a dance that many a Hackaday reader will know all too well: filler, sand, primer, sand, filler, sand, primer, sand, so on and so on. In the end, the final result looked perfect; you’d never have thought the front panel wasn’t stock.

It should have been so easy. Just snap the case back together and be done with it. But when [Robert] finally got the machine buttoned back up and looked at the front, well, it’s safe to say his day couldn’t get much worse. Maybe the glue was not up to the task. Perhaps it was how excited he was to get the case put back together; a momentary loss of muscular coordination. A few extra foot-pounds of energy per second, per second. Who can say?

[Robert] says he’ll return to the project, but for now he needs a break. We agree. Interestingly, he mentions in his post that his body filler work was inspired by [Eric Strebel], a name that is well known around these parts. Considering how good it looked before it exploded, we’ll consider that high praise.

How To Put The ‘Pro’ In Prototype

It’s easy to get professional-quality finishes on your prints and prototypes if you take the right steps. In the final installment of his series about building with Bondo, product designer [Eric Strebel] shows us how it’s done no matter what the substrate.

How does he get such a smooth surface? A few key steps make all the difference. First, he always uses a sanding block of some kind, even if he’s just wrapping sandpaper around a tongue depressor. For instance, his phone holder has a round indent on each side. We love that [Eric] made a custom sanding block by making a negative of the indent with—you guessed it—more Bondo and a piece of PVC. The other key is spraying light coats of both primer and paint in focused, sweeping motions to allow the layers to build up.

If you need to get the kind of surface that rivals a baby’s behind, don’t expect to prime once, paint once, and be done with it. You must seek and destroy all imperfections. [Eric] likes to smooth them over with spot putty and then wet sand the piece back to smooth before applying more primer. Then it’s just rinse and repeat with higher grits until satisfied.

There’s more than one way to smooth a print, of course. Just a few weeks ago, our own [Donald Papp] went in-depth on the use of UV resin.

Continue reading “How To Put The ‘Pro’ In Prototype”

You Can Build Anything Out Of What Is Holding Your 97 Eagle Talon Together

We all know it, we all love it, and the guy parked outside of the 7-11 covered his car in it. What is it? Polyester body filler, better known by the almost generic trademark, Bondo. There’s a lot more you can do with Bondo than fairing in that sweet body kit, bro, and [Eric Strebel] is here to show you how far you can push the mechanical properties of polyester body filler.

We didn’t always have polyester body filler. In the days before OSHA, auto body workers would use a torch, bricks of lead, and a grinder. You can check out a video of the era before OSHA here. Needless to say, vaporizing and grinding lead in your shop isn’t the greatest idea, and there had to be a better way. This led Robert ‘Bondo Bob’ Spink to invent a much less toxic auto body filler that we now know as Bondo.

For the beginning of the demonstration, [Eric] mixes up a cup of polyester body filler with a few special additions: he’s using printer ink to get his mixture to something other than that one shade of pink we all know. Although Bondo is a bit too thick to cast, he did manage to put a little bit of it in a square mold, a PVC pipe, and applied a little to foam and wood. It’s enough for a demonstration, but for the actual ins and outs of machining Bondo we’re going to have to wait until [Eric]’s next video. Until then, you can check out this introduction below, or look at his previous work on free-form sculpting of uncured Bondo.

Continue reading “You Can Build Anything Out Of What Is Holding Your 97 Eagle Talon Together”