Old Time Traffic Signal Revived With A Raspberry Pi Controller

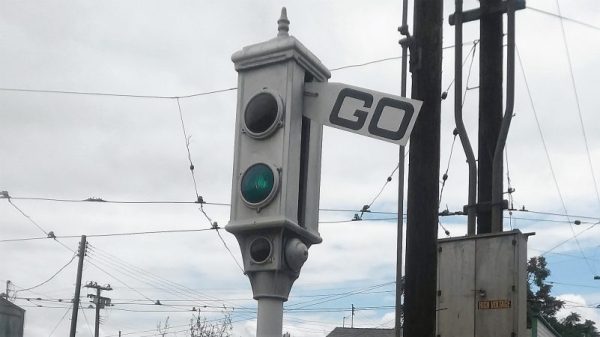
Anyone with even a passing familiarity with the classic animated shorts of the 1940s will recognize the traffic signal in the image above. Yes, such things actually existed in the real world, not just in the Looney world of [Bugs Bunny] et al. As sturdy as such devices were, they don’t last forever, though, which is why a restoration of this classic Acme traffic signal was necessary for a California museum. Yes, that Acme.

When you see a traffic signal from the early days of the automotive age like this one, it becomes quickly apparent how good the modern equivalent has become. Back in the day, with a mix of lights distributed all over the body of the signal, arms that extend out, and bells that ring when the state changes, it’s easy to see how things could get out of hand at an intersection. That complexity made the restoration project by [am1034481] and colleagues at the Southern California Traffic Museum all the more difficult. Each signal has three lights, a motor for the flag, and an annunciator bell, each requiring a relay. What’s more, the motor needs to run in both directions, so a reversing relay is needed, and the arm has a mechanism to keep it in position when motor power is removed, which needs yet another relay. With two signals, everything was doubled, so the new controller used a 16-channel relay board and a Raspberry Pi to run through various demos. To keep induced currents from wreaking havoc, zero-crossing solid state relays were used on the big AC motors and coils in the signal. It looks like a lot of work, but the end results are worth it.

Looking for more information on traffic signal controls? We talked about that a while back.

Fail Of The Week: Careful Case Mod Is All For Naught

Today’s entry comes to us from [Robert Tomsons], who was kind enough to document this crushing tale of woe so that we might all learn what true heartbreak is. If you’ve ever toiled away at getting that perfect surface finish with body filler, this one is going to hurt. In fact, you might just want to hit that “Back” button and head to safety now. There’s probably a pleasant story about some 3D printed thing being used with a Raspberry Pi of some sort that you can read instead.

For those of you brave enough to continue on, today we’ll be looking at what [Robert] thought would be a simple enough project. Seeing the board from a USB 3.0 external hard drive kicking around his parts bin, he had a rather unusual idea. Wanting to add an extra drive to his computer, but liking the idea of being able to independently control its power, he decided to integrate the external drive into machine’s front panel. This would not only allow him to power off the secondary drive when not in use, but it meant he could just plug his laptop into the front panel if he wanted to pull files off of it.

All [Robert] needed to do was make it look nice. He carefully squared off the edges of the external drive’s back panel to roughly the size of the computer’s 3.5 inch drive bay opening. He then glued the piece in place, and began the arduous task of using body filler to smooth everything out. It’s a dance that many a Hackaday reader will know all too well: filler, sand, primer, sand, filler, sand, primer, sand, so on and so on. In the end, the final result looked perfect; you’d never have thought the front panel wasn’t stock.

It should have been so easy. Just snap the case back together and be done with it. But when [Robert] finally got the machine buttoned back up and looked at the front, well, it’s safe to say his day couldn’t get much worse. Maybe the glue was not up to the task. Perhaps it was how excited he was to get the case put back together; a momentary loss of muscular coordination. A few extra foot-pounds of energy per second, per second. Who can say?

[Robert] says he’ll return to the project, but for now he needs a break. We agree. Interestingly, he mentions in his post that his body filler work was inspired by [Eric Strebel], a name that is well known around these parts. Considering how good it looked before it exploded, we’ll consider that high praise.

Teardown Of Sonos And Amazon Smart Speakers Reveals Interesting Engineering Details

Taking things apart is always fun, and this What Cracking Open a Sonos One Tells Us About the Sonos IPO”>excellent writeup of a teardown of a Sonos and Amazon smart speaker by [Ben Einstein] shows what you can learn. [Ben] is a Venture Capitalist and engineer, so much of his write up focuses on what the devices say about how the company spends money. There are plenty of things to learn for hackers, though: he details how the Sonos One uses a PCI daughterboard for wireless communications, while the Amazon Echo has a programmable radio on the main board.

Continue reading “Teardown Of Sonos And Amazon Smart Speakers Reveals Interesting Engineering Details”

Hacked LCD Shutter Glasses See The Light

It’s always a little sad to see a big consumer technology fail. But of course, the upside for us hacker types is that the resulting fire sale is often an excellent source for hardware that might otherwise be difficult to come by. The most recent arrival to the Island of Unwanted Consumer Tech is 3D TV. There was a brief period of time when the TV manufacturers had nearly convinced people that sitting in their living room wearing big dorky electronic glasses was a workable solution, but in the end we know how it really turned out.

Those same dorky glasses are now available for a fraction of their original price, and are ripe for hacking. [Kevin Koster] has been playing around with them, and he’s recently came up with a circuit that offers the wearer a unique view of the world. Any reflective surface will look as though it is radiating rainbows, which he admits doesn’t show up as well in still images, but looks cool enough that he thought it was worth putting the board into production in case anyone else wants in on the refraction action.

To explain how it works, we need to take a couple of steps back and look at the mechanics of the LCD panels used in these type of glasses. At the risk of oversimplification, one could say that LCDs are sort of like capacitors: when charged the crystals align themselves in such a way that the polarization of the light passing through is changed. Combined with an external polarization filter, this has the end result of turning the panel opaque. To put the crystals back in their original arrangement, and let the light pass through again, the LCD panel is shorted out in the same way you might discharge a capacitor.

What [Kevin] found was that if he slowly discharged the LCD panel rather than shorting it out completely, it would gradually fade out instead of immediately becoming transparent. His theory is that this partial polarization is what causes the rainbow effect, as the light that’s passing through to the wearers eyes is in a “twisted” state.

[Kevin] has provided all of the information necessary to build your own “Rainbow Adapter”, but you can also purchase a kit or assembled board from Tindie. If you’re looking for other projects to make use of those 3D glasses collecting dust, how about turning them into automatic sunglasses or having a go at curing your lazy eye.

Air Quality Readings At A Glance

Since the industrial age, air pollution has increasingly become a problem on society’s radar. Outside of concerns about global warming and greenhouse gases, particulate emissions can be highly hazardous to human health. Over time, various organizations have set up measuring systems to check and report the particulate pollution level in cities around the world – but what if you could get an immediate idea on the pollution in your immediate vicinity? Enter less-smog.org.

The prototype under test.

In an integration sense, it’s a straightforward project. An ESP-12F is used as the brains behind the operation. This then talks to a combination of sensors to measure the local air quality. The system is set up to use a variety of temperature or humidity sensors depending on what the builder has to hand. As for particulate concentration measurements, those are achieved with the use of a PMS7003 sensor. This device shines a laser into a cavity containing an air sample from the surrounding environment and measures the scattered light to determine the concentration of particles in the PM2.5 range. This is the range most commonly used to make judgments on air quality regarding human health.

Data is collected and then output to a series of bright RGB LEDs. By turning the numerical PM2.5 reading into a color output, it becomes much simpler to get an instant idea of the pollution conditions in the immediate area. This has the benefit of being readable by even very young children, or those with poor eyesight, at the cost of leaving the colorblind and otherwise vision impaired at a loss.

The project presents a tidy way to create a series of indicators in a modern public environment that can give the average person an at-a-glance reading of whether its advisable to stay out or to head inside until conditions improve. We’d love to see this project deployed in cities to both collect data and help people gain a better understanding of the air quality around them.

The Bad Old Days Of Telephone Answering Machines

Telephone answering machines were almost a fad. They were hindered for years by not being allowed to connect to the phone lines. Then a mix of cell phones and the phone company offering voicemail made the machines all but obsolete. Unless you are really young, you probably had one at some point though. Some had digital outgoing messages and a tape to record. Some had two tapes. But did you ever have one that didn’t connect to the phone line at all? Remember, there was a time when they couldn’t. My family had one of these growing up and after doing enough research to find it in an old catalog, I decided you might like to know how it really worked.

Even if you grew up in the 1960s and 1970s, it is hard to imagine how little technology there was in an average person’s home at that time. You probably had one TV and one wired telephone. You probably had a radio or two and maybe even a record or tape player. If you were very fancy, you had a big piece of furniture that had a TV, a turntable, a radio, and a tape player in it. No cell phones, no computers, no digital assistant, and appliances were electro-mechanical and didn’t have displays. So when you saw a new piece of tech — especially if you were a kid who didn’t know what a hacker was, but still wanted to be one — it made an impression.

I still remember the first time I even saw a tape recorder. I was amazed! But a tape recorder is a far cry from a telephone answering machine.

A Bit of Background

My Dad always had a regular job and his side business. He had a lot of different side businesses at one time or another, but he was always concerned about missing a phone call from a customer. We had two phones: the old wall mount phone with a dial and another desk phone in the “store” (the front room of the house) which also had a dial — we were way too cheap to pay for TouchTone service.

Remember, there was no call waiting and getting a second phone line was out of the question for my frugal parents. So they were always nervous about keeping the phone line clear during the day. But if you had to leave, you might miss a call. What do you do about that?

Continue reading “The Bad Old Days Of Telephone Answering Machines”

Dual Sensor Echo Locator Gives High Accuracy At Low Cost

Infrared certainly has its uses, but if you’re trying to locate objects, ultrasonic detection is far superior. It’s contact-less, undetectable to the human ear, and it isn’t affected by smoke, dust, ambient light, or Silly String.

If you have one ultrasonic sensor and a microcontroller, you can detect plenty of useful things, like the water level in a rain barrel or the distance traveled by a tablet along a rail. If you have two sensors and a microcontroller, you can pinpoint any object within a defined range using trigonometry.

[lingib]’s dual sensor echo locator uses two HY-SRF05s, but the cheap and plentiful HC-SR04s will work, too. Both sensors are arranged for maximum beam overlap and wired up to an Arduino Uno. One sensor’s emitter is blocked with masking tape, so all it does is listen.

When the system registers the object, it shows up as a red dot on a grid inside a Processing sketch along with a bunch of details like the object’s coordinates, its distance from each sensor, and the area of the triangle formed by the two sensors and the object. [lingib] reports that the system is quite accurate and will work for much larger playgrounds than the 1 meter square in the demo after the break.

Don’t want to detect objects? Ultrasonic sensors are cheap enough to hack into other things, like this one-way data communications module.

Continue reading “Dual Sensor Echo Locator Gives High Accuracy At Low Cost”