I was always a sucker for art classes in my early days. There was something special about getting personal instruction while having those raw materials in your hands at the same time. Maybe it was the patient voice of the teacher or the taste of the crayons that finally got to my head. Either way, I started thinking: “I want to do this; I want to teach this stuff.”
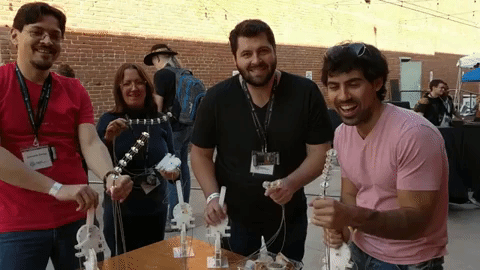
Last year at Hackaday Superconference I got my chance. Hardware workshops with real hardware were so rare; I just had to bring one to the table! What follows is my tale of joys and woes bringing together a crew to take their first few steps into the world of cable-driven animatronics. If you’re thinking about getting your feet wet with teaching your own hardware workshop, read on. I’ve packed this story with as much of my own learnings as I could to set you on a path to success.
The good news is that Supercon returns every year. I you want to take part in some epic workshops like this one, grab a ticket for this year’s conference now. If you want to host a hardware workshop, the Call for Proposals is still open! Okay, let’s dive in.
In July of 2017 I saw the call for workshop proposals go out. The year before that I had taken some inspiration from the Stan Winston Tutorial series to build my own cable-driven tentacle mechanism. That two-stage mechanism was a smashing success as a party trick, and I wrote a brief guide to building your own on these pages. With tentacle parts still loitering in my garage a year later, I figured: why not bring a tentacle-mechanism-building workshop to the Hackaday Supercon?
Victory Means… Determining the Scope of Your Workshop
Defining success was going to be my first challenge, and my focus needed to center on my target audience: the workshop attendees. Just who are these people? And how does this workshop make their Supercon just a little more awesome? I figured that these folk could come from all walks of life. From sleepwalks to moonwalks, they’re background in tinkering could be anywhere from 0-to-NASA (literally), and I needed to make sure everyone was having a good time. I realized that not everyone would finish, but I wanted to ensure that anyone could finish later on their own time so that all people could get to the same goal: a working tentacle.
With the audience in mind, I forged my thesis: I wanted workshop attendees to get a solid roadmap of principles for working with laser-cut materials, and I wanted everyone to walk away with something physical that’s either finished or finishable without extra guidance or tools. I wanted attendees to go back to their local hackerspaces and feel comfortable plugging designs into the laser cutter and getting parts out that fit together.
What’s Getting Assembled?
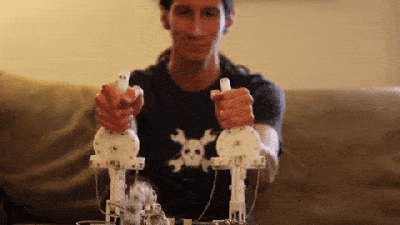
With about 2.5 hours to go from 0-to-tentacles, I was going to need to make some serious mods to the old design to make it sizable for a Saturday morning stint — only moments after a cup of coffee! First off, I realized that my old build was just too complicated. There were two controllers and two flexible stages. Honestly, building two of the same controller is just plain ol’ repetitive, so I cut my old design in half, almost literally. Instead of two controllers, we’d just have one. Instead of a long tentacle with four degrees of freedom, we’d make a shorter one with two. Behold: the Workshop Tentacle was born!
Workshop Tentacle was supposed to be easy to build, so it needed a small BOM. To get there, I redesigned the controller and tentacle to cut down on the number of unique parts. Less unique parts makes the missing screw that-just-flew-across-the-room-never-to-be-seen-again a little less precious. In the worst of cases, if I had left out a part across all kits entirely, it would only be a 30 minute drive from Supercon to the mother-of-all-mechanical-parts: McMaster-Carr. Most of my nuts and bolts were sourced there anyways, so if I made some gross mistake making the kits, I’d actually be able to get them back before the workshop finished.
I premanufactured everything I could. This meant instead of having attendees laser-cut the parts themselves, I’d spend 10 minutes discussing the key features of the laser cutter and what effects it has on your parts. Each kit only needed to drill out two identical parts, but the holes weren’t allowed to be misaligned, so we couldn’t use hand drills… or could we? I turned to my friend [Amy] with this question, and she gave me the pro-tip I needed: a drill guide. A drill guide was a supplementary tool for a hand drill that would guide it vertically into the hole ensuring a straight cut. Presto! With a drill guide, we could use hand drills! I ended up laser-cutting a custom one for just this particular purpose. It worked flawlessly.
Great Instructions Lead to Great Workshops:
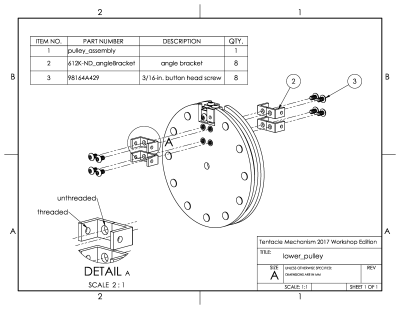
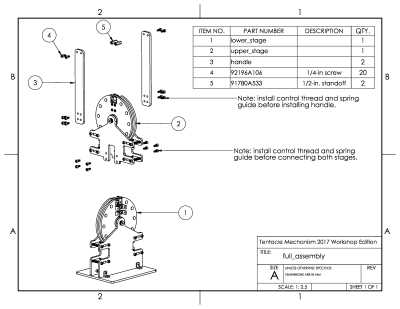
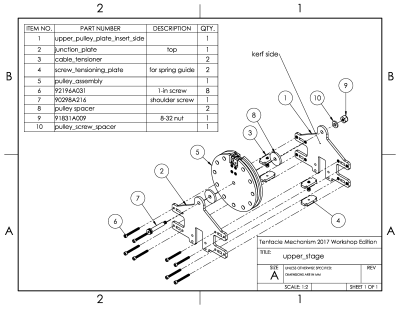
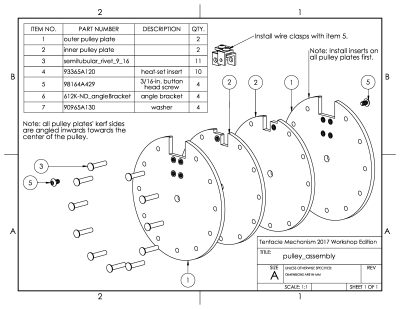
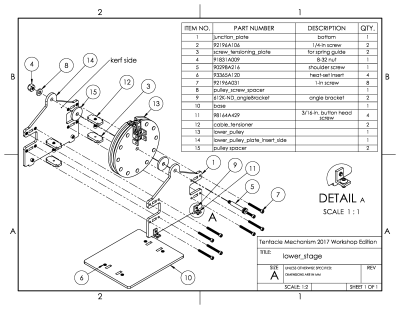
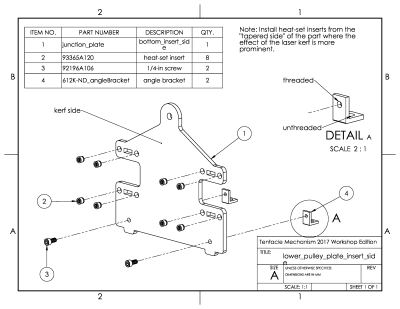
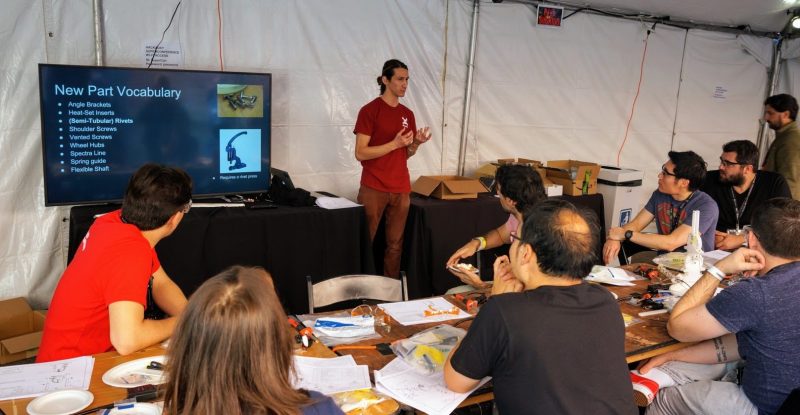
In any given classroom there’s usually one teacher to about 20+ students. Getting peppered with 20+ questions every 20 minutes would spell doom to the instructor trying to get through their lecture notes. Lucky for me, I had one secret weapon that I could arm in advance: building instructions. Here’s a snapshot of what they looked like:
On delivery day my plan would be to (1) give a quick rundown of the kit and the workshop tools while highlighting the pinchpoints, and then (2) send them on their way building kits, using the instructions as a guide.
Instructions were now a must-have, but what were they supposed to look like? One one hand, I figured if my instructions halfway resembled Lego manuals, they might fly with most. Lego’s target audience starts at age 5 and manages to get by without a single written word of English (or Danish)! On the other hand, I had to remember why my target audience was here in the first place.
This was a group of attendees who could very well be inspired to build by the engineering domain. Shouldn’t I try to treat them like real engineers? In the end, I settled for a series of engineering-style exploded views. In the professional world, I might actually hand these off to a technician and expect them to come back with a tentacle. For this workshop though, I made a few extra notes in the drawings, figuring that “explicit would be far better than implicit.” In this case, just like Lego, each page had a part list of the necessary parts for that step. Hopefully, these instructions would keep most of us on the right track doing independent work. Of course, if anything else came up, they could still poke me with questions.
The Kit: the making of…
As for the actual kit-making, I needed to source a few thousand parts. For starters, I decorated all my CAD models with part numbers and vendor metadata and then exported a part list straight out of the software package. No manual bookkeeping needed! As long as my model wasn’t missing any screws, I knew exactly what I needed to order and fabricate.
Laser-Cut Parts
The end of September was coming up quickly. With about a month away, I needed to cut just over 450 pieces for all 15 kits. I had a couple options: cut them via a 3rd party or use my homebrew laser cutter in the garage. A 3rd party might really come in handy here, but they were going to charge me by the minute. Cutting at home would just cost me time and had the extra bonus that I’d be able to dial in any sizing tolerances as I see fit. I figured I’d try the cut-at-home route first.
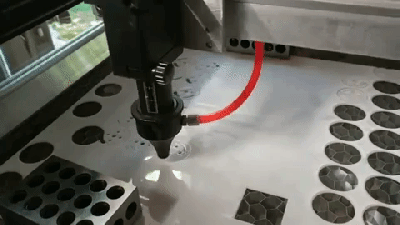
Amazingly, the whole job only took about 9ish hours to complete without any major hitches! (Woohoo! Turns out you can build a production-worthy laser cutter at home if you put your mind to it!) Before cutting parts in bulk, I ran a few tests to find the maximum speeds at which I could reliably cut through parts. A few extra minutes of dialing in the numbers saved me hours before doing the same job as many as 60 times in some cases. I also spread those 9 hours out over the two weeks so that I wouldn’t go crazy idling in the garage while the laser did all the heavy lifting.
It was here in my first production run of laser-cut parts that I discovered an interesting phenomenon. Cutting away large chunks of material out of a sheet of Delrin tends to relieve internal stresses, causing the sheet to bend while cutting. To counteract the bends, I weighed down the sheet in as many places as I could. With all the effort I put into keeping the plastic from warping, I now wonder if 3rd party laser-cutter shops do any sort of fixturing before running a job. At the end of the day, I was glad that I was able to do the job myself rather than risk receiving a surprise batch of parts that were out of spec.
Special Parts
Most parts came in from McMaster-Carr except for a couple of specialty items. One of these is the spring guide, the flexible sheath that the cables ride in that make the mechanism work in the first place! Since these were made-to-order, I placed an order about a month in advance. (They barely came in on time, so I’ll be sure to give myself even more headroom next year!)
The next specialty item was a set of flexible shafts from AliExpress. These shafts form the core of the tentacle mechanism, which let the tentacle flex without twisting. I knew that these parts would probably ship by boat, so I also placed this order a month in advance.
Last on the specialty items were miniature wheel hubs. Each tentacle segment needs to be rigidly fixed to the flexible shaft. A hub with a set-screw did the trick perfectly. It’s a blessing that so many robotics-tuned parts which used to require a machine shop to make are now off-the-shelf items these days. The folks at Pololu were also very kind to give me a discount on a bulk order of their wheel hubs.
Bagging it all up
Probably my favorite part in this endeavor: bagging! Once I had all the parts in the living room, I just needed to put them in the right spot. Easy right?
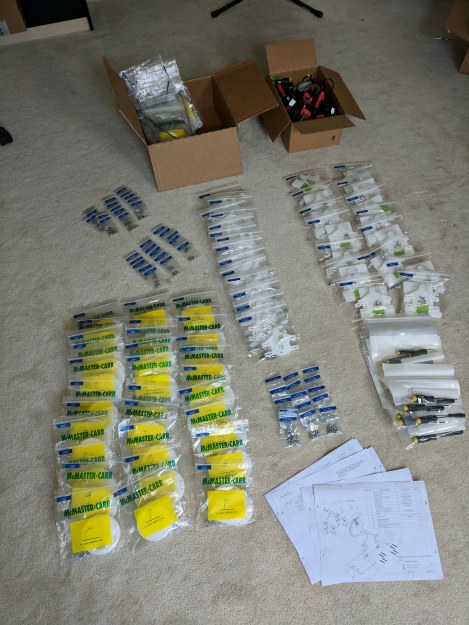
To help with this adventure, I recruited a few friends. Using the part lists in the instructions, we were able to bag everything up in about 12 people-hours, thankfully shared among 3 people! I always wanted to have a crew of friends come over and bag a series of projects I made, whether that was for fulfilling my first Kickstarter or kicking off my first hardware workshop. There’s just something special about the ritual of your friends gathered in a part-bagging assembly line.
Bagging also turned out to be my biggest place for improvement. To help my attendees, I decided to bag up parts by sub-assembly. What that means was each page of the instruction had its own bag. This idea turned out to be overkill when delivery day came around. Since some tasks center around using the same tool over and over, it would be much more helpful to bag parts by type. In that way, they can do some bulk operations in one go, like heat-sticking all the heat-set inserts. Finally, if I bag parts by type, I can weigh them to make sure that they have the right number of nuts-or-bolts. This extra QA step would be a nifty nice-to-have if I plan to do 30+ kits.
In bagging parts and writing instructions, I realized that I’m almost scripting a behavior for my workshop attendees to perform. I’m… programming? Nevertheless, with instructions that are somewhat open-ended, I discovered that tentacle builders found their own way to navigate the kit. Knowing how folks wrapped their heads around the building process will help me re-jigger the instructions and bagging for the next time this workshop comes around.
Delivery Day
At long last: showtime! I split the workshop into two payloads. Let’s call them “Lecture” and “Lab.”
In “Lecture” I gave a quick rundown of the parts they’d encounter in this kit. I’m a shameless prophet of the idea that engineers should be constantly expanding their “vocabulary of parts.” The more parts you’re in-tune with using, the better equipped you are to solve a complex problem with a solution you can pull from your expansive mental bag of parts. (Hey, can I just stand on my pedestal once a year and say how engineering should be?)
In “Lab,” they built their tentacles. I gathered everyone’s attention for a couple minutes to go over some pinchpoints, but for the rest of it, they took to the instructions to get building. I’m a fan of the “inverted-classroom” model in a case like this one where everyone needs to do the same exercise. Here, they can go at their own pace and just poke me as needed.
If you managed to sit in on this workshop last year, thanks a bunch for joining me and supporting me with your enthusiasm. I had a blast putting it together, and I’d do it again in a heartbeat. SuperCon 2017 might’ve been the last SuperCon of the tentacle, but who knows what we’ll see this year?


“Either way, I started thinking: ‘I want to do this; I want to teach this stuff.'” Been there, done that!
I still have your previous article bookmarked in my todo list. Would have been great to take your workshop.
And great looking plans! How did you make them? I’m just thinking of plans I’ve made which took a long time.
Thanks mate! I generated both these drawings and the diagrams with my CAD package. About 3 years ago, I bit the bullet and bought a Solidworks license. (I’d call it my “fancy car.”) A lot has changed since then in the land of CAD. Fusion 360 has come a long way, and other budget competitors like OnShape have landed on the scene. Were I to go back in time, I might look closer at Fusion 360 since, as it turns out, you can make exploded drawings in that package too. (That said, I’m not sure if one package will save you much time over another when doing the drawings. The truth is that these took some love to get just right.)
Thanks! Mine were hand-drawn in a vector drawing program but they were all 2D anyway.
“some love to get right” or “some obsession to get right”. Same thing I guess. :-)
Unhalved GIFs / 2018 Please, pick one.
Its 2018, most enjoy high speed unlimited internet access, If you still care about data usage, you should use plugins for blocking big media files from being loaded.
When people started using gifs for video and PNG for photos, all the imagesites slowed down to a crawl like it was 1995 again.
It’s not that -your- connection can’t handle the data load, but the servers that push these things around the net are getting congested, and the slashdot effect gets worse every day when millions are trying to access the same 10 megabyte GIF that would be better served as a 200 kb webm.
The a gain on can choose not to become bothered by things as insignificant as I GIF.
Lecture/classroom, and lab. Even if they wheren’t located in separate buildings that’s the structure I recall many subjects during high school, tech school.
TeleDildonics at its finest.
I’m glad I wasn’t the only one who thought that looking at the GIF. Maybe “glad” isn’t the right word, actually.