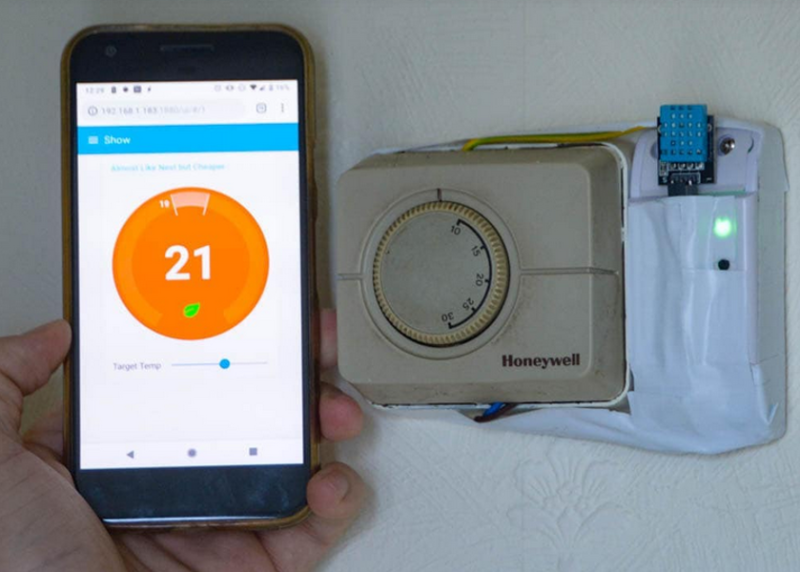
The Nest Thermostat revolutionized the way that people control the climate in their homes. It has features more features than even the best programmable thermostats. But, all of the premium features also come at a premium price. On the other hand, for only $5, a little coding, and the realization that thermostats are glorified switches, you can easily have your own thermostat that can do everything a Nest can do.
[Mat’s] solution uses a Sonoff WiFi switch that he ties directly into the thermostat’s control wiring. That’s really the easy part, since most thermostats have a ground or common wire, a signal wire, and a power wire. The real interesting work for this build is in setting up the WiFi interface and doing the backend programming. [Mat’s] thermostat is controlled by software written in Node-RED. It can even interface with Alexa. Thanks to the open source software, it’s easy to add any features you might want.
[Mat] goes through a lot of detail on the project site on how his implementation works, as far as interfacing all of the devices and the timing and some of the coding problems he solved. If you’ve been thinking about a Nest but are turned off by the price, this is a great way to get something similar — provided you’re willing to put in a little extra work. This might also be the perfect point to fall down the home automation rabbit hole, so be careful!


It looks like his heating system thermostat controls line voltage directly. If your heating system uses a 24v control circuit, I don’t think the Sonoff will function.
You can still use the stepdown and power the ESP8266 with 3.3v/ 5v logic depending on the board used. Although, it does add an extra step in the process. The advantage of 24v is that the whole set up is simply safer to wire up.
Keeping in mind that the common wire of a modern HVAC system this is 24 VAC and not VDC.
Modern HVAC systems are available with 24VDC, 24VAC, and 120VAC controls. (The millivolt system is rare these days, although still commonplace on gas water heaters.)
There is a Sonoff SV which is a 5-24V DC version.
Here is additional benefit of universal enclosure – your project stops looking like IED.
I know, should scare anyone trying to rob my pad! I will add the LCD screen and the case soon!
Ha, it really does look like somebody slapped a sticky bomb on the wall. Oh well! Still good to make alternatives to Nest, et al, alternatives which aren’t connected to the big data grift.
This is a little more nuanced than pointing a heat gun at the thermostat to get the AC to turn on down in the lab.
But strapping a heat gun into position pointing at the thermostat and then plugging it into a smart switch… now you’re automating your home, my friend!
I think a small incandescent light bulb just below the thermostat would be simpler than a heat gun.
Just saying.
Heathkit used that approach in the ’70s. They sold a setback thermostat with a mechanical timer and a lightbulb that you added to your thermostat.
…my comment was intended to be sarcastic, certainly there are simpler ways than what I said.
lol are you sure you can’t think of aaaaany other ways which might be simpler or more effective?
I can’t believe anyone has a negative feedback or dipstick put down to say about this. Give Mat a round of koodos. Fully impressed! This is our future everyone. Give the kid a 3d printer and a buck n a quarter. Let there be nest or as I would refer to it as M-est.
<3 M-est hahaha
As I said Mat. Koodos. This looks like half the projects around my pad. One exception. Yours is a functional not formal design. I can make some look pretty but unintended work. I can make other things twice as ugly and twice as unfunctional
#Mest
#nowthatsworthhacking
This post have few negative feedback, it’s not common on HaD this days. Far less than the average.
Now, on the post itself: nice job! OP could even create a professional case and make it a business. “Smartify your dumb thermostat for only $5/mo, plus setup fees!”
Let’s not encourage them haha!
As much as I would like to end up with a commercial product, we all know that sooner or later to deal with any support – it would end up with a service of some sort – exactly what I’m trying to avoid :)
However… my final design might have a custom PCB to buy (ESP, screen, controls etc) I might sell this as DIY kits? But this means I would have to figure out other than 3 wire thermostats.
Are those old Honeywell thermostats still in use? I think I threw the last one away in the 80s.
BTW: Nice air wire/insulating tape design. :-)
Had one exactly like that in my house, built 2000. Nothing wrong with it. The smarts are all in the boiler controller. It got replaced by a wireless one when our boiler was replaced – which only happened so we could get rid of the hot water tank.
You probably know the old saying – ain’t broken, don’t change it? Well, I didn’t break it! :)
I couldn’t really see (and TBH tl;dr), but how do you (Mat) prevent the heating flipping on/off (I guess by using a range about the set point), and what about drafts (like when you open that door next to the thermostat. Some hysteresis built in the code)?
Some time ago, I built a thermostat for my bathroom on about the same principle. There were a few simple things I built in to prevent this from happening:
– Hysteresis loop on the temperature, so relay switches on 0.5degC below the lower limit and off at the lower limit
– I made sure that the relay was switched on for at least a minute before taking any action (in other words: making it somewhat slower to respond)
– Also implemented a time limit for the minimum time the relay should be off before striking again
Heating a room is a slow process. By just using a hysteresis loop most problems are already solved. The old Honeywell thermostats (this one: https://en.wikipedia.org/wiki/Honeywell_T87 ) did the same by using the weight of the mercury bubble to tilt the glass envelope just enough to not roll back on a small temperature change.
Currently, I’m using the average of 50 reads to prevent the temp from dropping down too quickly. In addition to that I have the temp reporting to 5 min – so unless the temperature drops quickly, I get no oscillations
Very nice build. What I’d love to see someone accomplish with these “DIY nest” projects is the schedule learning part of the nest. To me, that’s the real feature that differentiates the nest from a “regular” wifi thermostat.
The learning part is something nice, but when you already use some domotics in your house, it is possible you don’t even have to let your thermostat automatically learn.
For example:
– No phone at home? Switch off heating.
– Dark outside and no lights or TV on, but phones home? People are probably asleep.
Automatic learning is something that could be usefull if you have a regular schedule, but with a regular schedule, it isn’t too hard to just program the time schedule. I know that doing this automatically is the sole purpose of a real smart thermostat, but I doubt the usefullness. Can you explain to me what this brings for you to make me understand?
what if I left my phone at home, or I’m in the dark commenting on HaD posts while GF sleeps?
That aside, these are interesting ideas. What about using the “find my phone” feature to tell the heating to turn on when you are approaching home… etc.
A lot of this is possible with Tasker. Bear in mind that I try to integrate this with other services, so you could have a choice of how you want to interact with it. Not every one would like the same features. (I work nights, sleep during the day and often, my phone is in offline mode to have an uninterrupted sleep) This would mess up the phone detection etc.
With that said, while I have no experience with machine learning or AI, a simple protocols can be made in NodeRED alone.
What would need to be changed to get this board or the electrodragon equivalent working on 24vac? Looking at the schematic the transformer would need to be replaced?
24VAC can be transformed to 3.3V logic and you can DIY your own switch. I have done so in the past with a charger:
https://notenoughtech.com/featured/diy-smart-socket/
But I have not translated 24VAC to 3.3V DC but the general idea would be to rectify the voltage to DC and then step it down to 3.3 to drive an ESP based board. If you can provide the power externally, you don’t have to mess about with the 24VAC at all, just use it as is in the relay
Glorified switch? You guys in the US aren’t innovating when it comes to control. Nest is capable of using the OpenTherm protocol which can modulate the output of the heat source (if compatible). This is a basic language, but other bus languages are available and are becoming quite commonplace in Europe. I wouldn’t use an on/off switch in my own home, I want my thermostat to control the flow temperature of my boiler and I want geolocation
With the thermostat being metric and he says he has 230 volts for driving the sonoff, I figured he was in Europe, a bit more digging and it appears he is in England not the US.
Hello Sherlock! You are spot on :) I’m in the UK
What’s wrong with the glorified switch? Especially, that you won’t find a device which is commercially available at this price giving you the same functionality?
As per flow temperature and geolocation – NEST will do this, especially if you are happy to retrofit the valves with connected ones (about £50 a pop) – it’s all there if you have the money.
“other bus languages are available”
That’s the problem with heating controls, HVAC if you will certainly in Europe.
There are 3432453283253259287 protocols and it’s growing each day.
Nothing beats the simple method of relays and switches as a method of communicating.
If you go look up Y plan, S plan heating control systems, then think on how you can expand that for multiple heat sources, zones, etc, and no need for uC’s and complex protocls to speak to each other – until a enforced cloud software update breaks it all.
This is super tutorial, I made this setup for 4 rooms in my house and is working perfectly.
I was lucky , because my old thermostat system was on 220V (Romania) and was easy to add in the wall socket the components.
I made a change in the nest code, on my first test, when I setup a new target temp from dial, the slider was not updated, and after 5 second, dial returned to the initial temperature, but if I changed the target temp from the slider all was working perfect.
I added “scope.send({topic: “update”, payload: v});” to the below function:
“”””””””””””””””””””””””””””””””””””””””””””””””””””””””””””””””””””””””””””””””””””””””””””””””””””””””””””
(function(scope) {
var nest = new thermostatDial(document.getElementById(‘thermostat’),{
onSetTargetTemperature: function(v) {
scope.send({topic: “target_temperature”, payload: v});
“”””””””””””””””””””””””””””””””””””””””””””””””””””””””””””””””””””””””””””””””””””””””””””””””””””””””””””
Thank you ! ! !
Expat Brit in California here…
Dang… now I have to reply to my own message.
Cabins in the mountains have these ancient millivolt thermopile control systems.
This approach is the bee’s knees!