Ramen Lamp Has Us Feeling Hungry

Ramen comes in many forms, and whether you’re eating the 10 cent instant packets during the school year, or dining out at a fancy noodle bar, it’s a tasty meal either way. [ramenkingandi] has long been in love with the classic Japanese fare, and decided to create a homage to the dish – in lamp form.

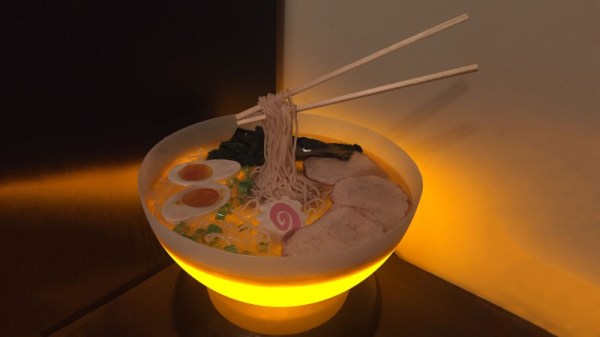
The lamp build begins, somewhat unsurprisingly, with a lamp – but not how you’d think. A Walmart floor lamp is harvested for its lampshade, which approximates the dimensions of a typical ramen bowl. It’s then fitted with warm yellow LEDs to give it a pleasing glow. Polymer clay is used to create fake ramen ingredients – including noodles, pork, and choy sum. Jewelery wire is used to suspend the chopsticks in mid-air, before resin is poured into the bowl and the ingredients arranged on top. For a final touch, the bowl is painted with an artistic stripe to hide the electronics inside, and the lamp is complete.

It’s a great example of fake Japanese food, which is actually a huge industry in that part of the world. We’d love to have this lamp on display in our own home, fully expecting ramen consumption to increase considerably over time.

Lamps are a common feature around these parts – and some of them have even learned to leap. 

Hands-On: GreatFET Is An Embedded Tool That Does It All

There’s a new embedded hacking tool on the scene that gives you an interactive Python interface for a speedy chip on a board with oodles of GPIO, the ability to masquerade as different USB devices, and a legacy of tricks up its sleeve. This is the GreatFET, the successor to the much loved GoodFET.

I first heard this board was close to launch almost a year ago and asked for an early look. When shipping began at the end of April, they sent me one. Let’s dig in for a hands-on review of the GreatFET from Great Scott Gadgets.

Continue reading “Hands-On: GreatFET Is An Embedded Tool That Does It All”

The Arduboy Gets A Crank Mod

You’ve seen VR headsets and wearable video game controllers and flight yokes and every other type and kind of video game controller, but a crank? Yes, the Arduboy now has a crank modification in tribute to (or blatant ripoff of) the PlayDate, a video game console created by Panic and Teenage Engineering.

The basis for this build is the Arduboy, a miniature game system the size of a credit card. This game console features candy-like buttons, compatibility with the Arduino IDE, and a community that has produced dozens of games already. Where there’s software developers there’s inevitably a few hardware engineers waiting in the wings, and this is no exception. [bateske] created a crank mod for the Arduboy that gives this miniature, toy-like game console a crank. Ready to write a bass fishing simulator? This is your shot.

The hardware for this build consists of a 360° rotary encoder for the internals of the device. For the handle, [bateske] found an interesting ‘premium grinder for herbs and spices’ on Amazon. Shockingly, this crank handle just sort of works with the rotary encoder.

As for games, this is a brand new user interface for the Arduboy game console, so of course there are some interesting possibilities. There’s a fishing simulator that’s more interesting than real fishing and something like Flappy Bird only instead of flapping it’s bouncing over bottomless pits. You can check out this crank console out below.

Continue reading “The Arduboy Gets A Crank Mod”

Building A Googie-Style Sign With The Help Of CNC

The Googie style was a major architectural trend of the post-war period in the United States. It remains popular to throwback to this style, and [Wesley Treat] got the job to create a sign in this vein for a local trailer motel (Youtube link, embedded below).

CNC tools make just about any job easier, and this one is no exception. The smooth curves of the sign were carved out of several sections of PVC sheet, and stacked up to form the body of the sign. These were then sanded, coated in putty, and given a lick of  paint. Steps like these could likely be skipped in the interest of saving time, especially given that few will see those parts once the sign is installed. However, [Wesley] takes pride in his work, and the final piece is all the better for it. It’s also important for the piece to impress the client, not just the public.

The front of the sign is also produced in PVC sheet, and given a coat of paint with brush techniques used to create a faux-wood finish. Vinyl is then applied to the textual and graphical elements in order to create a colored backlit effect. The sign is lit with off-the-shelf LED strips, and the whole assembly is weather sealed to protect it from the elements.

The final product is a beautiful piece, harking back to the classic Googie aesthetic and serving as a testament to [Wesley]’s skills. It’s a great example of how easy it is to create great work with the right tools and the proper attention to detail. It also goes to show how great LEDs are for signage, whether you’re at the beach or the lab. Video after the break.

Continue reading “Building A Googie-Style Sign With The Help Of CNC”